For automotive professionals specializing in Mercedes-Benz vehicles, having the right diagnostic tools is crucial. Xentry Passthru 2019.12, compatible with Windows 10, stands out as a powerful solution. This software enables in-depth diagnostics, programming, and ECU coding, ensuring comprehensive vehicle servicing. This article delves into the features, compatibility, and setup of Xentry Passthru 2019.12 on Windows 10, providing you with the essential information to leverage this diagnostic tool effectively.
Understanding Xentry Passthru and its Benefits
Xentry Passthru is the Mercedes-Benz diagnostic software solution designed to work with standard PassThru (SAE J2534) interfaces. This is distinct from the full Xentry Diagnosis system that typically requires specialized hardware. Passthru compatibility offers flexibility, allowing workshops and technicians to utilize a wider range of diagnostic interfaces, potentially reducing hardware costs while still accessing Mercedes-Benz’s comprehensive diagnostic capabilities.
Choosing Xentry Passthru 2019.12 for a Windows 10 environment offers several advantages:
- Cost-Effectiveness: Utilizing PassThru interfaces can be more economical than investing in proprietary Mercedes-Benz hardware.
- Flexibility: Compatibility with various J2534 devices provides users with options based on their existing equipment and budget.
- Comprehensive Diagnostics: Despite using a Passthru interface, you still gain access to a wide range of diagnostic functions, including reading fault codes, live data, actuation tests, and even ECU programming and coding, depending on the interface capabilities and software version.
- Windows 10 Compatibility: Xentry Passthru 2019.12 is specifically designed to function optimally on Windows 10 64-bit, a widely used and stable operating system in professional environments. This ensures smooth operation and avoids compatibility issues.
Compatibility and System Requirements
Xentry Passthru 2019.12 is designed to be compatible with a range of diagnostic interfaces that support the SAE J2534 standard. While specific compatibility can depend on the interface manufacturer and drivers, commonly used and recommended interfaces include:
- SD Connect C4: Although traditionally a Mercedes-Benz specific interface, SD Connect C4 can be configured to work in Passthru mode and is often a reliable choice.
- Xentry Connect (Xentry Kit 2): Similar to SD Connect, Xentry Connect can also function as a Passthru device.
- MB VCI (Xentry Kit 3): Mercedes-Benz Vehicle Communication Interface (VCI) is also compatible in Passthru mode.
It’s important to note that while Xentry Passthru broadens hardware compatibility, it’s crucial to ensure your chosen J2534 interface is robust and reliable for professional diagnostic work. Always verify compatibility with your interface manufacturer before deployment.
Operating System: Windows 10 64-bit is the recommended and most stable operating system for Xentry Passthru 2019.12. While some users may have success with other versions, Windows 10 x64 provides the optimal environment for performance and stability.
Vehicle Coverage Limitations: It’s worth noting that, similar to other Passthru solutions, Xentry Passthru in DAS (Diagnostic Assistance System) may have limitations in vehicle coverage compared to the full Xentry Diagnosis system. Specifically, certain vehicle brands and models may not be fully supported through Passthru in DAS. These may include:
- Bharat Benz
- Foton
- Fuso
- LKW (Trucks)
- IMO (Industrial/Marine Engines)
- Unimog
- PKW (Passenger Cars) using HHT (Hand Held Tester – older models)
For these specific vehicles, or for comprehensive coverage across all Mercedes-Benz models, a full Xentry Diagnosis system might be necessary. However, for a vast majority of Mercedes-Benz passenger cars and commercial vehicles, Xentry Passthru 2019.12 offers excellent diagnostic capabilities.
Setting Up Xentry Passthru 2019.12 on Windows 10
While the installation process for Xentry Passthru 2019.12 can be detailed, a crucial aspect for wireless communication with diagnostic interfaces like SD Connect C4 is the network configuration on Windows 10. The following steps outline how to configure Wi-Fi settings for SD Connect C4 on Windows 10, which can be adapted for other compatible interfaces if needed.
Configuring Wi-Fi for SD Connect C4 on Windows 10
These steps detail setting up an ad-hoc network for communication between your Windows 10 system and the SD Connect C4 interface.
-
Check Hosted Network Support:
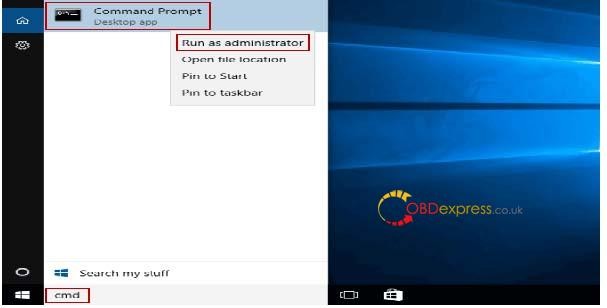
- Open Command Prompt as administrator.
- Type
netsh wlan show driversand press Enter. - Look for “Hosted network supported”. It must display “Yes”. If “No”, your Wi-Fi card doesn’t support hosted networks, and you may need a compatible Wi-Fi dongle.
 Command Prompt showing hosted network support for wifi adapter
 -
Manually Create a Network Profile:
- Disconnect from any existing Wi-Fi networks and disable your wireless adapter temporarily.
- Enable your wireless adapter but do not connect to any network.
- Click the Network icon in the taskbar.
- Select “Network and Internet settings” (or “Open Network and Sharing Center”).
- Click “Network and Sharing Center”, then “Set up a new connection or network”.
- Choose “Manually connect to a wireless network” and click “Next”.
- Enter the following:
- Network name (SSID): Choose a name for your ad-hoc network (e.g., “SDConnectNetwork”).
- Security type: Select “No authentication (Open)”. For testing purposes. Consider WPA2-Personal with a strong password for security in a workshop environment after initial setup.
- Security key: Leave blank if “No authentication” is selected.
- Uncheck both “Start this connection automatically” and “Connect even if the network is not broadcasting”.
- Click “Next” and then “Close”.
-
Set Connection Type to IBSS (Ad-hoc):
- Open Command Prompt as administrator again.
- Type the command:
netsh wlan set profileparameter name="YourNetworkName" ConnectionType=IBSS- Replace
"YourNetworkName"with the SSID you created in the previous step (e.g.,"SDConnectNetwork").
- Replace
- Press Enter. If successful, the network icon in “Manage Wireless Networks” should change to an ad-hoc icon (three interconnected screens).
-
Connect to the Ad-hoc Network:
- Enable your wireless adapter.
- Click the Network icon in the taskbar.
- Select the ad-hoc network you created (e.g., “SDConnectNetwork”) and click “Connect”. You should connect without needing a security key if you selected “No authentication”.
Automatic Connection on Windows Boot (Optional):
For convenience, you can set up automatic connection to the ad-hoc network when Windows starts:
- Open the Startup folder:
- Press
Win + R, typeshell:startup, and press Enter.
- Press
- Create a Shortcut:
- Right-click in the Startup folder, select “New” -> “Shortcut”.
- In the “Type the location of the item” field, enter:
netsh wlan connect name="YourNetworkName"- Replace
"YourNetworkName"with your ad-hoc network SSID.
- Replace
- Click “Next”, give the shortcut a name (e.g., “Connect SD Connect Network”), and click “Finish”.
This shortcut will attempt to connect to your ad-hoc network each time Windows starts.
Important Notes:
- Administrator Rights: You will likely need administrator privileges for many of these steps.
- Security: For a production environment, it’s highly recommended to use WPA2-Personal security with a strong password for your ad-hoc network instead of “No authentication”. Configure this after verifying basic connectivity.
- Interface Specific Instructions: Consult the documentation for your specific J2534 interface for any additional or interface-specific setup steps.
Conclusion
Xentry Passthru 2019.12 on Windows 10 provides a robust and flexible diagnostic solution for Mercedes-Benz vehicles. By understanding its capabilities, compatibility, and proper setup procedures, automotive professionals can effectively utilize this tool for a wide range of diagnostic and repair tasks. While Passthru solutions offer cost savings and flexibility, always ensure your chosen J2534 interface is reliable and meets the demands of professional automotive diagnostics. For more advanced diagnostic tools and solutions, explore xentryportal.store.