Setting up your XENTRY Diagnostics system with an SD Connect multiplexer via a wired connection ensures a stable and reliable diagnostic process. While SDconnect devices can operate wirelessly, a wired setup, particularly using an Ethernet cable or a USB2LAN adapter, offers enhanced stability and is often preferred for critical diagnostic tasks. This guide provides a detailed walkthrough on how to configure your SDconnect for XENTRY Open Shell using a cable connection, ensuring a smooth and efficient diagnostic experience.
Configuring a Direct Ethernet Connection for XENTRY SD Connect
Establishing a direct Ethernet connection is a straightforward method for linking your SDconnect to your diagnostic system. This setup requires a crossover Ethernet cable, typically green, which should be included with your SDconnect package.
Step-by-Step Guide for Direct Ethernet Configuration:
-
Hardware and Cable Requirements: Ensure you have a crossover Ethernet cable. This cable is essential for direct communication between your computer and the SDconnect.
-
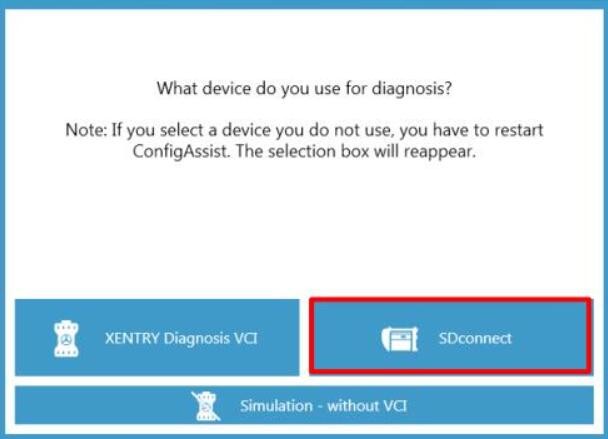
Access ConfigAssist: Initiate the configuration process by launching ConfigAssist. This can usually be found on your desktop as a button. If you’ve just restarted your system, the hardware selection window might appear immediately.
-
Select SDconnect: When prompted to choose your hardware, select “SDconnect” to proceed with the configuration for this device.
-
Connect Ethernet Cable: Locate the LAN connection port on the right side of your SDconnect, beneath a protective cap. Connect one end of the crossover Ethernet cable to this port and the other end to the Ethernet port on your computer.
-
Configure TCP/IP Settings: To establish communication, you need to manually configure the TCP/IP settings on your computer’s Ethernet connection. Use the following static IP address settings:
- IP Address: Set your computer’s LAN connection IP address to
172.29.127.X. ReplaceXwith any number between 1 and 254, except 129, as172.29.127.129is the default IP address commonly assigned to the SDconnect itself. - Subnet Mask: Set the subnet mask to
255.255.0.0. It is crucial not to alter this value.
- IP Address: Set your computer’s LAN connection IP address to
-
Firewall Configuration: Properly configure your firewall to allow communication between your system and the SDconnect. Typically, you will receive a prompt to grant these permissions when you first connect the SDconnect via cable. Ensure you allow these connections for seamless operation. For DoIP (Diagnostics over Internet Protocol) functionality, additional firewall settings may be required.
Important Considerations for Direct Ethernet Connection:
- LAN Port Exclusivity: Be aware that when using a direct Ethernet connection, your computer’s LAN port will be dedicated to the SDconnect and cannot be used for other network connections simultaneously.
Setting Up XENTRY SD Connect via USB2LAN Adapter
Utilizing a USB2LAN adapter provides an alternative wired connection method, particularly useful if your computer has limited Ethernet ports or for specific network configurations. This method involves installing drivers for the USB2LAN adapter and then configuring the network connection.
USB2LAN Adapter Driver Installation:
-
Initial Adapter Connection: Connect the USB2LAN adapter to your computer, but do not connect the Ethernet cable to the SDconnect yet. Ensure your computer is connected to the internet for automatic driver installation.
-
Automatic Driver Installation (First-Time): Windows (Windows 7 and later) will typically initiate driver installation automatically upon first connection. Allow Windows to search for and install the driver software online. This process may take several minutes; do not interrupt it. Look for notifications in the Windows tray, often represented by a balloon icon. If you miss the initial notification, check the hidden icons in the tray.
-
Monitor Driver Installation: It’s crucial to ensure the driver for the “USB-MAC Controller” device is installed correctly. Wait until Windows confirms the installation status, indicating either successful installation and device readiness or failure.
-
Automatic Driver Installation (Later or Reinstallation): If the initial installation was interrupted or unsuccessful, or if you are reconnecting the adapter to a different USB port, you may need to reinstall the drivers.
- Go to “Devices and Printers” in the Windows Control Panel.
- Look for “Other Devices” or “Network Adapters” and find “USB-MAC Controller,” which may be marked with a yellow exclamation point indicating a driver issue.
- Right-click on “USB-MAC Controller” and select “Update driver software.”
-
Choose Driver Source: In the “Update Drivers” dialog, if your computer is online, select “Search automatically for updated driver software.” If offline or if automatic search fails, choose “Browse my computer for driver software.”
-
Manual Driver Installation (Offline): If automatic installation fails or you are offline, manual installation is required. The necessary driver software is included on your XENTRY update DVD/BD.
- Determine your Windows version (32-bit or 64-bit) by going to “Control Panel” > “System.”
- In the “Update Driver Software” dialog, select “Browse my computer for driver software.”
- Insert the XENTRY DVD/BD and browse to the appropriate driver folder:
USB2LAN DriverWindows 764 bit(for 64-bit Windows)USB2LAN DriverWindows 732 bit(for 32-bit Windows)- Select the folder, and Windows should find and install the driver. If prompted for a specific file, choose
netmosu.inf(32-bit) orUSBMAC64.inf(64-bit).
Configuring USB2LAN Adapter and SDconnect Connection:
Once the USB2LAN adapter driver is successfully installed, proceed with the network configuration:
-
Prerequisites: Ensure the USB2LAN adapter is connected, driver errors are resolved (no yellow exclamation marks), and the SDconnect is powered on and fully booted. It’s recommended to connect the SDconnect to an external power source or vehicle OBD port to prevent it from entering sleep mode during configuration. Always use the same USB port for the adapter as used during driver installation, as using a different port might lead to recognition issues.
-
Establish Connection: Connect the green Ethernet cable to the SDconnect and then to the USB2LAN adapter. Allow Windows a moment to establish a network connection.
-
Verify Connection Status: Check the connection status in “Control Panel” > “Network and Internet” > “Network Connections.” A successful connection for the “High Speed USB-Ethernet Adapter” will show as enabled without a red “X” or yellow exclamation point. If you check the “Status” and it shows “No Network Connection,” proceed to the next steps to configure the IP address.
-
Assign Static IP Address: Configure a static IP address for the USB2LAN adapter.
- Go to “Control Panel” > “Network and Internet” > “Network Connections.”
- Right-click on “High Speed USB-Ethernet Adapter” and select “Properties.”
- Select “Internet Protocol Version 4 (TCP/IPv4)” and click “Properties.”
- Choose “Use the following IP address:” and enter:
- IP address:
172.29.127.X(ReplaceXwith a number between 1 and 254, excluding 129). - Subnet mask:
255.255.0.0
- IP address:
- Leave other fields blank and click “OK” to save. If Windows warns about IP address conflicts, try a different value for
X.
-
SDconnect Number Configuration: Use the SDconnect Administration tool to finalize the connection.
- Go to “Start” > “All Programs” > “Mercedes-Benz” > “SDconnect Administration.”
- Select your SDconnect device, which might be listed as “unknown” or with an unassigned number. Wait for the device data to load.
- Under “Select name,” choose a number for your SDconnect that is not already in use in your workshop. Label your physical device with this number using the provided number clips.
- Click “Start” to save the configuration and exit SDconnect Administration after confirmation.
Verification of Successful Setup:
After successfully configuring the cable connection, you should see SDconnect status icons in the Windows tray. These icons display the SDconnect number, connection type (e.g., Wi-Fi if also configured), and a padlock icon indicating connection security. You may need to customize your Windows tray settings to ensure these icons are visible.
By following these steps, you can effectively set up your XENTRY SD Connect system for reliable wired diagnostics using either a direct Ethernet connection or a USB2LAN adapter, ensuring a stable and efficient workflow in your automotive repair operations.