For automotive professionals and Mercedes-Benz enthusiasts, Xentry PassThru is an essential tool, enabling diagnostics and programming on newer vehicle models. Particularly for models compliant with Euro 5/6 standards, including the W205, W213, and W222 series, a robust and reliable diagnostic setup is crucial. While Xentry PassThru is designed to function effectively, users sometimes encounter challenges, especially when trying to achieve Xentry Passthru 2019 Activation on a 64-bit Windows 10 system using a VAS5054A interface. This guide provides a detailed walkthrough to navigate this setup, ensuring successful activation and operation.
Understanding the Challenge: Xentry PassThru and 64-bit Windows
The conventional VAS5054A diagnostic interface, while widely used and effective, was not originally designed to seamlessly operate as a PassThru device on 64-bit Windows environments. Although 64-bit drivers exist for the VAS5054A hardware itself, a compatible PassThru driver for 64-bit systems has historically been lacking. This incompatibility can present a significant hurdle when attempting Xentry PassThru 2019 activation and utilizing the full capabilities of Xentry software on modern machines.
The common workaround often involved using Actia drivers, which are essentially patched 32-bit PassThru API files adapted to function with 64-bit device drivers on Windows 10 x64. While this method could sometimes enable Xentry to recognize the VAS5054A and function with certain models like the W205, it was often considered an unofficial and potentially unstable solution.
The Solution: Leveraging the Softing VAS5054A PassThru Driver
A more reliable approach to achieve Xentry PassThru 2019 activation on Windows 10 x64 with a VAS5054A interface involves utilizing a specific Softing VAS5054A PassThru Driver. This driver is engineered to bridge the compatibility gap, allowing for smoother and more dependable communication between Xentry PassThru, the VAS5054A interface, and newer Mercedes-Benz vehicles on a 64-bit operating system.
This method, while effective, is provided with a crucial WARNING: It is intended for testing and experimental purposes. Users should proceed at their own risk, understanding that unforeseen issues can arise during the process.
Step-by-Step Guide to Xentry PassThru 2019 Activation
To successfully achieve Xentry PassThru 2019 activation using the Softing VAS5054A PassThru driver, follow these detailed steps:
What You Will Need:
- VAS5054A Bluetooth Hardware: Whether you use a genuine VAS5054A or a good quality clone, both are reported to be compatible with this method.
- (Optional) VAS5054A EDIC_PDU_API Driver Installation File: Specifically version 1.20.4x. This may be required to install necessary .NET Framework or VC++ redistributable files.
- (Optional) Firmware: Firmware version 1.20.41 is recommended for enhanced compatibility. Avoid version 1.20.42.
- Softing_VAS5054A_PassThru_Driver_x64_v3.zip: This is the core driver file required for this activation method.
- 64-bit Windows 10: Ensure your operating system is a 64-bit version of Windows 10.
- (Optional) DC 12V Power Adapter & Jumper Wires: For temporary powering of the VAS5054A during setup, especially if OBD-II port power is not readily available.
Pre-Installation Steps:
- Install Xentry PassThru: Begin by installing Xentry PassThru software and applying all necessary patches as per the software provider’s instructions.
- (Optional) Install EDIC_PDU_API Driver: If performing a fresh installation on a clean Windows 10 system, consider installing the EDIC_PDU_API 1_20_42 (or 1_20_41) driver first. This step ensures that essential components like .NET Framework and VC++ redistributables are installed, which are prerequisites for the PassThru driver to function correctly. Note that some files installed by this driver might be overwritten in subsequent steps, but it helps establish the foundational software environment.
Installation Procedure:
- Copy Softing Files: Manually copy the folder “Program Files (x86)Softing*” from the provided ZIP archive to your hard drive’s “C:Program Files (x86)Softing” directory.
- Copy D-PDU API Data: Similarly, copy the “Program DataD-PDU API” folder from the ZIP archive to “C:Program DataD-PDU API” on your system drive.
- Registry Update: Execute the “Softing_VAS5054A_PassThru_1_20_042.reg” file by double-clicking it and confirming the registry import. This step adds necessary registry entries for the driver to function.
- Create SftngCM.exe Shortcut: Create a desktop shortcut for the “SftngCM.exe” file, typically found within the copied Softing directory.
- Install Device Driver: Navigate to “C:Program Files (x86)SoftingEdicDriverwin7” and right-click on “softingedic7_ntamd64.inf”. Select “Install” from the context menu to manually install the device driver.
- Connect VAS5054A Hardware: Connect your VAS5054A hardware to your computer using a USB cable. Provide power to the VAS5054A either through the OBD-II port of a vehicle or by using a temporary 12V DC power adapter.
- Verify Driver Installation: Open “Device Manager” in Windows Control Panel and check under “Softing…” to confirm that the VAS5054A device driver has been installed correctly. If it’s not properly installed, manually update the driver by pointing Windows to the driver files in the Softing directory.
- Create EDICConfig.exe Shortcut: Create a desktop shortcut for “EDICConfig.exe” from the Softing directory.
- (Optional) Install Newer API Driver: If you possess a newer version of the EDIC_PDU_API driver than 1.20.42 and are using a genuine VAS5054A, you may choose to install the newer API driver at this stage.
Post-Installation Verification:
- Power VAS5054A: Ensure the VAS5054A is powered, either via a vehicle’s OBD-II port or a temporary 12V DC source.
- Run SftngCM.exe: Execute the “SftngCM.exe” shortcut on your desktop as an administrator. If a “C:Temp” directory does not exist, create it. This directory is used for log files, and its absence can cause errors in the test process.
- Select VAS5054A and Enter Serial Number: In the SftngCM application, select “VAS5054A” and input the serial number of your VAS5054A device (often starting with “0821xxxxx”).
- Start Test: Click on the “Test” button, and then “Start Test”. Observe the indicator dots:
- RED dot: Indicates a communication failure between the PC and VAS5054A. This usually points to a driver issue.
- YELLOW dot: Signifies successful communication between the PC and VAS5054A hardware.
- GREEN dot: Confirms successful communication between the PC, VAS5054A, and a vehicle (if connected).
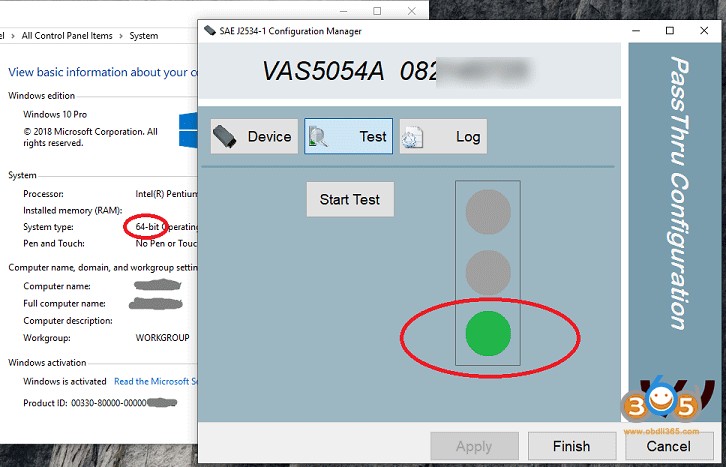 vas5054a-windows-10-setup
The VAS5054A setup interface as seen on Windows 10, highlighting the device selection for testing the PassThru connection.
Essential Tips for Successful Activation
- .NET Framework 3.5: Ensure that “.NET Framework 3.5 (includes .NET 2.0 and 3.0)” is enabled in Windows Features. This can be accessed via “Control Panel > Programs and Features > Turn Windows features on or off”.
- VC++ Redistributables: Install necessary Visual C++ redistributable packages if you encounter errors related to missing DLL files (e.g., MSVCR100.dll, mfc100.dll).
- Temporary Power for Testing: When testing outside of a vehicle, use a temporary power setup for the VAS5054A: Ground to pin 4 or 5, and 12V DC to pin 16 on the OBD-II connector.
- Driver Updates: If you have a newer EDICDriver version, you can update the driver files in “Program Files (x86)SoftingEDICDriver” and then update the device driver in Device Manager.
- Registry Edits for Newer API Versions: If using a newer EDIC_PDU_API driver version than 1.20.42, modify the *.reg file to reflect your version number (e.g., change “EDIC_D_PDU_API_1_20_042” to “EDIC_D_PDU_API_1_20_0XX”). Re-run the modified *.reg file after editing.
- Serial Number Adjustments: If your VAS5054A has a different serial number and SftngCM.exe doesn’t allow changes, edit the *.reg file to include your device’s serial number, save, and re-run the *.reg file.
By following these steps and tips, you can enhance your chances of successful Xentry PassThru 2019 activation on a Windows 10 x64 system using a VAS5054A interface. Remember to proceed cautiously and at your own risk, as this method involves using potentially unofficial drivers and configurations. Always prioritize data safety and system stability when performing these procedures.