Mercedes-Benz diagnostic software, Xentry Open Shell XDOS, is a powerful tool for automotive technicians. Installing it on Windows 10 can present some challenges. This guide addresses common issues and provides solutions for a smooth Xentry Open Shell Installation.
Addressing Common Xentry Open Shell Installation Issues on Windows 10
Many users encounter specific problems when setting up Xentry Open Shell on a Windows 10 system. These issues can range from license validation errors to network connectivity problems. Here we break down the common hurdles and offer practical advice to overcome them.
1. Resolving “StartKey not valid” Error in Xentry Open Shell
One frustrating issue is the “StartKey not valid” error in ConfigAssist when attempting to enter the Xentry key. This often occurs on Windows 10 64-bit, despite it being a recommended system.
Troubleshooting Steps:
- Standalone Key Center Errors: If you encounter a 0x8000704C7 error when using the standalone key center, this could indicate a deeper system incompatibility or issue with the key itself. Double-check the key’s validity and ensure it is intended for Xentry Open Shell XDOS.
- System Compatibility: While Windows 10 x64 is generally compatible, underlying system configurations or security settings might interfere. Ensure your Windows 10 installation is a clean, professional version and that no conflicting software is present.
- Key Source Verification: Verify the StartKey is from a legitimate and reliable source. Keys obtained from unofficial channels may be invalid or blacklisted.
2. Navigating Windows 10 Security Settings for Xentry Open Shell
Windows 10’s robust security features, while beneficial, can sometimes clash with the installation and operation of diagnostic software like Xentry Open Shell.
Security Setting Considerations:
- User Account Control (UAC): Temporarily lowering the UAC level during installation can prevent permissions-related errors. However, remember to restore it afterwards for system security.
- Firewall and Antivirus: Windows Firewall or third-party antivirus software might block certain components of Xentry Open Shell during installation or runtime. Create exceptions for Xentry-related executables and ports in your firewall and antivirus settings.
- Compatibility Mode: Running the Xentry Open Shell installer or application in compatibility mode for older Windows versions (like Windows 7) can sometimes resolve compatibility issues.
3. Addressing Ad-Hoc Connection Issues on Windows 10 for SDConnect C4
Establishing a wireless connection between your SDConnect C4 diagnostic interface and a Windows 10 laptop via an ad-hoc network can be problematic. Windows 10 has tightened security around ad-hoc networks, particularly with WEP encryption.
Solutions for Ad-Hoc Connectivity:
- Windows 8.1 Wireless Drivers: A known workaround involves using Windows 8.1 drivers for your wireless adapter. These drivers often retain ad-hoc functionality with WEP, which might be restricted in native Windows 10 drivers.
- Driver Installation Steps:
- Identify your specific wireless card model.
- Download the driver-only package for Windows 8.1 for your wireless card from the manufacturer’s website. Avoid downloading software suites.
- Uninstall your current wireless adapter drivers completely through Device Manager.
- Run the downloaded Windows 8.1 driver .exe file to install the older drivers.
- Reboot your system.
- Driver Installation Steps:
- Manual Ad-Hoc Network Setup: Manually configuring the ad-hoc network with specific settings can also help.
- Network Configuration Steps:
- Note down the SSID, security type (WEP), encryption type, and key for your ad-hoc network.
- Disable your wireless adapter temporarily.
- Enable the wireless adapter again but do not connect to any network.
- Open Network and Sharing Center > Manage Wireless Networks > Add.
- Choose “Manually create a network profile”.
- Enter the SSID, security type, encryption type, and key.
- Uncheck “Start this connection automatically” and “Connect even if the network is not broadcasting”.
- Click Next and Close.
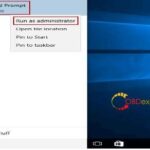
- Open Command Prompt as administrator.
- Type:
netsh wlan set profileparameter name=YourNetworkName ConnectionType=IBSS(Replace “YourNetworkName” with your SSID). - Enable your wireless adapter and try connecting to the ad-hoc network.
- Network Configuration Steps:
4. Finding a Reliable Source for Xentry Open Shell Software
Sourcing your Xentry Open Shell software from a trustworthy provider is crucial to ensure you receive a functional and secure installation package.
Reliable Source Recommendation:
- Professional Diagnostic Tool Suppliers: Websites specializing in automotive diagnostic tools, like obdii365.com, can be reliable sources. They often offer technical support and activation assistance, which can be invaluable during the installation process.
Conclusion
Successfully installing Xentry Open Shell on Windows 10 requires careful attention to system settings and potential compatibility issues. By addressing these common challenges with the outlined solutions, you can ensure a functional diagnostic environment for Mercedes-Benz vehicles. Remember to always prioritize reliable software sources and verify the legitimacy of your Xentry Open Shell license.