Many Mercedes-Benz owners and DIY mechanics are interested in customizing their vehicle settings, a process often referred to as “coding.” This doesn’t involve traditional programming but rather adjusting parameters within the car’s control units, similar to changing settings on your computer. To perform this coding, you need specific tools and software, and understanding how to use an Xentry Key Generator Unlock Code is crucial for accessing protected functions. This guide will walk you through the essentials of Mercedes-Benz coding, focusing on using Xentry and related tools.
Essential Tools for Mercedes-Benz Coding
To begin coding your Mercedes-Benz (models from 2005 onwards), you’ll need the following components:
- Compatible Mercedes-Benz Car: Ensure your vehicle is from 2005 or newer.
- J2534 Pass Thru Adapter: This hardware acts as an interface between your car and computer. Numerous brands are available across different price ranges.
- Xentry Pass Thru Software: This is the official Mercedes-Benz diagnostic software used by mechanics. It’s essential for communicating with your car’s systems.
- Advanced Coding Software (Optional):
- Vediamo 4.2.2 (Older but capable): More advanced than Xentry, often used by developers and experienced enthusiasts for deeper customization.
- DTS Monaco 8.16 (Newer and more powerful): Even more advanced than Vediamo, designed for programmers but also utilized by advanced DIY users.
- Seed Key Calculator: This software is critical for generating xentry key generator unlock codes, allowing access to protected ECU functions. A free, open-source option like MBSeedKey is available.
- Windows Laptop: A laptop running Windows 10 or 11 (64-bit) with an Intel/AMD CPU, at least 8GB of RAM, and 100GB of free SSD space is required.
Sourcing Your Coding Equipment
- Car: You already own this.
- J2534 Pass Thru Adapter: Purchase from manufacturers, Amazon, eBay, or Aliexpress. Prices vary significantly based on features and brand.
- Xentry, Vediamo, DTS Monaco: While Mercedes-Benz sells Xentry to professionals, these software packages are often obtained from online sources by independent mechanics and enthusiasts.
- Seed Key Calculator: MBSeedKey, an open-source application, can be downloaded from GitHub: https://github.com/Xplatforms/mbseedkey/releases/. Note that you’ll need to separately acquire DLL files for MBSeedKey to function. Search online for “MB SeedKey latest version with DLL” to find these files and place them in the MBSeedKey’s lib or dlls subfolder.
- Laptop: Use a compatible laptop you already own or purchase a new one. Ensure it meets the specified Windows and hardware requirements. Avoid pre-configured “Xentry laptops” from online marketplaces as they are generally overpriced.
Choosing the Right J2534 Adapter
Any J2534 adapter with compatible Windows 10 x64 drivers and Pass Thru library will work. If you already have one, test its compatibility. For new purchases, the Tactrix Openport 2.0 is a recommended option. When buying, verify that the adapter includes both the Windows driver and Pass Thru library. DoIP adapters, while advanced, are not necessary for basic coding tasks.
Software Installation Steps
- Install and Activate Xentry Pass Thru: Follow online guides to install and activate Xentry Pass Thru. Note the distinction between Xentry Pass Thru (for J2534 adapters) and Xentry XDOS (for SD C4 or DoIP adapters).
- Install J2534 Adapter Drivers and Pass Thru Library: These should be provided by your adapter’s manufacturer.
- (Optional) Install and Activate Vediamo 4.2.2: Find online resources for installation and activation instructions.
- (Optional) Install and Activate DTS Monaco 8.16: Similarly, search online for guides on installing and activating DTS Monaco.
- Install Seed Key Calculator (MBSeedKey): Simply extract the downloaded MBSeedKey software to a folder on your computer.
To configure Vediamo 4.2.2 to work with your J2534 adapter:
- Locate slave.ini: Edit the file at “C:Program Files (x86)VediamoCaesardriverslave.ini”.
- Modify DeviceName: In the “[PartJ]” section, replace the “DeviceName” value with your adapter’s name. This name can be found in Windows Device Manager or by running Xentry, which will prompt you to select your Pass Thru driver and display its name.
- Update Vediamo: Run Vediamo 4.2.2, click “Update,” select only “Part J,” and click “Update.”
Preparing Your Vehicle for Coding
- Connect Adapter: Connect your laptop to your car’s OBD-II port using the J2534 adapter.
- Launch Xentry: Run the Xentry software.
- Quick Test: Perform a quick test in Xentry to ensure communication with your vehicle is established. If successful, proceed; otherwise, re-check your connections and software installation.
Vehicle Power Management During Coding
When coding, the car should be in the “ON” position (ignition on, engine off). Do this by pressing the start button twice without pressing the brake pedal, or turning the key to the second click. Be aware that the car battery will drain during coding. For short coding sessions, this is acceptable. For longer sessions, connect a 12V battery charger. Mercedes-Benz recommends a 30A charger, but a lower amperage charger is sufficient for most DIY tasks. To minimize battery drain, turn off headlights, interior lights, and the HVAC fan.
Identifying the Control Unit for Coding
Let’s use the example of disabling the Start/Stop ECO function. This typically involves coding the Main Engine ECU. The specific name of this ECU varies by model.
- Run Diagnosis in Xentry: Start Xentry and select the “Diagnosis” function.
- Identify Engine ECU: Look for entries like “Motor electronics … for combustion engine …” or similar descriptions in the control unit list.
- Find Control Unit Variant: Within the Engine ECU section, locate “Control unit variant.”
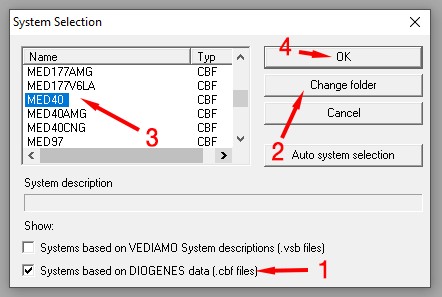
- Note the ECU Name: In the example image, the ECU name is “MED40.” This is the control unit we will target for coding.
Performing the Coding Procedure
- Launch Vediamo Ecoute: Open Vediamo and start the “Ecoute” application.
- Select CBF Files: Click “Select…” (the first icon) and in the dialog, ensure “*.cbf” is selected. Click “Change folder.”
- Navigate to CBF Folder: Vediamo and DTS Monaco use CBF and SMR-D files located within the Xentry installation directory. Navigate to “C:Program Files (x86)Mercedes-BenzXentryMB_PKWCaesarcbf.”
- Choose ECU Definition: Select the CBF file corresponding to your ECU (e.g., “MED40”) and click “OK.”
-
Select ECU for Properties: In the Vediamo window, you should see “MED40” and “MED40 – xxxxxx.” Right-click on “MED40 – xxxxx..” and select “Properties.”
-
Set Connection: Change the connection type to “xxxxxxx…… HSCAN_UDS_500”. Always use “500.” Click “OK.”
-
Initiate ECU Contact: Click the “Initiate ECU Contact” icon (third icon from the left).
-
Variant Coding: Select “Code the variant of an ECU” (eleventh icon).
-
Access Variant Coding Menu: The “Variant Coding – MED40” dialog will appear. Select “VCD_Implizite_Variantenkodierung.”
-
Locate Start/Stop Parameter: Find “Betriebsstrategie Stopp Start” (Start/Stop Operation Strategy).
-
Change Setting: You will see “Stopp Start Standard Logik, Default ON.” Change this to “Stopp Start Standard Logik, Last Mode.”
-
Pause and Backup: STOP HERE. Take a moment. Click “Save to Files.” This creates a backup of your current ECU parameters in the “MED40” subfolder within the CBF directory, named with the current date (YYYY-MM-DD.html). Verify the file is saved correctly and review its contents by opening the HTML file in a browser.
-
Execute ECU Coding: Click “ECU-Coding.” You will likely see a warning about SCN coding being erased – ignore this and click “OK” (or “Proceed”). The coding will likely fail at this point, which is expected because you need an xentry key generator unlock code for higher access levels.
-
Manual Command Input: Go to the “ECU” menu at the top of Vediamo and select “Manual Command Input …”
- Request Seed Key: Type “27 0B” in the Request Message field and click “Send.” This command requests a seed key for access level 0B, which is required for variant coding.
- ECU Response: The ECU will respond with a message like “67 0B BF DF 6F 37.” The sequence of numbers (e.g., BF DF 6F 37) is your temporary seed.
- Launch MBSeedKey: Open the MBSeedKey program. Configure the DLL folder path if necessary.
- Select ECU DLL: Choose the DLL file corresponding to your ECU, in this case, “MED40_MED40_…….dll.” Selecting the correct DLL is crucial as each DLL contains a specific seed key algorithm.
- Set Access Level: Select “0B” as the Access Level.
- Enter Seed Value: Input the seed value received from Vediamo (e.g., “BF DF 6F 37“) into the “SEED:” field. Click “Generate Key.”
- Generated Key: MBSeedKey will display the generated key (e.g., “9B 1A 69 C0“). This is your xentry key generator unlock code.
- Return to Vediamo: Go back to Vediamo.
- Send Unlock Code: In the “Manual Command Input…” dialog, type “27 0C 9B 1A 69 C0” (replace with your generated key) in the Request Message field and click “Send.” Note that the command is “27 0C” followed by the generated key.
- Verify Unlock Confirmation: The ECU should respond with “67 0C,” confirming that access level 0B is now unlocked. If you receive a different response (e.g., “0x7F ….”), something went wrong – re-check from step 18.
- Close Manual Command Input: Close the “Manual Command Input…” dialog.
- Re-open Variant Coding: Re-open the “Code the variant of the ECU” dialog.
- Repeat Coding Steps: Repeat steps 11-16.
- Execute ECU Coding Again: Click “ECU-Coding.” This time, the coding should complete successfully. If it fails, retrace your steps.
- Save Post-Coding Parameters: Click “Save to Files” to save a backup of the ECU parameters after coding. Compare this file with the pre-coding backup to identify the changes made.
- Hard Reset: In the left-hand tree menu, navigate to “System: MED40 / ECUs / MED40 – xxxxx / Function.” You will find “FN_HardReset.”
- Perform Hard Reset: Double-click “FN_HardReset” to initiate a hard reset of the MED40 ECU, forcing it to reload the new parameter settings.
- Exit ECU Contact: Click the “Exit ECU Contact” icon (fourth icon).
- Close Vediamo: Close the Vediamo program.
Coding complete. Congratulations! You have successfully used an xentry key generator unlock code to modify your Mercedes-Benz settings.
Important Caution: Coding can significantly alter your vehicle’s behavior. Only modify parameters if you fully understand their function and are certain of the intended outcome. Incorrect coding can lead to malfunctions or damage. Proceed with caution and always back up your original settings.