Installing and configuring Xentry Openshell XDOS on Windows 10 can present a few hurdles, especially for those new to the process. This guide addresses common issues users encounter, offering solutions based on practical experience to get your Xentry diagnostics system running smoothly. While these tips are provided as helpful suggestions, remember to proceed with caution and at your own risk when modifying your diagnostic tools and vehicle software.
Addressing “StartKey not valid” Error in XDOS on Windows 10
One frustrating issue users face is the “StartKey not valid” error in ConfigAssist when setting up XDOS on a Windows 10 64-bit system. Despite Windows 10 x64 being a recommended environment for Mercedes-Benz diagnostic software, this error can block the activation process. Attempting to use a standalone key center might also lead to a 0x8000704C7 error.
While the exact cause can vary, it’s worth noting that some users have successfully navigated this problem. It is crucial to ensure that you are using a valid and correct StartKey for your specific Xentry Openshell version. Double-check the key’s accuracy and ensure it matches the software version you are attempting to activate. Sometimes, re-entering the key carefully can resolve typos or input errors.
Windows 10 Security Settings and Xentry XDOS Compatibility
Windows 10’s robust security features, while beneficial for general use, can sometimes interfere with the installation and operation of diagnostic software like Xentry XDOS. Some users have reported fewer issues when using Windows 7 x86, suggesting potential conflicts with stricter Windows 10 security protocols.
If you encounter problems, temporarily adjusting Windows 10 security settings might be necessary. However, proceed with caution when lowering security settings and ensure you understand the potential risks. Consider disabling User Account Control (UAC) temporarily during the installation process and then re-enabling it afterward. Also, check if Windows Defender or other antivirus software is blocking any Xentry components and create exceptions if needed.
Windows 7 VMware and Windows 10: Direct Installation Approach
There’s a common misconception that running Xentry on Windows 10 requires a Windows 7 virtual machine (VMware) or image. This is not necessarily true. Xentry Openshell XDOS, especially versions compatible with patches like “Xentry Diagnostics Open Shell Patcher 4.2”, can function directly on a Windows 10 64-bit Professional system.
The original article clarifies that a direct installation on Windows 10 is indeed possible. The key is to configure the system correctly, particularly the network settings for SDConnect C4 connectivity. Avoid the complexity of VMs if you can achieve a stable and functional setup directly within Windows 10.
Fixing Ad-Hoc Connection Issues on Windows 10 for SDConnect C4
Establishing an Ad-Hoc connection for your SDConnect C4 diagnostic interface on Windows 10 can be challenging due to Windows 10’s limitations with WEP (Wired Equivalent Privacy) encryption in hosted networks. However, a workaround involving driver manipulation has proven effective for many users.
The suggested solution involves installing Windows 8.1 wireless adapter drivers instead of the default Windows 10 drivers. This is because Windows 8.1 drivers often retain the functionality to support Ad-Hoc networks with WEP encryption, which is necessary for older SDConnect C4 interfaces.
To implement this fix:
- Identify your Wireless Adapter: Determine the exact model of your wireless network adapter.
- Download Windows 8.1 Drivers: Search online for Windows 8.1 drivers specifically for your wireless adapter model. Ensure you download only the driver files, not the bundled software suite.
- Uninstall Current Drivers: In Device Manager, uninstall your wireless adapter, including removing the driver software.
- Install Windows 8.1 Drivers: Run the downloaded driver .exe file. The installer should detect your wireless adapter and install the older drivers.
- Reboot: Restart your Windows 10 system for the changes to take effect.
After rebooting, attempt to set up your Ad-Hoc connection again. This driver rollback method often restores Ad-Hoc functionality and allows for successful wireless communication with your SDConnect C4.
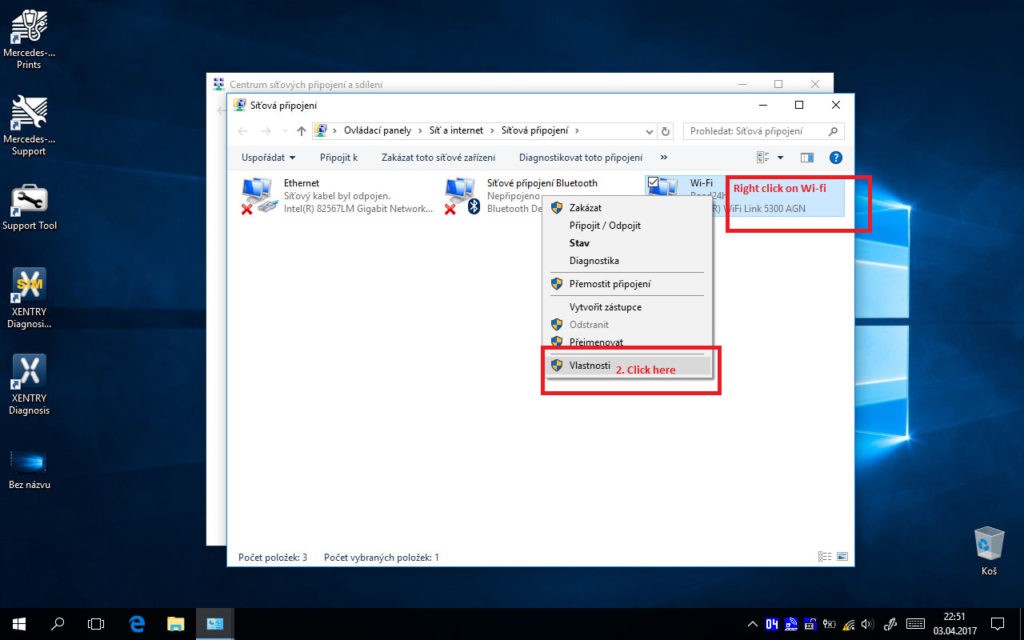
Image: Screenshot showing successful Ad-hoc network connection on Windows 10 for Xentry Diagnostics.
Step-by-Step Guide to Configure Ad-Hoc Connection on Windows 10
Even with the driver fix, properly configuring the Ad-Hoc connection on Windows 10 is crucial. Here’s a detailed guide based on user experiences:
-
Manual Network Profile Creation:
- Go to Network and Sharing Center and select “Manage Wireless Networks”.
- Click “Add” and choose “Manually create a network profile”.
- Enter the following details:
- Network name (SSID): Road24h (or your preferred SSID)
- Security type: WEP
- Encryption type: WEP
- Security key: (Your WEP key)
- Crucially, uncheck both “Start this connection automatically” and “Connect even if the network is not broadcasting”.
- Click “Next” and then “Close”.
-
Command Prompt Configuration (Setting Connection Type to IBSS):
- Open Command Prompt as Administrator (search for “cmd”, right-click, and select “Run as administrator”).
- Type the following command, replacing “NetworkName” with your chosen SSID (e.g., Road24h):
netsh wlan set profileparameter name=NetworkName ConnectionType=IBSSExample:
netsh wlan set profileparameter name=Road24h ConnectionType=IBSS - Press Enter. If successful, the network icon in “Manage Wireless Networks” should change to an ad-hoc icon.
-
Connect to Ad-Hoc Network:
- Enable your wireless adapter.
- Select the Ad-Hoc network you created (e.g., Road24h) from the available Wi-Fi networks.
- You should now connect without needing to re-enter the security key.
Images: Step-by-step screenshots demonstrating Ad-hoc network setup for Xentry Windows 10 installation.
Automating Ad-Hoc Connection on Windows 10 Startup
For convenience, you can automate the Ad-Hoc network connection to occur automatically when Windows 10 starts:
-
Open Startup Folder:
- Press
Windows Key + Rto open the Run dialog. - Type
shell:startupand press Enter. This opens your Startup folder.
- Press
-
Create Shortcut:
- Right-click in an empty area of the Startup folder, go to “New” -> “Shortcut”.
- In the “Type the location of the item” field, enter the following command, again replacing “NetworkName” with your SSID:
netsh wlan connect NetworkNameExample:
netsh wlan connect Road24h - Click “Next”.
- Give the shortcut a name like “Connect to Road24h” and click “Finish”.
Now, every time you start Windows 10, a brief command prompt window will flash as the system automatically attempts to connect to your saved Ad-Hoc network.
Finding a Reliable Source for Xentry Openshell XDOS 09.2018 (and Newer Versions)
Sourcing a trustworthy and functional version of Xentry Openshell XDOS, such as the 09.2018 release or newer versions that are compatible with “xentry diagnostics open shell patcher 4.2”, is essential. Users often seek confirmation that the software works reliably with SDConnect interfaces and comes with adequate technical support.
One source that has been mentioned and recommended within user communities is http://www.obdii365.com/wholesale/201809-mb-sd-connect-compact-c4-software-ssd.html. This website is reported to provide working software versions and offer technical assistance, including remote activation help, which can be invaluable during the setup process.
Image: Promotional banner for Xentry Openshell XDOS download, highlighting software version and compatibility.
Disclaimer: Remember that modifying diagnostic software and vehicle systems carries risks. Always proceed with caution, back up your systems, and understand the potential consequences before implementing any changes. The solutions provided are based on user experiences and are offered as potential troubleshooting steps, not guaranteed fixes. Always prioritize safety and consult with professionals if you are unsure about any procedure.