Mercedes-Benz vehicles are renowned for their sophisticated engineering and advanced technology. To properly diagnose and maintain these vehicles, automotive professionals rely on specialized diagnostic tools. Among these, Xentry Diagnostic software stands out as the most comprehensive solution. This article will guide you through everything you need to know about Xentry Diagnostic software, focusing on how to download and install it on Windows 10, ensuring optimal performance for your diagnostic needs.
Understanding Mercedes Xentry Diagnostic Software
Xentry Diagnostic software is the official diagnostic tool for Mercedes-Benz vehicles, covering models up to the latest releases. It’s an indispensable tool for workshops and technicians, offering a wide array of functionalities:
- Comprehensive System Diagnostics: Dive deep into every system of the vehicle, from engine and transmission to chassis and body electronics.
- Fault Code Reading and Clearing: Quickly identify and resolve issues by reading Diagnostic Trouble Codes (DTCs) and clearing them after repairs.
- Actuation Tests: Verify the functionality of components by directly controlling actuators and observing their response.
- Live Data Monitoring: Analyze real-time data from sensors and control units to pinpoint intermittent faults and performance issues.
- Repair and Maintenance Guidance: Access detailed repair instructions, wiring diagrams, and component locations to facilitate efficient repairs.
However, navigating the world of Xentry software can be complex, especially when it comes to installation and compatibility. This guide focuses specifically on downloading and installing Xentry on Windows 10, the most widely used operating system for diagnostic workstations.
Xentry Versions and Compatibility: OpenShell vs. PassThru
When discussing Xentry software, it’s crucial to understand the two main versions: OpenShell and PassThru. Choosing the right version depends on your diagnostic interface and the level of access you require.
-
Xentry OpenShell: This is the full-featured version of Xentry, designed for use with professional diagnostic multiplexers like SD Connect C4/C4 DOIP, SD Connect C5, and VCI C6. For optimal and robust diagnostics, especially for older and newer models, SD Connect C4 DOIP is generally recommended. OpenShell provides extensive access to vehicle systems and functionalities.
-
Xentry PassThru: This version is designed to work with generic J2534 PassThru devices. While it offers compatibility with a broader range of interfaces (including VAS5054, Autel, and Open Port devices), it may have limitations in functionality compared to OpenShell, particularly with older models or advanced diagnostic procedures. PassThru is often used when a more cost-effective or versatile interface is preferred, or when specific OEM requirements mandate J2534 compatibility.
For users seeking the most comprehensive diagnostic capabilities and utilizing professional Mercedes-Benz diagnostic interfaces, Xentry OpenShell is the preferred choice. This guide will primarily focus on the installation of Xentry OpenShell on Windows 10.
System Requirements for Xentry Diagnostic Software on Windows 10
Before attempting to download and install Xentry Diagnostic software, ensure your Windows 10 system meets the necessary specifications. Meeting these requirements is crucial for smooth operation and preventing installation issues.
- Operating System: Windows 10 64-bit is mandatory for compatibility with the latest Xentry versions and optimal performance.
- Storage: Allocate sufficient disk space. You’ll need approximately 23GB of free space for the software files and an additional 110GB for the installation process itself. Using an SSD (Solid State Drive) is highly recommended for faster installation and software responsiveness.
- Processor: An Intel Core i5 3rd generation processor (or equivalent AMD) with a clock speed of 2.3 GHz or higher is recommended as a minimum. For smoother multitasking and faster processing, a more powerful CPU is beneficial.
- RAM: 8GB of RAM is the minimum requirement, but 16GB or more is highly advisable for optimal performance, especially when running multiple diagnostic applications or dealing with large datasets.
- .NET Framework 4.8: Ensure that .NET Framework 4.8 is installed on your Windows 10 system. This is a critical component for Xentry to function correctly. You can download it from the official Microsoft website if it’s not already installed.
Meeting these system requirements will ensure a smoother installation process and prevent performance issues when running Xentry Diagnostic software on your Windows 10 machine.
Step-by-Step Guide to Installing Xentry Diagnostic Software on Windows 10
The installation process for Xentry Diagnostic software can be intricate. Follow these steps carefully to ensure a successful installation on your Windows 10 system.
Step 1: Disable Antivirus and Firewall
Antivirus and firewall software can interfere with the installation process and even block certain components of Xentry. It’s crucial to temporarily disable them before proceeding.
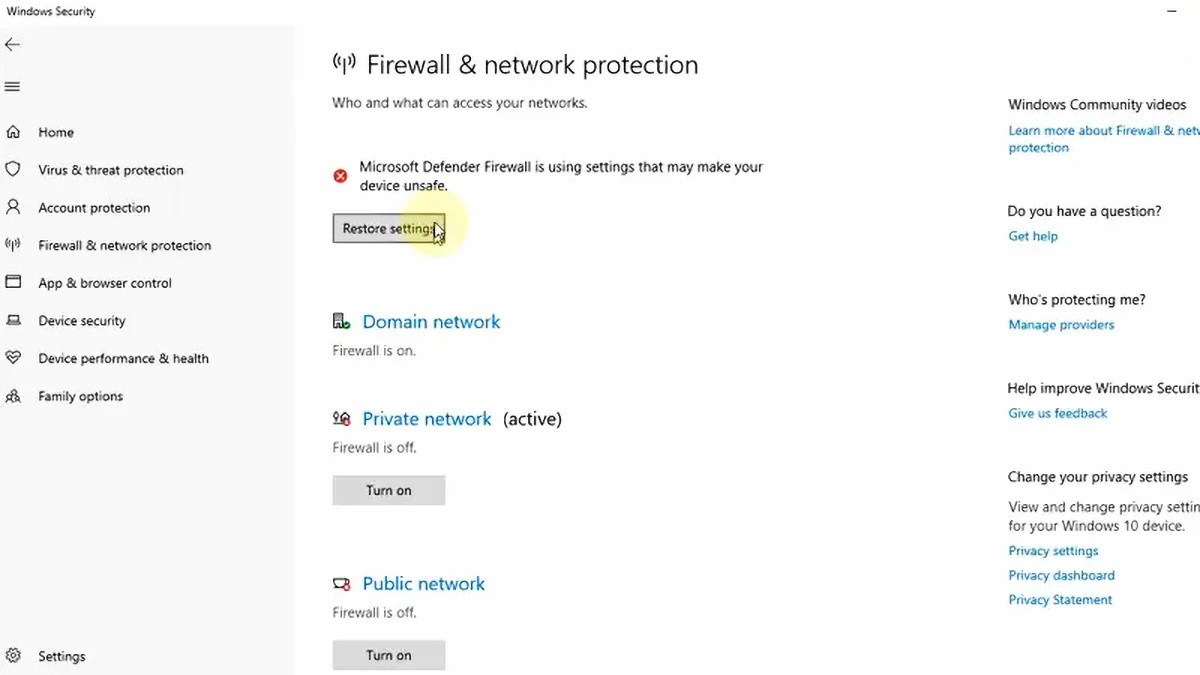
- Open Windows Security: Click on the search bar in the taskbar and type “Windows Security.” Select “Windows Security” from the results.
- Navigate to Virus & threat protection: In the Windows Security window, click on “Virus & threat protection.”
- Manage settings: Under “Virus & threat protection settings,” click on “Manage settings.”
- Disable Real-time protection: Toggle the switch under “Real-time protection” to the “Off” position.
- User Account Control: Confirm any User Account Control prompts that may appear to allow the change.
Disabling real-time protection in Windows Security is essential before installing Xentry Diagnostic software.
Step 2: Run the Xentry Installation
- Enable VCRedist x86 x64: Before starting the Xentry installation, ensure that “VCRedist x86 x64” (Visual C++ Redistributable) is enabled on your system. This is often a prerequisite for running many Windows applications, including Xentry.
- Mount the Xentry ISO: Locate the downloaded Xentry software folder. Typically, Xentry software is distributed as an ISO image file. Right-click on the ISO file (e.g., “XDOS.iso”) and select “Mount.” This will mount the ISO as a virtual drive.
- Initiate Installation: Open the mounted virtual drive. Locate the setup executable file (often named “Setup.exe” or similar, or as indicated in your software package instructions). Double-click the setup file to start the installation process.
- Run as Administrator: Right-click on the setup executable and select “Run as administrator” to ensure the installer has the necessary privileges to make changes to your system.
- Language Selection: During the installation, you’ll be prompted to select your preferred language. Choose your language and proceed.
- Follow On-Screen Prompts: Carefully follow the on-screen instructions provided by the Xentry installer. The installation process can take a considerable amount of time, potentially several hours, depending on your system speed and software version. Allow the installation to proceed uninterrupted.
Running the Xentry installer as administrator ensures all necessary system changes can be made.
Verifying sufficient disk space before installation is crucial to avoid interruptions.
Confirming .NET Framework 4.8 installation ensures software compatibility.
Step 3: Reboot Your Computer
After the Xentry installation process completes, the installer will prompt you to reboot your computer. It is essential to reboot your system at this stage. This allows the system to finalize the installation and register all the necessary components.
Rebooting the computer is a mandatory step after Xentry software installation.
Step 4: Disable Antivirus Again After Reboot
Upon restarting your computer, Windows Security might automatically re-enable real-time protection. You need to disable it again, as it’s often required for the software activation and proper functioning of Xentry, especially with crack or patch files that might be needed depending on your software source. Repeat the steps in Step 1 to disable real-time protection.
Disabling antivirus again after reboot ensures uninterrupted software activation and operation.
Step 5: Disable Xentry PDFs in Task Manager (If Applicable)
In some cases, background processes related to Xentry PDF viewers might interfere with the software’s operation or activation. If you encounter issues, disabling these processes via Task Manager can help.
- Open Task Manager: Right-click on the Windows taskbar and select “Task Manager.”
- Locate Xentry PDF Processes: In Task Manager, go to the “Details” tab (or “Processes” tab in older Windows versions). Look for any processes related to “Xentry PDF” or similar PDF viewers associated with Xentry.
- End Processes: If you find such processes, right-click on each one and select “End task.”
Step 6: Software Activation (Cracking/Patching)
This step is highly dependent on the source of your Xentry software. Legitimate licenses require official activation procedures. However, if you are using a non-official version, you will likely need to apply a crack or patch to bypass license checks. We strongly advise using legitimate, licensed software to comply with legal requirements and ensure software integrity and security.
If you are using a non-official version (at your own risk and awareness of potential legal and security implications):
- Navigate to Crack/Patch Folder: Locate the “crack” or “patch” folder that came with your downloaded software.
- Copy Files: Follow the instructions provided with your software package. Typically, this involves copying files from the crack folder to the Xentry installation directory (often “C:Program Files (x86)Mercedes-BenzXentry” or similar).
- Run Patch as Administrator: If a patch executable is provided, right-click on it and select “Run as administrator” to apply the patch.
Navigating to the crack folder for software activation (use with caution and at your own risk).
Copying crack files to the Xentry installation directory as part of the activation process (use with caution).
Running the patch as administrator to activate the software (use with caution).
Step 7: Activation Key (If Required)
Some cracked versions may require an activation key. The method for obtaining and entering this key varies depending on the specific crack. Follow the instructions provided with your software. This might involve using a key generator or using a pre-provided ID to obtain an activation key.
Entering the activation key as part of the software activation process (if required by your software version).
Step 8: Save Activation Key
If you obtained an activation key, save it securely. You might need it again if you reinstall the software or encounter activation issues.
Step 9: Modify LAN ID (If Required)
In some cases, you might need to modify the LAN ID of your system as part of the activation process. This is less common but might be required by certain cracks. Instructions for this, if needed, should be provided with your software.
Step 10: Verify and Utilize the Software
After completing the activation steps, launch Xentry Diagnostic software. Connect your diagnostic interface to your computer and the vehicle. Verify that the software starts correctly and you can establish communication with the vehicle. Perform basic diagnostic functions to confirm that the software is working as expected.
Verifying and utilizing the Xentry software after successful installation and activation.
Troubleshooting Common Xentry Installation Failures
Even with careful adherence to the installation steps, you might encounter issues. Here are some common reasons for installation failures and how to address them:
- Incorrect Activation Key: If you receive an “invalid activation key” error, double-check the key you entered and ensure it matches the one provided with your software. If using a key generator, ensure you followed the instructions precisely. For legitimate software, contact your vendor for key issues.
- Antivirus/Firewall Interference: If you encounter errors during installation or software launch, even after disabling antivirus initially, ensure that your antivirus and firewall are completely disabled. Some antivirus programs might have background services still running. Temporarily uninstalling antivirus software might be necessary in some stubborn cases (reinstall after successful Xentry setup).
- Insufficient Disk Space: If the installation fails with disk space errors, verify that you have at least the recommended free space (110GB) on your installation drive. Clear up space if needed and restart the installation.
- Previous Xentry Installation Conflicts: If you had a previous version of Xentry installed, ensure it was completely uninstalled before installing the new version. Use a dedicated uninstaller tool or follow the official uninstallation procedure to remove all traces of the old installation.残留 files can cause conflicts.
If you continue to experience difficulties despite troubleshooting these common issues, consider seeking professional assistance. Dealers Software or specialized automotive software support services can provide expert guidance and remote assistance to resolve complex installation problems efficiently.
For more information on Mercedes-Benz diagnostic tools and software, visit https://www.obd2tool.com.