If you’re a Mercedes-Benz technician using the Xentry diagnostic system, you’ve likely experienced the frustration of waiting for the Xentry Connect device to boot up. It’s a common complaint – these interfaces can feel incredibly slow, especially when compared to older systems like SDConnect C4 or the newer VCI C6. The reason for this sluggishness lies in the Xentry Connect’s design: it’s essentially a mini-computer, not just a simple interface.
Having worked extensively with Xentry Connect devices, we’ve delved deep into their architecture to understand and address this performance bottleneck. This guide breaks down the hardware limitations of the Xentry Connect, explains how to upgrade it for significantly faster boot and operation times, and provides troubleshooting steps for common booting issues, including the dreaded “device is booting” prolonged wait.
Understanding Why Your Xentry Connect Device is Booting Slowly
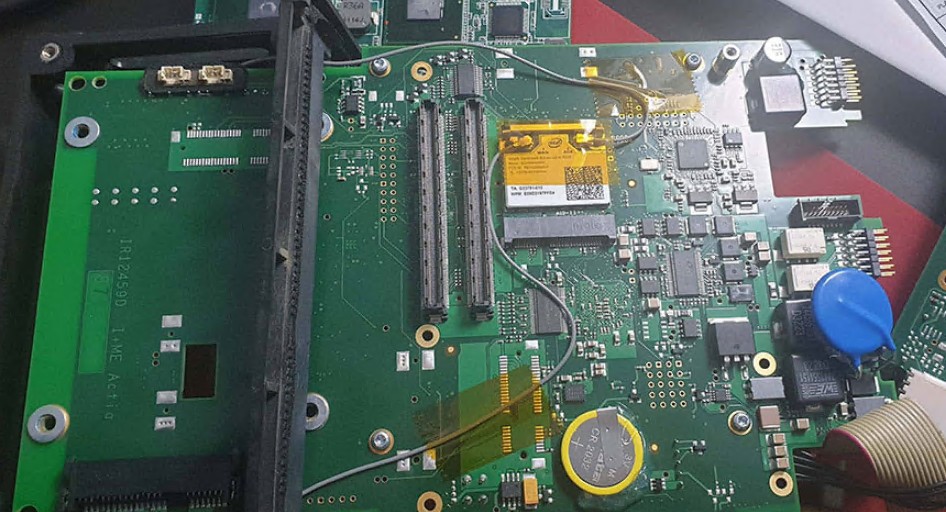
To understand the slow boot times, let’s look under the hood of the Xentry Connect. Disassembling the device reveals its core components, which are more akin to a basic laptop than a typical vehicle interface.
Hardware Limitations: The Bottleneck
The original Xentry Connect hardware specifications reveal why it struggles with speed:
- OS: Windows 7 Embedded 32bit – An older, 32-bit operating system limits performance and RAM usage.
- Motherboard: HM65 Chipset – A chipset from an older generation.
- CPU: Intel Celeron B810 (2 cores, 2 threads, 1.6Ghz) – This is the primary culprit. A low-power, budget processor from Intel’s 2nd generation is simply not powerful enough for the demands of modern diagnostic software.
- GPU: Integrated Graphics – Basic integrated graphics, sufficient for its needs but not contributing to speed.
- RAM: 4GB DDR3 1333Mhz – While 4GB is decent, the 32-bit OS limits usable RAM to around 3.5GB.
- SSD: 256GB (various manufacturers) – Storage is adequate, but the stock SSD might not be the fastest.
- WiFi: Intel Centrino Advanced-N 6205 – Standard WiFi capabilities.
This hardware configuration, while functional, is clearly geared towards cost-effectiveness rather than high performance. The slow CPU is the main bottleneck affecting boot times, application loading, and overall responsiveness.
Xentry Connect vs. SDConnect C4 and VCI C6
In contrast to the Xentry Connect, older interfaces like the SDConnect C4 and newer VCI C6 are simpler devices. They act more as direct communication bridges, relying on the processing power of an external computer running the Xentry software. The Xentry Connect, being a standalone computer, handles more processing internally, which is why its hardware specifications directly impact its speed.
Boosting Performance with a CPU Upgrade: A Step-by-Step Guide
The most impactful upgrade you can perform on a Xentry Connect is replacing the Celeron CPU with a more powerful, compatible processor. Based on our testing, upgrading to an Intel Core i7-2640m (2 cores, 4 threads, 2.8Ghz – 3.5Ghz Turbo) provides a significant performance boost without overheating or power consumption issues.
Performance Gains:
- Xentry Program Start to Data Status:
- Celeron B810: 57 Seconds
- i7-2640m: 25 Seconds (Over 50% faster!)
- Sleep Mode to No Car Connected:
- Celeron B810: 47 Seconds
- i7-2640m: 37 Seconds (Noticeable improvement)
Why the i7-2640m?
This processor is the sweet spot for upgrading the Xentry Connect because:
- Performance: It offers a substantial performance increase over the Celeron.
- 35W TDP: Crucially, it maintains the same 35W Thermal Design Power (TDP) as the Celeron. This is vital as the Xentry Connect cooling system is designed for this power level. Higher wattage CPUs can lead to overheating or system instability due to insufficient cooling and power delivery. We tested a higher wattage CPU (2670qm) and encountered power shutdown issues.
- Compatibility: It’s compatible with the HM65 chipset and PGA989 socket of the Xentry Connect motherboard (2nd generation Intel). While 3rd generation CPUs use the same socket, they are not supported by this motherboard.
Installation Guide:
Caution: Disassembling electronic devices carries risks. Proceed with caution and at your own risk. Ensure the device is powered off and disconnected.
- Remove Battery: Open the Xentry Connect and carefully disconnect the battery.
- Remove Back Shield: The back shield is held in place by double-sided adhesive. Gently pry it off.
- Unscrew Radiator: Remove the six screws securing the radiator/heatsink.
- Remove Radiator: Carefully lift off the radiator, which cools the CPU.
- Unlock CPU Socket: Turn the small black plastic piece on the CPU socket to release the existing Celeron CPU.
- Replace CPU: Gently remove the Celeron CPU and install the i7-2640m. Apply new thermal paste to ensure proper heat transfer.
- Reassemble: Reinstall the radiator, secure it with the screws, reattach the back shield, and reconnect the battery.
After the upgrade, you’ll immediately notice a faster boot time and snappier performance within the Xentry software.
Other Potential Hardware Upgrades
While the CPU upgrade provides the most significant performance gain, here are other areas you could consider:
- SSD Upgrade: The stock SSD is sufficient, but you could potentially install a faster SSD for marginal gains in loading times. Cloning the original SSD to a new one is recommended.
- RAM: The 32-bit Windows 7 Embedded OS limits RAM usage to around 3.5GB, so upgrading beyond 4GB is not beneficial unless you undertake a complex and potentially unsupported 64-bit OS installation.
- WiFi: Upgrading the WiFi card is possible, but may require driver modifications and might not offer significant real-world benefits for diagnostic use.
Software and Updates for Xentry Connect
The Xentry Connect uses a two-part software system:
- Xentry Tab (Part of Xentry Kit 2): This software resides on your diagnostic laptop and interacts with the Xentry Connect interface.
- Xentry Connect (Part of Xentry Kit 2): This is the operating system and diagnostic software running on the Xentry Connect device itself.
Updating Xentry Connect Software:
Keeping your Xentry Connect software up to date is crucial for compatibility and access to the latest diagnostic features. Here’s how to update the software release (using Xentry Kit 2 06-2020 as an example, which is the last official update for this hardware):
- Download Xentry Kit 2 06-2020: Obtain the update package (link usually provided by your diagnostic software supplier).
- Prepare USB Drive: Extract the downloaded Kit 2 folder to a minimum 32GB USB drive.
- Enter Update Mode: Ensure the Xentry Connect is in standby mode. Connect the power supply and insert the USB drive. Simultaneously press and hold the “red cross” and “green tick” buttons to start update mode.
- Confirm Update: When “Start update” appears on the display, confirm with the “green tick” button. The update process will begin and take approximately 100 minutes. The display will show progress.
- Completion: Once the update is finished (indicated on the display), press the “gearwheels” button or wait for auto-shutdown.
Xentry Control Configuration:
After updates, you may need to configure network settings:
- Start Interface: Power on the Xentry Connect.
- Connect Network: Connect a LAN cable between the Xentry Connect and your laptop.
- Open Xentry Control: Launch Xentry Control software on your laptop.
- Configuration: Navigate to the configuration section and follow the steps to set up LAN, WiFi, and other settings as needed.
Xentry License/StartKey:
If your Xentry Connect license has expired (common for older devices), you will need to reactivate it. This often requires a paid activation service.
Troubleshooting “Device is Booting” and Other Issues
Encountering a “Device is booting” message for an extended period (longer than 3 minutes) can indicate a software problem, often related to boot files.
Fixing “Device is Booting” Hang:
- Create Windows 7 Bootable USB: Prepare a normal (non-embedded) Windows 7 32-bit bootable USB drive (minimum 4GB). For newer laptops with USB 3.0, you may need to integrate USB 3.0 drivers into the Windows 7 ISO to ensure mouse functionality during setup.
- Remove Xentry Connect SSD: Disassemble the Xentry Connect and remove the SSD.
- Connect SSD to Laptop: Connect the SSD to your laptop (either internally in an older laptop or externally using an adapter).
- Boot from USB and Repair: Boot your laptop from the Windows 7 USB drive. Select “Repair my computer,” then “Startup Repair.” Let the repair process complete.
- Reinstall SSD: Reinstall the SSD back into the Xentry Connect. Crucially, ensure the SSD is securely fastened with at least one screw. A loose SSD can lead to boot corruption again.
This Startup Repair process often resolves corrupted Boot Configuration Data (BCD) issues that cause the “Device is booting” hang.
Reset Procedure for Update Errors:
If you encounter update errors, a reset procedure can help:
- Open Support Tool: Launch the Xentry Support Tool.
- Navigate to Reset: Go to the “Reset” section.
- Confirm UHD Contact: Check the “I have spoken to the Diagnosis UHD and would like to reset the Xentry Connect” option.
- Create Reset USB: Click “Setting up USB data media.” This creates a small (1.6KB) reset file on a USB stick.
- Initiate Reset: Insert the USB stick into the Xentry Connect (in sleep mode). Press and hold the “Tick (Green)” and “X (Red)” buttons simultaneously.
- Reset Process: The Xentry Connect will perform a reset (indicated as x/15 on the display).
- Update Again: After the reset, attempt the software update process again with the 2020/06 Kit 2.
Display Issues (No Text):
If the display lights up but shows no text, it could indicate various hardware faults, including internal defects, missing display files, or BIOS issues. These problems often require professional repair.
Dust Accumulation and Overheating:
Even without a CPU upgrade, simply removing the back cover and cleaning out accumulated dust can improve cooling and potentially reduce slowdowns caused by thermal throttling.
Optional Software for Xentry Connect
While primarily designed for Xentry, you can optionally install other diagnostic software on the Xentry Connect, such as:
- DAS Standalone
- Vediamo 05.01.01
- WIS 2020.04 (Note: Xentry Connect officially supports WIS only up to 2020.04)
- DTS Monaco 8.16
Conclusion
The Xentry Connect, while a powerful diagnostic tool, can be significantly improved with a relatively simple CPU upgrade. Addressing the slow boot times and overall sluggishness by upgrading to a faster processor like the i7-2640m dramatically enhances the user experience and efficiency of Mercedes-Benz diagnostics. Combined with proper maintenance and troubleshooting knowledge, your Xentry Connect can provide years of reliable service.