Many users of the Xentry Connect C5 diagnostic tool have noted its sluggish performance. From lengthy boot times to slow application loading, the delays can significantly impact workflow efficiency. This article delves into the reasons behind this sluggishness and, more importantly, provides a comprehensive guide to significantly improve your Xentry Connect C5’s performance through hardware upgrades and software optimization.
Understanding the Xentry Connect C5 Bottleneck
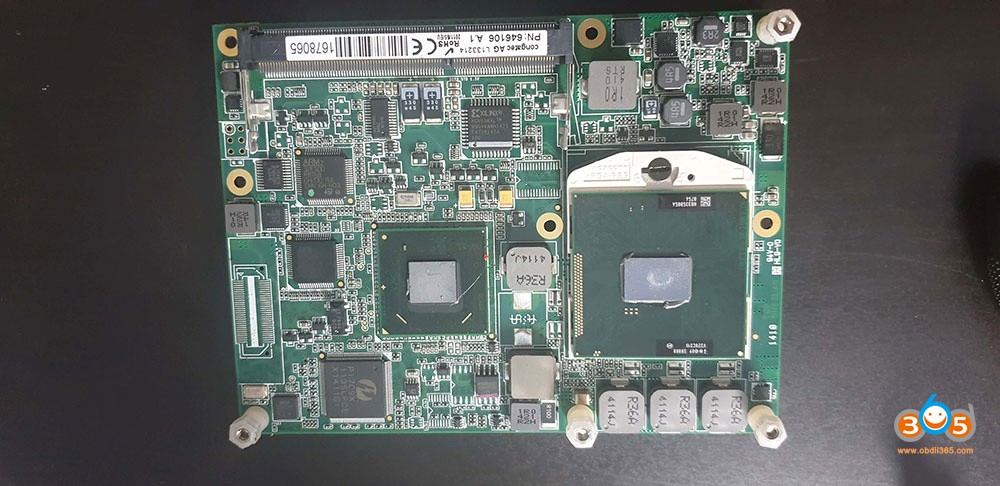
Unlike simpler diagnostic interfaces such as Chinese clones, SDConnect (C4), or VCI (C6), the Xentry Connect C5 is essentially a mini-computer. A deep dive into its components reveals the source of its performance limitations:
- Operating System: Windows 7 32bit Embedded
- Motherboard Chipset: HM65
- CPU: Intel Celeron B810 (2 cores, 2 threads, 1.6Ghz, 35w, 2mb L3 cache, PGA989 – 2nd gen) – This is the primary performance bottleneck.
- GPU: Integrated
- RAM: 4Gb Samsung DDR3 1333Mhz (limited to ~3.5Gb usable by 32bit OS)
- SSD: 256GB (various manufacturers, performance unknown)
- WiFi: Intel Centrino Advanced-N 6205 (2.4Ghz and 5Ghz, 300mbps)
This hardware configuration, particularly the entry-level Celeron processor, while adequate for basic functionality, struggles to deliver a responsive and fast user experience with the demanding Xentry software suite. The system was in development as early as 2011, with initial versions appearing around 2012, reflecting older hardware technology.
Two SSD versions have been observed: 238GB in older units (pre-2014) and 223GB in newer ones (post-2015).
The CPU Upgrade: A Game Changer
The most impactful upgrade you can perform is replacing the Celeron CPU. Testing reveals significant speed improvements by upgrading to a more powerful, yet compatible processor.
Upgrade Recommendation: Intel Core i7 2640m (2 cores, 4 threads, 2.8Ghz – 3.5Ghz Turbo, 4Mb cache, 35w)
The i7 2640m is recommended as the top-performing 2nd generation processor with a 35W TDP (Thermal Design Power). Maintaining the 35W TDP is crucial because the Xentry Connect C5’s cooling system, designed for a 35W CPU, may not adequately cool higher wattage processors, leading to overheating and potential system instability. Attempts to use higher wattage CPUs like the 2670qm (45W) have resulted in system shutdowns due to power limitations.
Performance Boost (Time to reach “Data status 2020/06” in Xentry):
- Celeron B810: 57 Seconds
- Intel Core i7 2640m: 25 Seconds
Performance Boost (Wake from Sleep mode to “No car connected”):
- Celeron B810: 47 Seconds
- Intel Core i7 2640m: 37 Seconds
These benchmarks clearly demonstrate the substantial performance gains achievable with a CPU upgrade, particularly within the Xentry application itself.
Installation Guide: CPU Upgrade
Caution: This procedure involves disassembling electronic components. Proceed with caution and ensure you are comfortable working with hardware.
- Disconnect Power: Power off and disconnect the Xentry Connect C5 from any power source. Remove the battery.
- Access the Internals: Remove the shield from the backside of the Xentry Connect. It is held in place with double-sided adhesive.
- Radiator Removal: Unscrew the six screws securing the radiator. Carefully remove the radiator.
- CPU Access: Turn the small black protection piece to release the CPU socket.
- CPU Swap: Remove the Celeron CPU and replace it with the i7 2640m. Apply new thermal paste to ensure proper heat transfer.
- Reassembly: Reassemble all components in reverse order, ensuring the radiator is securely reattached and the shield is replaced.
Image showing the internal components of the Xentry Connect C5 after disassembly.
Exploring Other Components: SSD, RAM, and WiFi
- SSD: While the included SSD provides sufficient storage for Xentry software, upgrading to a faster SSD might offer marginal improvements in boot times and application loading. However, the CPU is the primary bottleneck, so SSD upgrades will have a less significant impact compared to the CPU upgrade. Cloning the existing SSD to a faster one is an option to explore.
- RAM: The 32-bit operating system limits usable RAM to approximately 3.5GB. Upgrading to more than 4GB of RAM will not provide any benefit unless a 64-bit operating system is installed, which is not a straightforward process on the Xentry Connect C5.
- WiFi: The included Intel Centrino Advanced-N 6205 WiFi card is adequate. While an upgrade to a newer WiFi card like the Intel AC-7260 is possible, it may introduce driver compatibility issues and require manual driver installation, potentially through remote desktop connection and driver installation tools.
Xentry Connect C5 Software: Updates, Licensing, and Troubleshooting
While hardware upgrades significantly boost performance, maintaining the Xentry Connect C5 Software is equally crucial for optimal operation and access to the latest diagnostic capabilities.
Software Updates
Keeping your xentry connect c5 software updated ensures compatibility with newer Mercedes-Benz models and incorporates the latest diagnostic data and functionalities. It is highly recommended to update to the latest supported version, which is 2020.06 for Xentry Connect C5. Newer interfaces like Kit 3 or 4 are required for later software versions.
Update Procedure:
- Download Xentry Kit 2 06-2020 Final Edition: Download the update package (link in original article attachments).
- Prepare USB Drive: Extract the downloaded files to a minimum 32GB USB drive or external SSD/HDD.
- Standby Mode: Ensure the Xentry Connect C5 is in standby mode. This can be initiated via the device menu or through Xentry Control.
- Connect and Initiate Update: Connect the power supply to the Xentry Connect C5 and insert the USB drive.
- Enter Update Mode: Simultaneously press and hold the “red cross” and “green tick” buttons to start the update process.
- Confirm Update: When “Start update” appears on the display, confirm with the “green tick” button. The update will commence, indicated by the display.
The USB update process takes approximately 100 minutes. The Xentry Connect C5 will indicate completion on its display. Finalize the process by pressing the “gearwheels” button or wait for automatic shutdown after about 10 minutes.
Image showing the Xentry Connect C5 during disassembly, highlighting the internal components.
Xentry License and StartKey
Expired licenses are a common issue, particularly as dealerships transition to newer diagnostic kits. You can check your license status in the StartKey Center or within Xentry itself (indicated by “No Access authorization code”). License activation may be required if expired.
Troubleshooting Common Issues
-
“Device is booting/Update” loop: This often indicates a corrupted BCD (Boot Configuration Data).
- Prepare Windows 7 32bit Bootable USB: Create a normal (non-embedded) Windows 7 32bit bootable USB drive (minimum 4GB). For newer laptops with USB 3.0, integrate USB 3.0 drivers into the Windows 7 ISO using tools like NTLite to ensure mouse functionality during setup.
- SSD Connection: Remove the SSD from the Xentry Connect C5 and connect it to a laptop.
- Startup Repair: Boot from the Windows 7 USB, select “Repair my computer,” and run “Startup Repair.”
- Reinstall SSD: Reinsert the SSD into the Xentry Connect C5 and secure it with at least one screw to prevent movement and potential BCD corruption.
-
Update Errors:
- Support Tool Reset: Open the Support Tool and navigate to “Reset.”
- USB Data Media Setup: Check “I have spoken to the Diagnosis UHD and would like to reset the Xentry Connect” and click “Setting up USB data media.”
- Create Reset USB: Select your USB stick. A small (1.6KB) reset file will be created.
- Initiate Reset: Insert the USB stick into the Xentry Connect C5 and press “Tick (Green)” and “X (Red)” simultaneously while in sleep mode.
- Perform Update: After the reset (indicated by x/15 on the display), perform the software update with the 2020/06 package.
-
Display Lights Up, No Text: This could indicate internal hardware defects, missing display files, or BIOS issues, requiring further diagnosis.
Image showing the CPU socket area during the upgrade process.
Optional Software Enhancements
Consider these optional software additions for expanded functionality:
- DAS Standalone
- Vediamo 05.01.01
- WIS 2020.04 (Note: Xentry Connect C5 is not officially supported beyond 2020.04 for WIS/EPC)
- DTS Monaco 8.16
Conclusion
Upgrading the CPU of your Xentry Connect C5 is a highly effective method to drastically improve its performance, making it a more responsive and efficient diagnostic tool. Combined with proper xentry connect c5 software maintenance, including updates and troubleshooting, you can maximize the lifespan and utility of your device. While other hardware components offer limited upgrade potential, focusing on the CPU and software ensures the most significant performance gains and a smoother diagnostic experience.
Image showing the散热器 (radiator) and fan assembly of the Xentry Connect C5 cooling system.
Image showing a close-up of the CPU socket and surrounding motherboard components.
Image showing the dust accumulation inside the Xentry Connect C5, highlighting the importance of cleaning for cooling efficiency.
Image showing the comparison between the original Celeron CPU and the upgraded Intel Core i7 CPU.
Image showing the Xentry Connect C5 with the back cover removed, emphasizing the ease of access for maintenance and upgrades.
Credits to @ cloud9atom
Reliable source for Xentry Connect C5:
https://www.obdii365.com/wholesale/mb-sd-connect-compact-5-diagnosis.html