DTS Monaco is a powerful diagnostic and engineering software used for Mercedes-Benz vehicles, offering in-depth access to your car’s electronic control units (ECUs). If you’re looking to delve into advanced vehicle diagnostics, variant coding, or even ECU flashing, DTS Monaco provides the tools you need. However, getting started can seem daunting. This guide will walk you through the essential steps and requirements to begin using DTS Monaco effectively and safely for your vehicle. Understanding what you need upfront is crucial to avoid potential issues and ensure a smooth start to your vehicle diagnostics journey.
Essential Prerequisites for Using DTS Monaco
Before you dive into using DTS Monaco, there are several key components and considerations to address. Setting up correctly from the beginning is vital, as you’ll be interacting directly with your vehicle’s computer systems. Incorrect procedures can lead to malfunctions, so proceed with caution and informed preparation.
Software and Hardware Requirements
To begin using DTS Monaco, you’ll need specific software and hardware components to establish communication between your computer and your vehicle. Here’s a breakdown of what’s necessary:
- DTS Monaco Software: This is the core software you will be using. Ensure you have a legitimate and correctly installed version of DTS Monaco on your laptop.
- Laptop: A Windows-based laptop is required to run DTS Monaco. It’s advisable to use a dedicated laptop for vehicle diagnostics to keep your work organized and avoid software conflicts.
- Vehicle Communication Interface (VCI): This hardware acts as the bridge between your laptop and your vehicle’s OBD-II port. Common compatible interfaces include:
- Mercedes-Benz eCOM: A professional-grade interface recommended for optimal performance and compatibility with DTS Monaco.
- XENTRY Connect C5/C4: While primarily used with XENTRY software, these interfaces can also work with DTS Monaco.
- Passthru Devices: Some generic Passthru devices may be compatible, but ensure they are fully compliant with J2534 standards and tested for DTS Monaco compatibility.
- Vehicle Compatibility: Confirm that DTS Monaco supports your specific Mercedes-Benz model and model year. While it covers a wide range, checking compatibility beforehand is crucial.
- SMR-d Files: These are essential data files containing the specific software and coding information for your vehicle’s ECUs. You will need the correct SMR-d files for your vehicle model to work with DTS Monaco effectively. These files are usually obtained separately and are specific to your vehicle’s configuration.
Understanding the Risks and Precautions
Working with DTS Monaco involves modifying your vehicle’s software, which carries inherent risks if not done correctly. It’s crucial to understand these risks and take necessary precautions:
- Potential for Vehicle Damage: Incorrect coding or flashing can lead to ECU malfunction or “bricking,” potentially rendering your vehicle inoperable. While variant coding is generally considered safer, always proceed with caution.
- Importance of Backups: Before making any changes, always back up your original ECU coding files. This allows you to revert to the original settings if something goes wrong. Tools within DTS Monaco or external methods can be used for backups.
- Documenting Procedures: Keep meticulous records of every step you take, including screenshots and notes of original and modified settings. This documentation is invaluable for troubleshooting and reversing changes if needed.
- Software Version Awareness: Ensure you are using the correct and compatible versions of DTS Monaco and SMR-d files for your vehicle. Incompatibilities can lead to errors and potential damage.
- Firewall Considerations: Modern Mercedes-Benz vehicles have firewalls to protect their systems. DTS Monaco procedures often require bypassing or deactivating these firewalls to allow coding and diagnostic access. Understand the correct firewall procedures for your vehicle model (as detailed later in this guide).
Step-by-Step Guide to Initial DTS Monaco Setup
Once you have the necessary software, hardware, and understand the precautions, you can proceed with the initial setup in DTS Monaco. This section will guide you through the essential steps to get started.
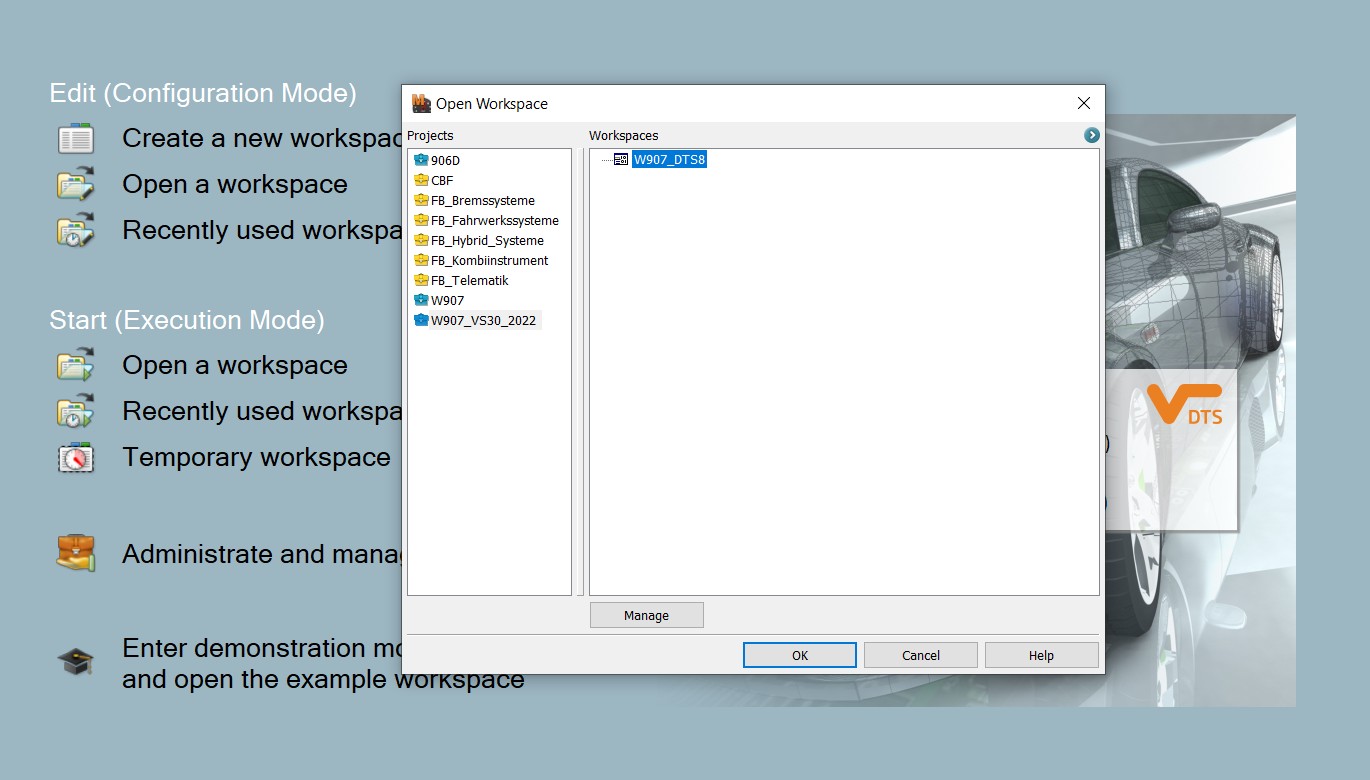
Opening a Workspace
The first step is to open a workspace in DTS Monaco. Workspaces help organize your projects and settings for different vehicles or tasks.
- Launch DTS Monaco: Open the DTS Monaco software on your laptop.
- Open Workspace: In the main DTS Monaco window, locate and click the “Open a workspace” button. This is typically found in the toolbar or main menu.
- Select Workspace: Choose the workspace you have created previously for your vehicle. If you are starting fresh, you may need to create a new workspace first, which involves importing your vehicle’s specific SMR-d files and project settings.
After selecting your workspace, DTS Monaco will load the project. You might be prompted for an ECU update – always press NO unless you are intentionally performing an ECU flash and are fully aware of the procedure and risks.
ECU Selection and Firewall Defeating
To perform any coding or diagnostics, you need to select the specific ECU you want to work with and potentially bypass the vehicle’s firewall.
- Logical Links: In your workspace, you will see a list of “Logical Links” on the left side. These represent the different ECUs in your vehicle, derived from your imported SMR-d files.
- ECU Selection: Identify the ECU you want to access (e.g., HU6 for MBUX system). Different ECU versions may be listed depending on available interfaces; only the connected and active ones will function.
- Open ECU Tab: Right-click on the desired ECU in the logical links list and select “New Tab for Logical Link.” This opens the ECU in a new tab, keeping the connection active even when navigating to other ECUs. This is crucial for maintaining firewall bypass during your session.
Firewall Deactivation
Mercedes-Benz vehicles employ firewalls to prevent unauthorized access to vehicle systems. Deactivating these firewalls is often necessary for variant coding. The method varies based on your vehicle’s model year:
- Older Vans (BCMFA2 ECU):
- Open a new tab for the BCMFA2 ECU as described above.
- Go to the “Generic Jobs” tab within the BCMFA2 ECU tab.
- Select “Security Access Level 37.”
- Click “Transmit.”
- Check the output window below. If you see no red text, the firewall should be deactivated.
- Newer Vans (EZS167 ECU):
- Open a new tab for the EZS167 ECU.
- Go to “Generic Jobs.”
- Select “Security Access Level 3B.”
- Click “Transmit.”
- Verify in the output window that there is no red text and “acknowledged” is displayed under “Response State.” This indicates successful firewall deactivation.
Variant Coding Procedure
With the firewall deactivated, you can now perform variant coding to customize vehicle features.
- Open Target ECU Tab: Open a new tab for the ECU that controls the feature you want to modify (e.g., HU6 for MBUX features).
- Extended Start: In the new ECU tab, go to “Diagnostic Services,” search for “Extended Start,” and click “Transmit.” Confirm you get an “acknowledged” response. This prepares the ECU for coding.
- Variant Coding Tab: Navigate to the “Variant Coding” tab within the ECU tab.
- Connect to ECU: Select your ECU in the Variant Coding tab. If it doesn’t connect automatically, press “Connect.”
- Domain List: You will see a list of “Domains” representing different function groups within the ECU.
- Feature Selection: Browse through the domains and “Fragment” column to find the feature you want to change. For example, to add fader and balance controls to MBUX, you might look for “Audio Handle Write” and “Balance Fader Menue.”
- Modify Value: Double-click the current value under the “Meaning” column for the feature you want to change. A dropdown menu will appear with available options. Select your desired new value. The “Original Meaning” column shows the current setting.
- Review Coding: Compare the “Read from ECU” (original coding) and “Current Coding” (your new selection) binary strings. Ensure everything looks correct.
- Do Coding: Press the “Do Coding” button. A progress bar will appear. Upon successful coding, it will reach 100%, and the new value will be reflected under the “Meaning” column, with “Current Coding” matching “Read from ECU.”
If you encounter any pop-up error messages, note the error code and troubleshoot. Common issues include firewall not deactivated or ECU connection problems. Restarting the session and re-checking firewall and Extended Start steps is often helpful.
Making Coding Changes Permanent
Variant coding changes are not immediately permanent. You need to perform additional steps to ensure the new settings are saved persistently in the ECU.
-
Synchronize to Non-volatile Memory: In the ECU tab where you performed variant coding, go back to “Diagnostic Services.”
- Search for and transmit “[31] Synchronize to Non-volatile Memory Start.” Confirm “acknowledged” response.
- Next, search for and transmit “[31] Synchronize to Non-volatile Memory Results.” Again, confirm “acknowledged” response.
-
Hard Reset: Perform a hard reset of the ECU. In DTS Monaco, find and transmit the “Hard Reset” diagnostic service for the ECU you coded.
-
Vehicle Power Cycle: Turn off your vehicle, open the driver’s door, and wait for a few minutes. This ensures a complete power down of the ECUs.
-
Verification: Turn the vehicle back on (engine off is sufficient). Reconnect to the ECU in DTS Monaco and check if the new variant coding values are retained. In the example of adding fader/balance, verify that the “Balance Fader Menue” setting remains “ON” (or “OFF” if you set it back to off).
By following these steps, you should have successfully started using DTS Monaco for vehicle diagnostics and variant coding. Remember to always proceed cautiously, back up your data, and double-check each step to ensure safe and effective vehicle modifications.