For automotive professionals working with Mercedes-Benz vehicles, Xentry PassThru is essential diagnostic software. However, setting it up to support newer models (Euro 5/6, W205, W213, W222 and beyond) on a 64-bit Windows 10 system using a VAS5054 diagnostic interface can present challenges. This guide provides a detailed walkthrough to successfully configure your Vas5054 Xentry PassThru setup on Windows 10 x64, ensuring compatibility and optimal performance for advanced Mercedes-Benz diagnostics.
What You Need for VAS5054 Xentry PassThru Setup
Before you begin, ensure you have the following components readily available:
- VAS5054A Bluetooth Hardware: Whether you opt for a genuine unit or a reliable clone, the VAS5054A interface is crucial.
- (Optional) VAS5054A EDIC_PDU_API Driver Installation File (version 1.20.4x): This driver package can be beneficial for ensuring all necessary dependencies are in place.
- (Optional) Updated Firmware: Firmware version 1.20.41 (included in some packages) is recommended for enhanced compatibility, potentially offering improvements over version 1.20.42.
- Softing_VAS5054A_PassThru_Driver_x64_v3.zip: This critical driver package is specifically designed for 64-bit systems and enables VAS5054 PassThru functionality.
- 64-bit Windows 10 Operating System: This guide is tailored for Windows 10 x64 environments.
- (Optional) DC 12V Power Adapter & Jumper Wires: For bench testing, a 12V DC power adapter and jumper wires can provide temporary power to the VAS5054A interface.
Pre-Installation Steps for VAS5054 Xentry
Prior to installing the VAS5054 PassThru drivers, complete these preparatory steps:
- Install Xentry PassThru and Apply Patches: Ensure your Xentry PassThru software is installed and updated with any necessary patches according to your software provider’s instructions.
- (Optional) Install EDIC_PDU_API 1_20_42 (or 1_20_41) Driver: If performing a clean installation on a fresh Windows 10 system, installing the EDIC_PDU driver first can streamline the process. This step helps install essential prerequisites like .NET Framework and Visual C++ redistributables. Note that some files installed in this step might be overwritten during the subsequent manual installation.
Step-by-Step VAS5054 PassThru Driver Installation
Follow these instructions carefully to install the VAS5054 PassThru drivers:
- Copy Softing Files: Navigate to the downloaded “Softing_VAS5054A_PassThru_Driver_x64_v3.zip” package. Copy the “Softing” folder from “Program Files (x86)Softing” to your local drive’s “Program Files (x86)” directory (typically `C:Program Files (x86)Softing`).
- Copy D-PDU API Data: Copy the “D-PDU API” folder from the downloaded package’s “Program Data” directory to your local “Program Data” directory (typically
C:\Program Data\D-PDU API). Ensure you show hidden folders to access Program Data. - Import Registry Settings: Double-click the “Softing_VAS5054A_PassThru_1_20_042.reg” file and allow it to merge into your Windows Registry. This step configures essential system settings for the VAS5054 PassThru driver.
- Create SftngCM Shortcut: Create a shortcut to “SftngCM.exe,” located in “C:Program Files (x86)SoftingEdicDriverSftngCM.exe,” and place it on your Desktop for easy access.
- Install Device Driver: Right-click on “C:Program Files (x86)SoftingEdicDriverwin7softingedic7_ntamd64.inf” and select “Install.” This action installs the core device driver for the VAS5054A interface.
- Connect VAS5054A Hardware: Connect your VAS5054A hardware to your computer using a USB cable. For initial setup and testing outside of a vehicle, connect it to a temporary 12V DC power source or the OBD-II port of a vehicle.
- Verify Driver Installation: Open “Device Manager” in Control Panel and check under “Softing” devices. If the driver is not installed correctly, manually update the driver by pointing to the “softingedic7_ntamd64.inf” file.
- Create EDICConfig Shortcut: Create a shortcut to “EDICConfig.exe,” located in “C:Program Files (x86)SoftingEdicDriverEDICConfig.exe,” and place it on your Desktop.
- (Optional) Install Newer API Driver (Genuine VAS5054A & Newer API): If you possess a genuine VAS5054A interface and a more recent EDIC_PDU_API driver version than 1.20.42, you can install the newer API driver at this point.
 VAS5054A Windows 10 Setup
Alt text: VAS5054A connection status verification in Windows 10 Device Manager after driver installation, showing Softing device recognition.
Post-Installation Verification for VAS5054 Xentry
After completing the installation steps, verify the setup:
- Power the VAS 5054a: Ensure the VAS5054A is powered either via a 12V DC adapter or connected to a vehicle’s OBD-II port.
- Run SftngCM.exe as Administrator: Execute “SftngCM.exe” from your Desktop shortcut with administrator privileges. Create a “Temp” folder directly under your C: drive (C:Temp) if it doesn’t exist. This folder is used for log files, and its absence can cause errors in SftngCM.exe.
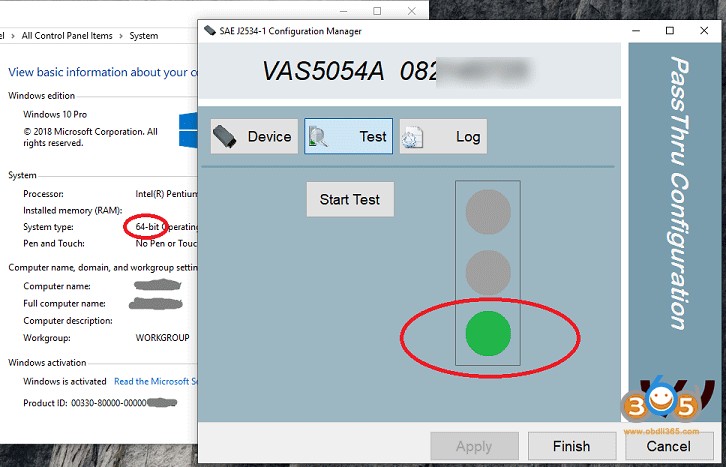
- Select VAS5054A and Enter Serial Number: In SftngCM.exe, choose “VAS5054A” and input the serial number of your device (often starting with “0821xxxxx”).
- Start Connection Test: Select “Test” and click “Start Test.” Observe the indicator dots:
- RED dot: Indicates no communication between your PC and the VAS5054A, suggesting a driver issue.
- YELLOW dot: Shows successful communication between your PC and the VAS5054A interface.
- GREEN dot: Confirms communication between your PC, VAS5054A, and the vehicle (if connected).
Helpful Tips for VAS5054 Xentry PassThru
- .NET Framework 3.5: If not automatically installed, ensure “.NET Framework 3.5 (includes .NET 2.0 and 3.0)” is enabled in “Control Panel/Programs and Features/Turn Windows features on or off.”
- Visual C++ Redistributables: Install necessary Visual C++ Redistributables if you encounter errors related to missing DLL files (e.g., MSVCR100.dll, mfc100.dll).
- Temporary Power for Testing: For bench testing, connect Ground to pin 4 or 5 and 12V DC to pin 16 on the VAS5054A connector.
- Upgrade EDICDriver: Newer versions of EDICDriver can be updated by replacing files in “Program Files (x86)SoftingEDICDriver” and manually updating the device driver in Device Manager.
- Registry Editing for Newer API Versions: If using a newer EDIC_PDU_API driver version than 1.20.42, edit the *.reg file, replacing “1_20_042” with your API version number (e.g., “EDIC_D_PDU_API_1_20_0XX”). Re-run the .reg file.
- Serial Number Modification: If SftngCM.exe doesn’t allow serial number changes, edit the *.reg file with a text editor, modify the serial number, and re-run the .reg file.
Download VAS5054 PassThru Driver
Download the necessary Softing_VAS5054A_PassThru_Driver_x64_v3.zip package via the link below:
Download Softing_VAS5054A_PassThru_Driver_x64_v3.zip
Disclaimer: This guide is provided for informational and testing purposes only. Implement these steps at your own risk. Incorrect configuration may lead to software or hardware issues. Always back up your system before making significant changes.