For Mercedes-Benz owners and automotive technicians, the MB Star Diagnostic system is an indispensable tool for comprehensive vehicle diagnostics and repair. Among the popular options, the MB Star C3 multiplexer, working in conjunction with Xentry and DAS (Diagnostic Assistance System) software, provides in-depth access to Mercedes-Benz vehicles. This powerful combination allows you to perform a wide range of functions, from reading and clearing fault codes to complex programming and module adaptations. However, activating the software often requires a Mb Star C3 Xentry Keygen, and the process can sometimes be confusing.
This guide provides a detailed, step-by-step walkthrough on how to activate your Super Star C3 diagnostic system with DAS and Xentry software, ensuring you can unlock the full potential of your Mercedes-Benz diagnostic capabilities.
Understanding MB Star C3, Xentry, and Keygen
Before diving into the activation process, let’s clarify what each component is and why a MB Star C3 Xentry keygen is necessary.
-
MB Star C3: This is the hardware multiplexer, the interface that connects your computer to the Mercedes-Benz vehicle’s diagnostic port. It facilitates communication between the diagnostic software and the car’s electronic control units (ECUs).
-
Xentry: Xentry is the comprehensive diagnostic software used for newer Mercedes-Benz models. It’s a successor to DAS and offers advanced diagnostic and programming functionalities.
-
DAS (Diagnostic Assistance System): DAS is the diagnostic software primarily used for older Mercedes-Benz vehicles. It provides a wide array of diagnostic capabilities, including fault code reading, live data streaming, and actuation tests.
-
Keygen (Key Generator): Due to software licensing and security measures, Xentry and DAS typically require activation keys. A MB Star C3 Xentry keygen is a utility designed to generate these license keys, enabling you to activate the software and use it with your MB Star C3 device.
Step-by-Step Activation Guide for MB Star C3 Xentry
The following steps outline the activation process for Super Star C3 diagnostic system, encompassing both DAS and Xentry software.
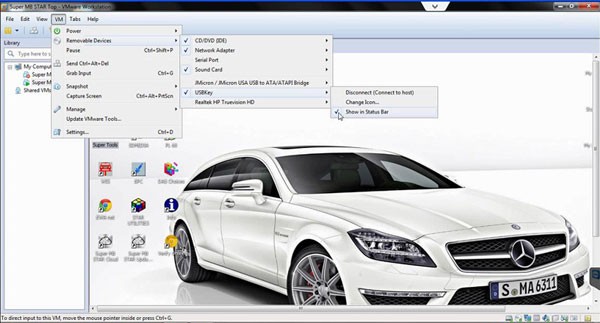
Step 1: Launching DAS and Xentry on VMware
Begin by running your Super Star C3 DAS and Xentry software within a VMware virtual machine environment. This is a common setup for these diagnostic tools to ensure compatibility and system stability.
Navigate to the VMware menu, select “VM,” then “Removable Devices,” and find “USBkey.” Click on “Show in Status Bar” to ensure the USB key (often containing license information or acting as a security dongle) is recognized by the virtual machine.
Step 2: Accessing Xentry Developer Tool
Locate the “Super Tools” folder, usually found in your local disk C://. Within this folder, open the “Xentry Developer” application. This tool is crucial for generating the necessary license keys.
Step 3: Generating License String using StartKey Center
Within “Super Tools,” open the “STAR Utilities” folder and then launch “StartKey Center.” This utility will display essential device data, including HW ID (Hardware ID), App ID (Application ID), and LAN-ID (Local Area Network ID). Note down the HW ID.
Next, open “Xentry Developer V1.1.0.” In the Xentry Developer interface, enter the HW ID you just noted into the “hardware ID” field. Set the “Start Date” to 20140101 and the “Expiration Date” to 20200101. Click “Generate” to create the License String. Copy this generated License String. This string acts as your MB Star C3 Xentry keygen output for the Xentry software.
Step 4: Applying the License String in StarKeys
Click the “StarKeys” button within the Xentry Developer tool. Paste the License String you copied in the previous step into the blank field provided. Click “Save” to apply the license settings.
Step 5: Confirmation of StartKey Saving
A confirmation message “StartKey Saved successfully” will appear. Click “OK” to proceed. This confirms that the Xentry license key has been successfully applied.
Step 6: Launching EWA Software
Open the EWA software. EWA (Elektronisches Werkstatt-Informationssystem) is Mercedes-Benz’s electronic parts catalog and workshop information system. Log in using the default username “admin” and password (often “admin” or “12345,” but refer to your software documentation for the correct default password).
Step 7: Copying the MAC Address (LAN-ID)
Within the EWA software, locate and copy the current MAC address, also referred to as LAN-ID. This is a unique identifier for your network adapter and is needed for generating the EPCnet and WISnet keys.
Step 8: Generating EPCnet and WISnet Keys with HP-WVA keygen
Go back to the “Super Tools” folder and open “HP-WVA keygen.” Paste the MAC address (LAN-ID) you just copied into the “ID” field. Set the “Expiration date” to 01/01/2020. Click “Generate” to create the EPCnet and WISnet keys. These keys are essential for accessing the electronic parts catalog (EPC) and workshop information system (WIS) within EWA.
Step 9 & 10: Applying EPCnet and WISnet Keys in EWA
Copy the generated EPCnet key and paste it into the “EPC StartKey” field within the EWA software. Similarly, copy the WISnet key and paste it into the “WIS/ASRA StartKey” field. These fields are usually located in the EWA administration or settings section, often accessible through a “StartKeys” or “License” menu.
Step 11: Completing Authorization and Saving Settings
The system will indicate that access authorization is complete. Click “Save” to store all the settings you have configured.
Congratulations! You have successfully activated your Super Star C3 diagnostic DAS and Xentry software using the MB Star C3 Xentry keygen process. You can now proceed to use your MB Star C3 tool for comprehensive Mercedes-Benz diagnostics, coding, and programming.
By following these steps, you can effectively activate your MB Star C3 Xentry system and gain full diagnostic capabilities for Mercedes-Benz vehicles. Remember to always use reliable sources for your software and keygen tools to ensure system security and proper functionality.