For users of diagnostic tools like Xentry and DAS, encountering a Chinese language interface can be a significant hurdle, especially when troubleshooting complex automotive issues. Navigating menus and understanding diagnostic information becomes unnecessarily complicated. Fortunately, switching Xentry from Chinese to English is usually a straightforward process, allowing you to work more efficiently and accurately. This guide provides several methods to change the language settings, ensuring your Xentry diagnostic software is user-friendly for English speakers.
Method 1: Changing Language within Xentry Software
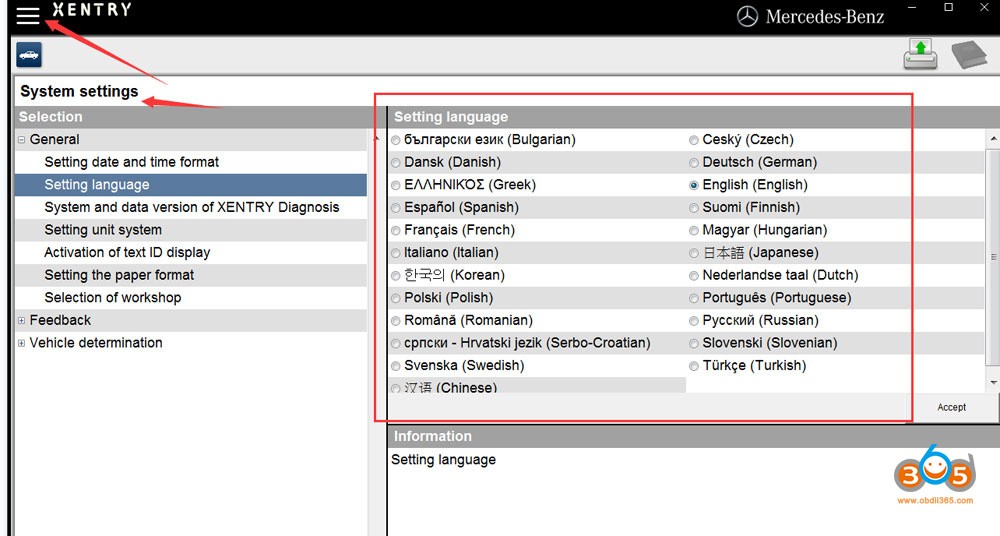
The most direct approach to changing the language in Xentry is through the software’s settings menu itself. While the exact menu names might appear in Chinese, the icons are generally consistent, and you can navigate by following a logical flow for settings adjustments.
- Open Xentry: Launch the Xentry diagnostic software on your Windows system.
- Navigate to Settings/Options: Look for a gear icon or a menu option that typically represents “Settings” or “Options.” This is usually located in the top menu bar of the Xentry interface.
- Language Settings: Within the settings menu, search for an option related to “Language.” It might be represented by a globe icon or text that includes characters related to language.
- Select English: A dropdown menu or a list of languages should appear. Scroll through the options and select “English” or “EN.”
- Confirm and Restart: After selecting English, confirm your choice by clicking “OK” or “Apply.” You may be prompted to restart Xentry for the language change to take effect fully. Close and reopen Xentry to verify the interface is now in English.
While this method is often the simplest, it relies on the language options being accessible within the Xentry software itself. If the initial installation was heavily configured for Chinese, or if this option is not readily available, you may need to explore alternative methods.
Method 2: Modifying Registry Settings for Xentry Language
If changing the language within the Xentry software is not possible or effective, directly editing the Windows Registry can force the language change. This method is particularly useful when dealing with pre-installed Xentry virtual machines or installations where the initial language selection was Chinese.
Caution: Modifying the Windows Registry incorrectly can cause system instability. Follow these steps carefully and ensure you back up your registry before making any changes.
- Open Registry Editor: Press
Windows Key + Rto open the Run dialog box. Typeregeditand press Enter to open the Registry Editor. - Navigate to Mercedes-Benz Settings: In the Registry Editor, navigate through the folder hierarchy on the left-hand side to locate the following path:
HKEY_LOCAL_MACHINESOFTWAREWOW6432NodeMercedes-BenzSettings. - Modify “Language” Key: Look for a key named “Language” within the “Settings” folder. It is likely a binary value. Right-click on “Language” and select “Modify.”
- Change Value to “EN”: In the “Value data” field, change the existing value to
EN. This sets the language code to English. - Navigate to Installation Framework: Next, navigate to the following path in the Registry Editor:
HKEY_LOCAL_MACHINESOFTWAREWOW6432NodeMercedes-BenzInstallation Framework. - Modify “DAI_Language” Key: Similar to step 3, look for the key named “DAI_Language.” Right-click on “DAI_Language” and select “Modify.”
- Change Value to “EN”: In the “Value data” field, change the value to
ENto ensure consistency with the “Language” setting. - Close Registry Editor and Reboot: Close the Registry Editor and restart your computer. This reboot ensures that the registry changes are applied system-wide, affecting Xentry and related components like SD Connect, ConfigAssist, and AddOn Center.
After rebooting, launch Xentry again. The interface should now be displayed in English. This registry modification method generally provides a more robust solution for changing the language across the entire Xentry suite.
 Registry Editor showing the Language key under Mercedes-Benz Settings, highlighting the modification of the value to EN for English language setting in Xentry.
Method 3: Adjusting System Locale to English (If Necessary)
In some cases, particularly with older versions or specific configurations, Xentry might rely on the system locale settings of Windows. If the above methods do not fully resolve the language issue, ensuring your system locale is set to English can be a final step.
- Open Control Panel: Search for “Control Panel” in the Windows search bar and open it.
- Change Region Settings: In the Control Panel, find and click on “Region” or “Region and Language.”
- Go to “Administrative” Tab: In the Region settings window, navigate to the “Administrative” tab.
- Change System Locale: Under the “Language for non-Unicode programs” section, click on “Change system locale…”
- Select English (United States): In the “Region Setting” dialog, choose “English (United States)” from the dropdown menu.
- Restart Your Computer: Click “OK” to save the changes and restart your computer.
Changing the system locale to English ensures that all non-Unicode applications, which might include older parts of Xentry, are forced to use English as the default language. This is generally a less common requirement for newer Xentry versions but can be helpful in specific scenarios.
By following these methods, you should be able to successfully switch your Xentry diagnostic software from Chinese to English, making it much more accessible and efficient for your automotive diagnostic work. If you continue to experience language issues or have other problems with your Xentry setup, consider reaching out to specialized support for further assistance.