For automotive diagnostic professionals relying on the Mercedes-Benz Xentry system, the C5 Xentry Connect multiplexer is a crucial piece of hardware. While robust and feature-rich, users often note that the C5 Xentry Connect can be slower than desired, particularly in boot-up times and program loading speeds. This article, brought to you by the experts at xentryportal.store, delves into the architecture of the C5 Xentry Connect and provides a detailed guide to significantly enhance its performance through hardware upgrades, focusing on the pivotal CPU upgrade.
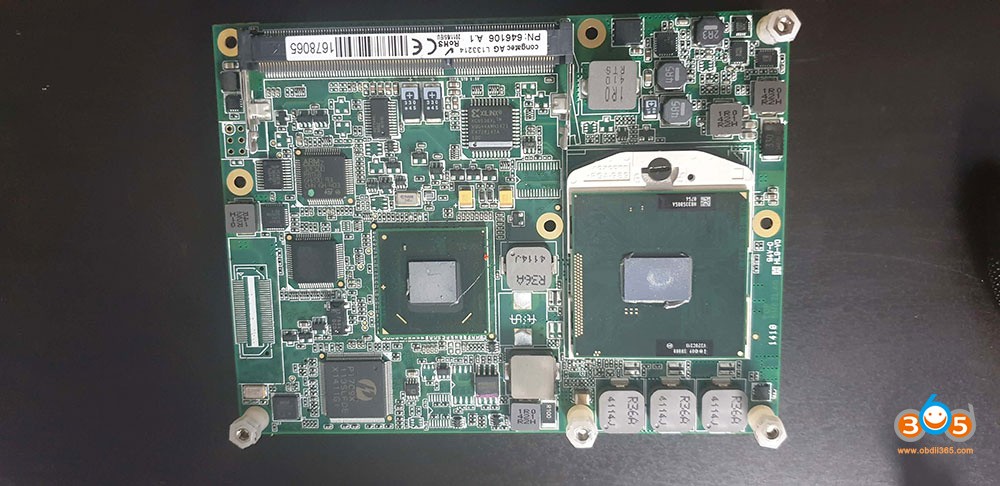
The original C5 Xentry Connect device, despite its capabilities, is essentially a compact computer designed for vehicle diagnostics. Upon disassembling the unit, we can identify its core components, revealing areas ripe for improvement. The internal architecture includes:
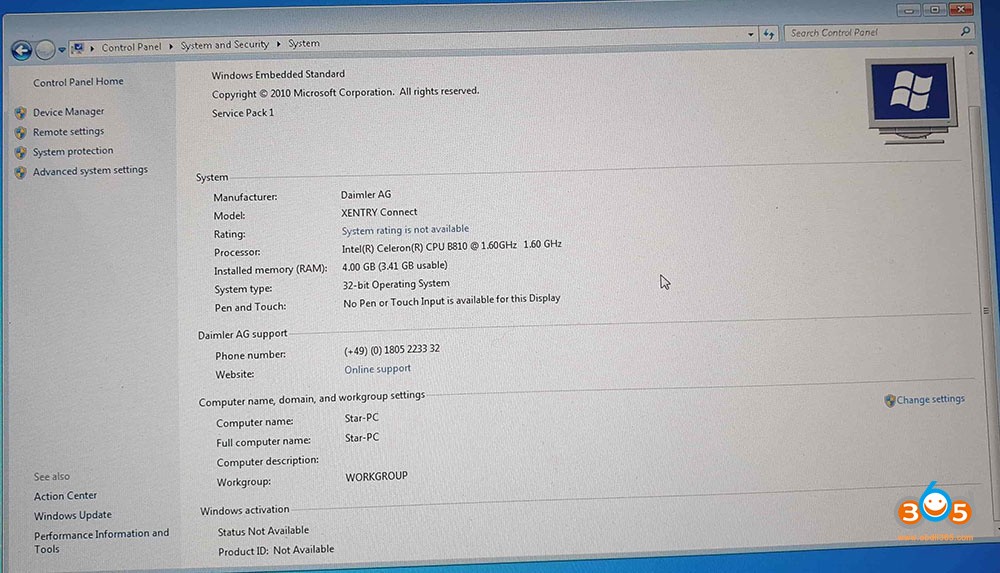
- Operating System: Windows 7 32bit Embedded – This older OS inherently limits RAM usage and can contribute to slower performance.
- Motherboard Chipset: HM65 – A mobile chipset from Intel.
- CPU: Intel Celeron B810 (2 cores, 2 threads, 1.6GHz, 35W, 2MB L3 cache, PGA989 socket) – This is identified as the primary bottleneck. A budget processor not optimized for demanding tasks.
- GPU: Integrated Graphics – Standard for this type of embedded system.
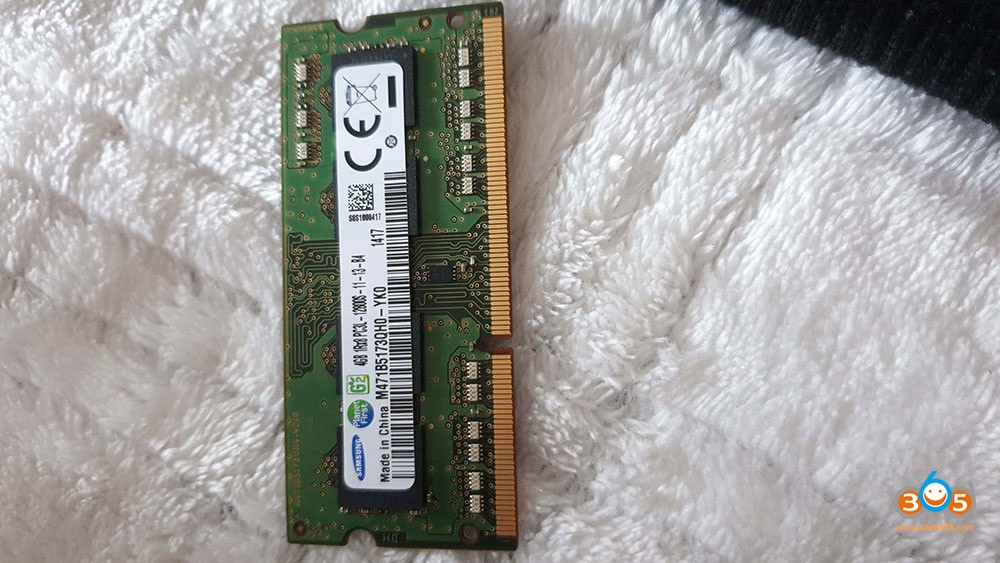
- RAM: 4GB Samsung DDR3 1333MHz – While sufficient for a 32-bit system, the OS limitation caps usable RAM to approximately 3.5GB.
- SSD: 256GB Xmore SSD – While 256GB offers ample storage for diagnostic software, the performance of this unbranded SSD is unknown and potentially a point of improvement.
- WiFi: Intel Centrino Advanced-N 6205 (2.4GHz and 5GHz, 300Mbps, PCIe Half MiniCard) – Adequate for wireless connectivity but not the latest standard.
This hardware configuration reveals that the C5 Xentry Connect, while functional, utilizes older, lower-performance components, particularly the Celeron CPU. The device’s design dates back to at least 2011, with initial versions appearing around 2012, explaining the use of 2nd generation Intel technology.
The Performance Bottleneck: Upgrading the CPU of your C5 Xentry Connect
The most impactful upgrade for your C5 Xentry Connect is undoubtedly replacing the Celeron CPU. Our tests demonstrate significant speed improvements by upgrading to a more powerful, yet compatible processor.
We upgraded the Celeron B810 to an Intel Core i7 2640m (2 cores, 4 threads, 2.8GHz base, 3.5GHz Turbo, 4MB cache, 35W). The i7 2640m is a 2nd generation processor with a similar 35W TDP (Thermal Design Power) to the original Celeron, ensuring thermal compatibility within the C5 Xentry Connect‘s cooling system.
Performance Gains Demonstrated:
| Test | Celeron B810 | Intel Core i7 2640m | Improvement |
|---|---|---|---|
| Xentry Program Start to Data Status | 57 Seconds | 25 Seconds | 56% Faster |
| Sleep Mode to “No car connected” | 47 Seconds | 37 Seconds | 21% Faster |
These benchmarks clearly illustrate the dramatic performance increase achievable with a CPU upgrade. The Xentry software operates significantly faster, leading to a more efficient diagnostic process.
Why the i7 2640m?
The i7 2640m was chosen as the optimal upgrade due to:
- 2nd Generation Compatibility: It is compatible with the HM65 chipset and PGA989 socket of the C5 Xentry Connect motherboard.
- 35W TDP: Crucially, it maintains the same 35W TDP as the original Celeron. Higher TDP processors generate more heat, potentially overwhelming the C5 Xentry Connect‘s cooling system, which consists of a small heatsink and two small fans similar to those found in laptops.
- Performance Boost: It offers a substantial performance leap with higher clock speeds and more cache, without exceeding the thermal and power limits of the device.
Attempts to install higher TDP processors, such as the 45W Intel Core i7 2670qm (4 cores, 8 threads), resulted in system shutdown due to insufficient power delivery from the motherboard, not overheating. Therefore, sticking to 35W TDP processors with 2 cores/4 threads is highly recommended for stability and optimal performance. While 3rd generation Intel processors also use the PGA-989 socket, they are not compatible with the HM65 chipset.
Step-by-Step CPU Installation Guide for C5 Xentry Connect
Caution: This upgrade requires disassembling your C5 Xentry Connect and working with sensitive electronic components. Proceed at your own risk. Ensure the device is powered off and disconnected.
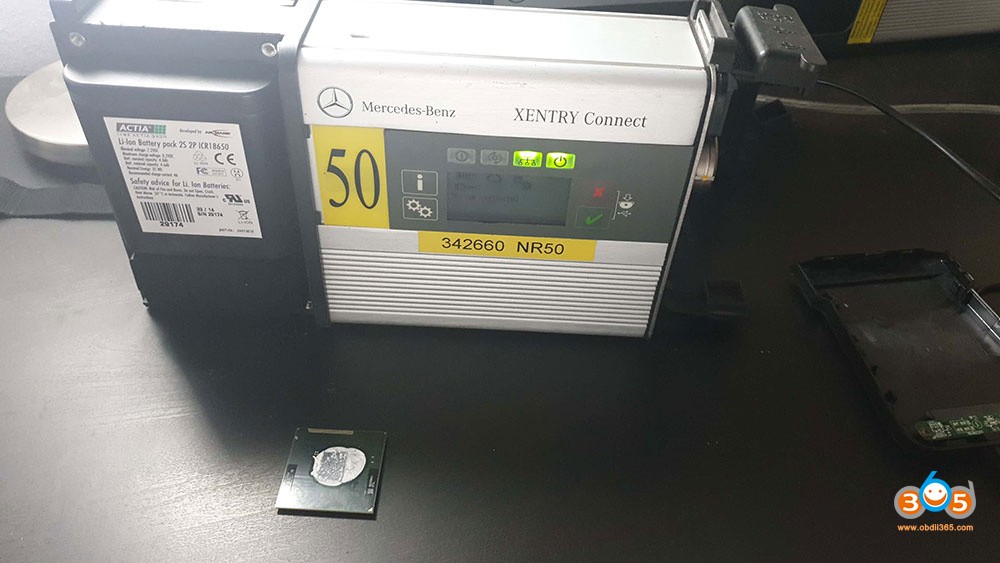
- Battery Removal: Begin by removing the battery from the C5 Xentry Connect.
- Back Shield Removal: Carefully detach the shield on the backside of the C5 Xentry Connect. It is held in place with double-sided adhesive.
- Heatsink Screw Removal: Unscrew the six screws securing the heatsink to the motherboard.
- Heatsink Removal: Gently remove the heatsink, exposing the CPU socket.
- CPU Socket Lever: Turn the small black lever on the CPU socket to release the original Celeron CPU.
- CPU Replacement: Remove the Celeron CPU and install the i7 2640m processor. Apply new thermal paste to the CPU for optimal heat transfer.
- Reassembly: Reinstall the heatsink, tighten the screws, reattach the back shield, and reinstall the battery.
Other Potential C5 Xentry Connect Upgrades
While the CPU upgrade delivers the most significant performance boost, other components can be considered for optimization:
- SSD: The 256GB SSD provides sufficient storage. Upgrading to a faster SSD might yield marginal improvements in boot times and application loading, but the impact is less pronounced than the CPU upgrade. Cloning the original SSD to a reputable brand SSD could be explored for reliability.
- RAM: Given the 32-bit Windows 7 Embedded OS, the usable RAM is limited to around 3.5GB. Upgrading beyond 4GB RAM is not beneficial unless a 64-bit operating system is installed, which is a more complex undertaking.
- WiFi: The Intel Centrino Advanced-N 6205 is adequate for most diagnostic tasks. Upgrading to a newer WiFi card, like an Intel AC-7260, is possible but may require driver modifications and might not offer substantial real-world benefits for diagnostic use. Some users have reported driver issues with the AC-7260 in this context. Using driver booster software via remote desktop can help manage driver installations. The C5 Xentry Connect supports USB 2.0, 3.0, and 3.1 for external peripherals if needed.
Software Updates and Configuration for C5 Xentry Connect
Keeping your C5 Xentry Connect software up-to-date is crucial for compatibility and accessing the latest diagnostic features.
Software Components:
- Xentry Tab (Part of Xentry Kit 2): This software resides on your diagnostic laptop and interfaces with the C5 Xentry Connect. It can be installed separately or from the complete Xentry Kit 2 package.
- Xentry Connect (Part of Xentry Kit 2): This is the firmware for the C5 Xentry Connect device itself.
Updating the C5 Xentry Connect Firmware:
It is highly recommended to update your C5 Xentry Connect to the latest compatible Xentry version, which is 2020.06 for this hardware. Later Xentry versions require newer hardware platforms (Kit 3 or 4).
Update Procedure:
- Download Xentry Kit 2 06-2020 Final Edition: (Link provided in original source).
- Prepare USB Drive: Extract the downloaded files using 7zip and copy the folder to a minimum 32GB USB drive or external SSD/HDD.
- Enter Standby Mode: Ensure the C5 Xentry Connect is in standby mode. This can be achieved via the device menu or through Xentry Control.
- Connect Power and USB: Connect the power supply to the C5 Xentry Connect and insert the USB drive into a free USB port.
- Initiate Update Mode: Simultaneously press and hold the “red cross” and “green tick” buttons on the C5 Xentry Connect to start update mode.
- Confirm Update: When “Start update” appears on the display, confirm with the “green tick” button. The update process will begin, indicated on the display. The USB update process takes approximately 100 minutes.
- Completion: The C5 Xentry Connect will indicate when the update is finished on the display. Press the “gearwheels” button or wait for automatic shutdown (approximately 10 minutes after completion).
Xentry Control Configuration:
- Start Interface: Power on the C5 Xentry Connect.
- LAN Connection: Connect a LAN cable from the C5 Xentry Connect to your laptop.
- Open Xentry Control: Launch Xentry Control software on your laptop.
- Configuration Menu: Access the configuration section within Xentry Control (usually in the top section).
- Step-by-Step Configuration: Follow the on-screen prompts to configure LAN, WiFi, and other settings as needed.
Xentry License/StartKey Activation:
If your C5 Xentry Connect license has expired (common for devices used beyond dealership support periods), you will need to reactivate it. This is indicated by messages in StartKey Center or Xentry (“No Access authorization code”). License activation solutions are available through specialized providers.
Troubleshooting Common C5 Xentry Connect Issues
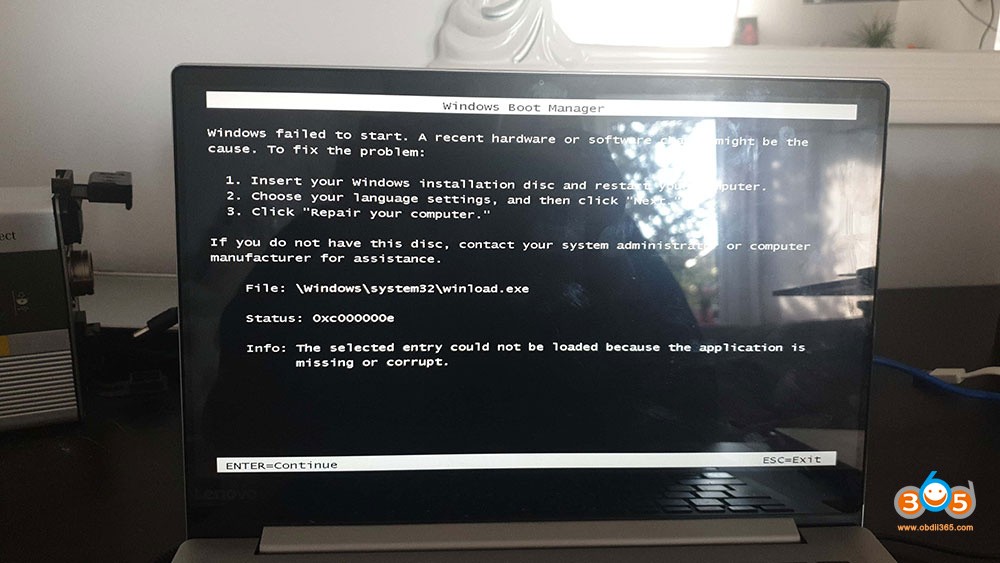
“Device is booting/Update” Loop:
If your C5 Xentry Connect gets stuck in a boot loop displaying “Device is booting/Update” for an extended period (over 3 minutes), it often indicates a corrupted Boot Configuration Data (BCD).
Recovery Procedure:
- Create Windows 7 32-bit Bootable USB: Prepare a normal (non-embedded) Windows 7 32-bit bootable USB drive (minimum 4GB). For newer laptops with USB 3.0, you might need to integrate USB 3.0 drivers into the Windows 7 ISO using NTLite to ensure mouse functionality during setup.
- SSD Removal: Remove the SSD from the C5 Xentry Connect.
- Connect SSD to Laptop: Connect the SSD to your laptop (internally or externally).
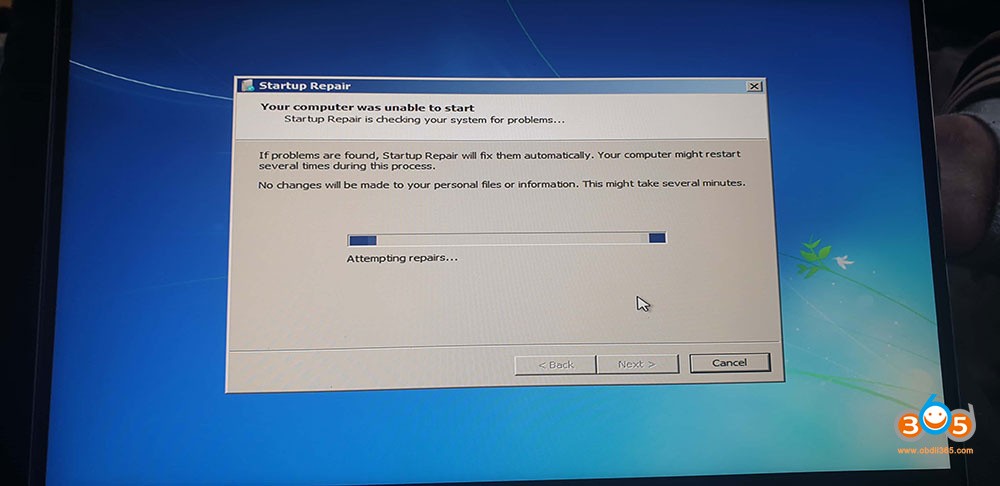
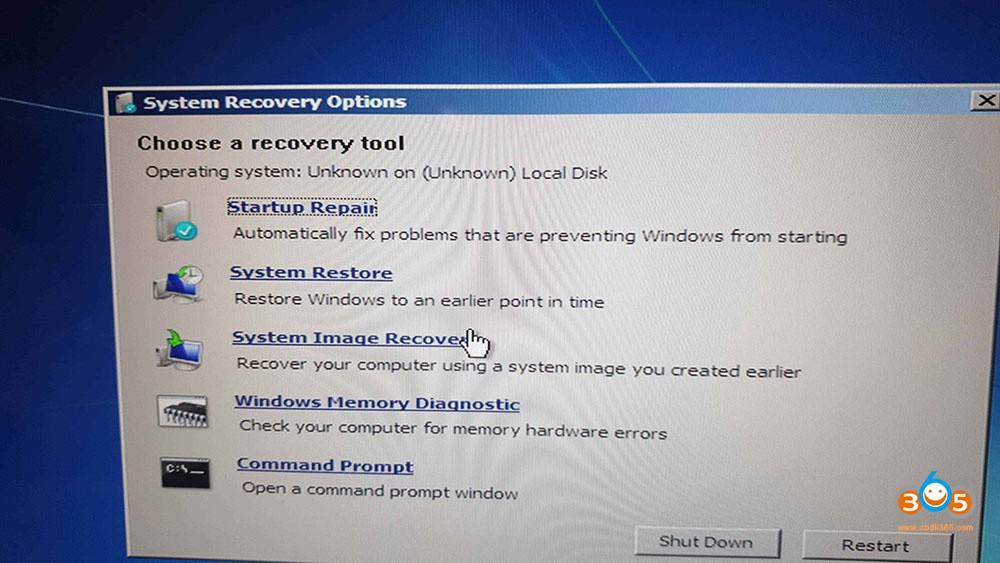
- Boot from USB and Repair: Boot your laptop from the Windows 7 USB drive. Select language, then “Repair my computer.”
- Startup Repair: Choose “Startup Repair” and allow it to run.
- SSD Reinstallation: Reinstall the SSD back into the C5 Xentry Connect. Crucially, secure the SSD with at least one screw to prevent movement, which can corrupt the BCD again.
Update Errors:
For any update errors during the firmware update process:
- Open Support Tool: Access the Support Tool within the Xentry software suite.
- Reset Function: Navigate to the “Reset” section.
- Confirm UHD Consultation: Check the “I have spoken to the Diagnosis UHD and would like to reset the Xentry Connect” option.
- Create Reset USB: Click “Setting up USB data media” to create a reset file (a very small 1.6KB file) on a USB stick.
- Initiate Reset: Insert the USB stick into the C5 Xentry Connect (in sleep mode). Press and hold the “Tick (Green)” and “X (Red)” buttons simultaneously to start the reset process (indicated by x/15 on the display).
- Firmware Update: After the reset completes, perform the firmware update procedure again with the 2020/06 update files.
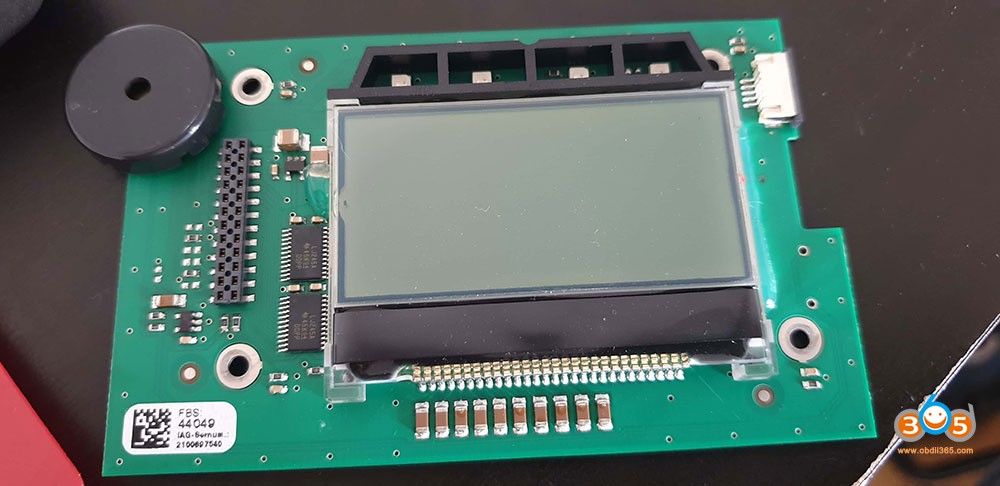
Display Lights Up But No Text:
If the display illuminates but shows no text, it can indicate various hardware issues, including internal defects, missing display hardware files, or a corrupted BIOS chip. Further hardware diagnostics may be required.
Overheating and Dust Accumulation:
If you choose not to upgrade the CPU, or even after upgrading, regularly check and clean the C5 Xentry Connect‘s cooling system. Removing the back cover and cleaning accumulated dust from the heatsink and fans can significantly improve cooling efficiency and prevent performance throttling due to overheating.
Optional Software Compatibility
The C5 Xentry Connect is also compatible with other diagnostic and programming software, including:
- DAS Standalone
- Vediamo (up to version 05.01.01)
- WIS 2020.04 (and earlier – Xentry Connect support was discontinued in WIS after 2020.04)
- DTS Monaco 8.16
Conclusion
Upgrading the CPU of your C5 Xentry Connect is a highly effective way to dramatically improve its performance, resulting in faster boot times and snappier operation of the Xentry diagnostic software. By following this guide and considering other potential upgrades and maintenance tips, you can maximize the efficiency and longevity of your C5 Xentry Connect, ensuring a smoother and more productive Mercedes-Benz diagnostic experience. For reliable C5 Xentry Connect devices and further diagnostic solutions, visit obdii365.com, your trusted source for automotive diagnostic tools.
Reliable source of SD Connect C5: https://www.obdii365.com/wholesale/mb-sd-connect-compact-5-diagnosis.html