As a Mercedes Sprinter owner, understanding your van’s components is crucial for maintenance and repairs. One common task is dealing with the battery, and knowing the Mercedes Sprinter Battery Location is the first step. If you’re the DIY type, like us at xentryportal.store, you’ll appreciate knowing you can handle tasks like battery replacement yourself, saving both time and money. Changing the starter battery in a Sprinter might seem daunting, but it’s actually quite manageable with the right guidance. This guide, based on our expert experience, will walk you through the process, focusing on the NCV3 series (2006-2018), which should be applicable to most models within this range and potentially beyond.
When Should You Replace Your Sprinter Battery?
Knowing when to replace your battery is as important as knowing the Mercedes Sprinter battery location. We recommend proactive replacement at the first sign of trouble. If your Sprinter hesitates to start, especially on cold mornings, it’s a clear indicator. While AGM batteries, commonly used in Sprinters, have a life expectancy of around 6 years, factors like climate and usage can affect this. Our van, a 2016 model, was approaching its fourth year when we decided to replace the battery. While battery tenders or engine block heaters can extend battery life, the risk of being stranded due to a failing battery outweighs the cost of a new one for us. Peace of mind and reliability are paramount, especially when you depend on your Sprinter.
Essential Tools for Battery Replacement
Before you start locating and replacing your Mercedes Sprinter battery, ensure you have these tools on hand:
- Torx Set: T25 and T27 Torx drivers are needed.
- 10mm Socket: Essential for terminal connectors and mounting bolts.
- Socket Extension: To reach bolts in the battery compartment.
- Ratchet: For use with the sockets.
Having these tools ready will make the replacement process smooth and efficient once you’ve located the Mercedes Sprinter battery location.
Battery Selection: Choosing the Right Replacement
Selecting the correct battery is crucial for your Mercedes Sprinter. The standard starter battery is a size 49 AGM battery, also known as H8. This designation refers to the battery’s physical dimensions, terminal type, and location. Any battery meeting the size 49 or H8 specification will fit perfectly in your Sprinter. Mercedes-Benz uses AGM batteries from the factory, and we recommend sticking with this type. AGM batteries offer superior performance and longevity, especially for the demanding electrical systems in Sprinter vans. This also applies if your Sprinter is equipped with a factory auxiliary battery, as it often shares the same specification as the starter battery.
Step-by-Step Guide to Starter Battery Removal in a Mercedes Sprinter
Now, let’s get to the practical part: removing the starter battery. The Mercedes Sprinter battery location for the starter battery is under the floor in front of the driver’s seat. Follow these steps carefully:
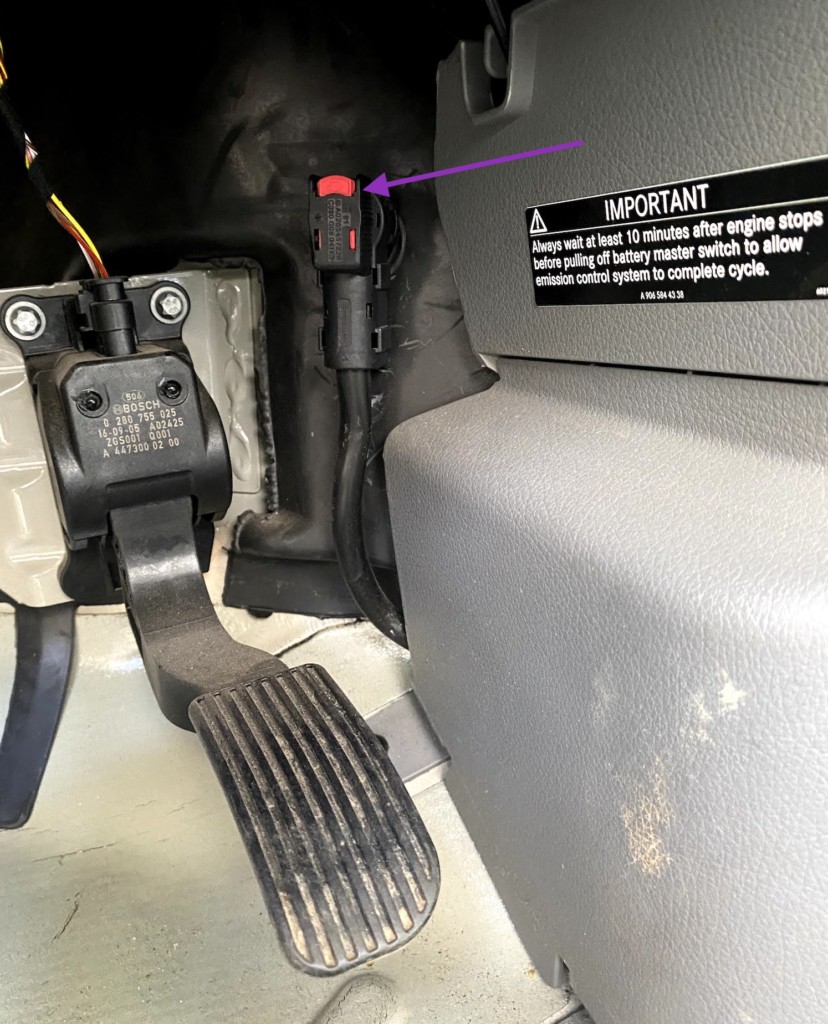
1. Disconnecting the Main Ground
Safety first! After turning off your Sprinter’s engine, wait for at least 10 minutes before proceeding. Then, disconnect the main ground connection. This is located next to the accelerator pedal.
Push down on the red tab of the connector and pull it back to disconnect the ground. This crucial step prevents electrical shorts during the battery removal process.
2. Accessing the Battery Compartment: Removing the Floor Trim
The starter battery is concealed beneath the floor. To access the Mercedes Sprinter battery location, you need to remove the plastic trim piece that secures the floor mat at the driver’s side door opening. This trim is held in place by three screws.
Use the T25 Torx tool to remove these three screws. Set the screws and the plastic trim piece aside in a safe place.
Once the trim is removed, carefully lift and remove the plastic floor mat to expose the battery compartment cover underneath.
3. Exposing the Battery: Removing the Compartment Cover
With the floor mat removed, you will see the battery compartment cover. This cover protects the Mercedes Sprinter battery location from debris and damage.
There are four screws on this cover that need to be loosened. Use the T27 Torx driver to loosen these screws about two turns each. You don’t need to remove them completely; loosening them allows you to slide the cover back and lift it off.
4. Disconnecting the Battery Terminals
Before fully exposing the battery, you need to disconnect the positive terminal cover and the electrical connections.
Remove the red plastic cover for the positive terminal and Power Distribution Center (PDC). This cover can be removed by gently pulling it upwards by hand.
Now, using the 10mm socket, loosen the terminal connectors on both the positive and negative terminals. Once loose, carefully pull them off the battery terminals. The PDC will come off with the positive terminal connector as it’s a self-contained unit.
5. Disconnecting the Battery Mount and Vent
With the electrical connections removed, the next step in accessing the Mercedes Sprinter battery location fully is to disconnect the battery mount and vent. These are located on the negative side of the battery.
Pull the plastic vent hose from the negative side of the battery. This vent hose is essential for AGM batteries and needs to be reused with your new battery.
Using the 10mm socket and extension, loosen the two mounting bolts located at the base of the battery on the negative side. You don’t need to fully remove these bolts as they remain in the mounting assembly.
Once loosened, lift the plastic assembly that holds the mounting bolts and vent hose out of the battery compartment.
6. Removing the Old Battery
Finally, you can remove the old battery. The top of the battery has two handles that are folded down. Lift these handles up. Use them to carefully lift the battery out of the compartment. Be aware that the battery is heavy and the angle is awkward, so consider having someone assist you with this step.
Installing the New Battery: Reverse Steps
Installing your new Mercedes Sprinter starter battery is essentially reversing the removal steps. Ensure you position the new battery in the compartment exactly as the old one was. Double-check all connections are secure and the vent hose is properly attached. The whole process, from start to finish, should take around 30 minutes.
Factory Auxiliary Battery Location and Replacement
While we’ve focused on the starter battery Mercedes Sprinter battery location, it’s worth noting the auxiliary battery. If your Sprinter is equipped with one, the factory auxiliary battery location is in the engine compartment. It’s significantly more accessible than the starter battery.
Replacing the auxiliary battery is also straightforward:
- Use the 10mm socket to loosen and remove the terminal connectors.
- Use the 10mm socket to remove the mounting nuts and brackets.
- Pull the vent tube connector.
- Carefully lift out the old battery.
- Install the new battery in the same orientation.
- Reconnect the vent tube, mounting brackets, and terminal connectors, ensuring everything is snug.
Understanding both the starter and factory auxiliary battery location in your Mercedes Sprinter empowers you to perform essential maintenance tasks confidently. By following this guide, you can successfully replace your Sprinter battery and ensure your van remains reliable on every journey.
Riding Roads And Trails