Many Mercedes-Benz owners and car enthusiasts are keen to personalize their vehicle settings and unlock hidden features. Often referred to as “coding,” this process involves adjusting parameters within your car’s control units. Think of it as accessing advanced settings, similar to customizing your smartphone or computer. While it’s not traditional programming in the software development sense, it allows you to tailor your Mercedes-Benz to your preferences. To embark on this journey, you’ll need specific tools and a clear understanding of the steps involved. This guide will walk you through the process, focusing on using Xentry, Mercedes-Benz’s official diagnostic software, along with readily available OBDII pass-thru devices.
Essential Tools for OBDII Xentry Coding
To begin coding your Mercedes-Benz using Xentry, you’ll need to gather the following components:
- Compatible Mercedes-Benz Vehicle: This guide is applicable to Mercedes-Benz models manufactured from approximately 2005 to the present day.
- OBDII J2534 Pass Thru Adapter: This hardware acts as the communication bridge between your laptop and your vehicle’s electronic systems. Numerous brands and models are available in the market, offering varying features and price points.
- Mercedes-Benz Xentry Pass Thru Software: Xentry is the official diagnostic software used by Mercedes-Benz technicians. The “Pass Thru” version is designed for use with J2534 adapters, making it accessible for independent users.
- Advanced Coding Software (Optional): Vediamo or DTS Monaco: For more in-depth coding and access to developer-level functions, Vediamo (version 4.2.2 or older) or DTS Monaco (version 8.16 or newer) can be used. These are powerful tools favored by experienced users.
- Seed Key Calculator: A seed key calculator is necessary to gain access to protected control units for advanced coding functions. Open-source options like MBSeedKey are available.
- Windows Laptop: A laptop running a 64-bit version of Windows 10 or 11 is required. It should have an Intel/AMD CPU, at least 8GB of RAM, and 100GB or more of free SSD storage space for optimal performance.
Sourcing Your Coding Equipment
Let’s break down where to acquire each item for your Mercedes-Benz coding setup:
- Mercedes-Benz Vehicle: Presumably, you already own your Mercedes-Benz.
- OBDII J2534 Pass Thru Adapter: These adapters can be purchased from various online retailers like Amazon, eBay, and Aliexpress, as well as directly from manufacturers. Prices range from budget-friendly options around $20 to professional-grade tools costing upwards of $5,000.
3, 4, 5. Xentry, Vediamo, DTS Monaco Software: Mercedes-Benz officially sells Xentry for a significant price. However, many independent mechanics and DIY enthusiasts obtain the software through various online channels. Vediamo and DTS Monaco are similarly sourced from online communities and forums. - Seed Key Calculator (MBSeedKey): The open-source MBSeedKey application can be downloaded from platforms like GitHub: https://github.com/Xplatforms/mbseedkey/releases/. Note that this application requires DLL files, which are not included in the download package. You’ll need to search online for these DLLs (e.g., “MB SeedKey latest version with DLL”) and copy them to the appropriate subfolder within the MBSeedKey directory (e.g.,
C:MBSeedKeylib*.dll). - Laptop: A modern Windows laptop is essential. Ensure it has an x64 Intel/AMD CPU (avoid ARM-based Macbooks like M1), SSD storage is highly recommended for speed, and it runs Windows 10 or 11 (64-bit). Be cautious of pre-configured “Xentry laptops” sold online, as they are often overpriced.
Choosing the Right OBDII J2534 Adapter
Selecting a suitable J2534 pass-thru adapter is crucial for successful Mercedes-Benz coding. The key criteria are Windows 10 x64 driver compatibility and a reliable Pass Thru library. If you already own a J2534 adapter, it’s worth testing its compatibility. For new purchases, the Tactrix Openport 2.0 is a widely recommended option known for its reliability and compatibility. When buying, verify that the adapter is genuine or a reputable clone and includes both the necessary Windows 10 drivers and Pass Thru library. While DoIP adapters offer advanced capabilities like ECU flashing and support for newer vehicles, they are not essential for basic coding tasks outlined in this guide.
Step-by-Step Installation Guide
Once you have all the necessary hardware and software, follow these steps to set up your Mercedes-Benz coding environment:
- Install and Activate Xentry Pass Thru: Install the “Xentry Pass Thru” software. Activation procedures can be found through online searches (e.g., “Xentry Pass Thru activation”). Remember, there are two main Xentry versions: XDOS (for SD C4 or DoIP adapters) and Pass Thru (for J2534 adapters). Ensure you install the Pass Thru version.
- Install J2534 Adapter Drivers and Pass Thru Library: Install the drivers and Pass Thru library software provided by your J2534 adapter’s manufacturer.
- (Optional) Install and Activate Vediamo 4.2.2: If you intend to use Vediamo, install version 4.2.2 and follow online guides for activation (e.g., “Vediamo 4.2.2 activation”).
- (Optional) Install and Activate DTS Monaco 8.16: For DTS Monaco, install version 8.16 and find activation instructions online (e.g., “DTS Monaco 8.16 activation”).
- Install Seed Key Calculator: Install the MBSeedKey application you downloaded.
To configure Vediamo 4.2.2 to work with your J2534 adapter, you need to adjust the driver settings:
- Edit
slave.iniConfiguration File: Navigate to the Vediamo installation directory and open theslave.inifile located atC:Program Files (x86)VediamoCaesardriverslave.ini. - Modify DeviceName: Locate the
[PartJ]section within theslave.inifile. Replace the existingDeviceNamevalue with the name of your J2534 adapter. Examples includeDeviceName = "Softing - VAS5054A#XXXXXXXX"orDeviceName = "Openport......(example)". - Identify Adapter Name: If you’re unsure of your adapter’s exact name, you can find it in the Windows Device Manager or by running Xentry. When Xentry launches, it typically prompts you to select a pass-thru driver, revealing the available adapter names. Use this name in the
slave.inifile. - Update Vediamo Part J Driver: Run Vediamo 4.2.2. Click the “Update” button, select only “Part J” (deselect other options), and click “Update” to apply the driver configuration.
Establishing Connection and Initial Checks
Before proceeding with coding, it’s essential to ensure a stable connection between your laptop, adapter, and vehicle:
- Connect Adapter to Vehicle: Plug your J2534 adapter into your Mercedes-Benz’s OBDII port.
- Run Xentry Software: Launch the Xentry diagnostic software on your laptop.
- Quick Test: Perform a quick test within Xentry to verify communication with your vehicle. If the test is successful, proceed to the next steps. If it fails, retrace your installation steps and troubleshoot any connection issues.
Preparing Your Vehicle for Coding
Proper vehicle preparation is crucial to avoid battery drain and ensure a smooth coding process:
- Vehicle “ON” State: Turn your vehicle’s ignition to the “ON” position (position 2) without starting the engine. Do this by pressing the start button twice without pressing the brake pedal, or turning the key to the second click.
- Battery Management: Coding draws power from the car battery. For short coding sessions, battery drain is usually not a concern. However, for longer sessions, connect a battery maintainer or charger to prevent voltage drops. Mercedes-Benz recommends a 30A charger, but a less powerful charger is usually sufficient for home use.
- Minimize Power Consumption: To further conserve battery power, turn off unnecessary electrical loads like headlights, interior lights, and the HVAC fan.
Locating the Control Unit Name in Xentry
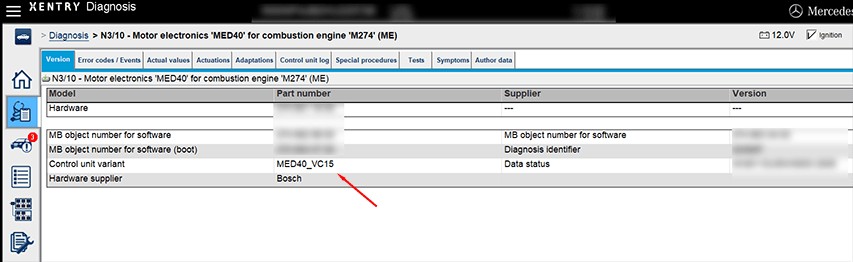
To perform specific coding changes, like disabling the Start/Stop ECO function, you need to identify the correct control unit within Xentry. In this example, we’ll target the Main Engine ECU:
- Run Xentry and Select Diagnosis: Launch Xentry and choose the “Diagnosis” option.
- Search for Engine Electronics: Look for entries like “Motor electronics … for combustion engine …” or similar descriptions that pertain to the engine control unit.
- Find “Control unit variant”: Within the selected engine electronics section, locate and select “Control unit variant”.
- Identify Control Unit Name: Note the control unit name displayed. In this example, it’s “MED40”. This name is crucial for selecting the correct files in Vediamo or DTS Monaco.
Performing Variant Coding with Vediamo
Now, let’s proceed with the actual coding process using Vediamo to modify the Start/Stop ECO function:
- Launch Vediamo Ecoute Application: Open Vediamo and start the “Ecoute” application.
- Select CBF Files: Click the “Select…” icon (first icon in the top menu).
- Choose CBF File Location: In the dialog box, ensure “*.cbf” is selected, and click “Change folder”.
- Navigate to Xentry CBF Directory: Vediamo and DTS Monaco use CBF and SMR-D files located within the Xentry installation directory. Navigate to
C:Program Files (x86)Mercedes-BenzXentryMB_PKWCaesarcbf. - Select MED40 CBF File: Choose the “MED40” folder and click “OK”.
-
Verify ECU Selection: The Vediamo window should now display “MED40”, “System:MED40” / “ECUs” / “MED40 – xxxxxx”.
-
Access ECU Properties: Right-click on “MED40 – xxxxx..” and select “Properties”.
-
Set Connection Type: Change the connection setting to “xxxxxxx…… HSCAN_UDS_500”. Always choose “500”. Click “OK”.
-
Initiate ECU Contact: Click the “Initiate ECU Contact” icon (third icon from the top).
-
Open Variant Coding Dialog: Select the “Code the variant of an ECU” icon (eleventh icon).
-
Variant Coding Options: The “Variant Coding – MED40” dialog will appear.
-
Select Implicit Variant Coding: Choose “VCD_Implizite_Variantenkodierung” from the options.
-
Find Start/Stop Operating Strategy: Locate “Betriebsstrategie Stopp Start” in the list.
-
Change to “Last Mode”: You’ll see “Stopp Start Standard Logik, Default ON” on the right panel. Select “Stopp Start Standard Logik, Last Mode“.
-
Pause and Backup: WARNING: STOP HERE. Take a moment before proceeding.
-
Save Current Parameters: Click “Save to Files”. This creates a backup of your current ECU parameters in a subfolder named “MED40” within the CBF directory (e.g.,
C:Program Files (x86)Mercedes-BenzXentryMB_PKWCaesarcbfMED40YYYY-MM-DD.html). In case of errors, you can revert to these saved settings. -
Verify Backup: Navigate to the saved folder and double-click the HTML file to review the backed-up parameters.
-
Initiate ECU Coding: Click the “ECU-Coding” button.
-
Ignore SCN Warning: A “warning: SCN number can be erased……” message might appear. Disregard this and click “OK” (or “go” or “proceed”).
-
Access Level Error (Expected): The coding process will likely fail at this stage. This is normal, as variant coding requires a higher access level.
-
Open Manual Command Input: Go to the “ECU” menu at the top and select “Manual Command Input …”.
- Request Seed Key: Type “27 0B” in the “Request Message” field and click “Send”. This command requests a temporary PIN (seed) for access level 0B, which is required for variant coding.
- ECU Response (Seed Value): The ECU will respond with a message like “67 0B BF DF 6F 37“. The part after “67 0B” (e.g., “BF DF 6F 37”) is the temporary seed value.
- Launch MBSeedKey Calculator: Open the MBSeedKey application.
- Select Correct DLL: Choose the DLL file corresponding to your ECU (e.g., “MED40MED40…….dll“). Each DLL contains a specific seed key algorithm used by Mercedes-Benz. Selecting the correct DLL is essential for generating the right key.
- Set Access Level: Select “0B” as the Access Level in MBSeedKey.
- Enter Seed Value: Type the seed value received from the ECU (e.g., “BF DF 6F 37“) into the “SEED:” field.
- Generate Key: Click “Generate Key”. The calculated key (e.g., “9B 1A 69 C0“) will be displayed.
- Enter Key in Vediamo: Return to Vediamo’s “Manual Command Input…” dialog. Type “27 0C 9B 1A 69 C0” in the “Request Message” field (replace “9B 1A 69 C0” with the key generated by MBSeedKey) and click “Send”.
- Verify Access Level Confirmation: The ECU should respond with “67 0C“, indicating that access level 0B has been granted. If you receive a different response (e.g., “0x7F ….”), something went wrong. Recheck steps 25-28 and ensure you selected the correct DLL and entered the seed and key values accurately.
- Close Manual Command Input: Close the “Manual Command Input…” dialog.
- Re-open Variant Coding: Re-open the “Code the variant of the ECU” dialog.
- Repeat Variant Coding Steps: Repeat steps 11-16 (selecting “VCD_Implizite_Variantenkodierung” and changing “Betriebsstrategie Stopp Start” to “Last Mode”).
- Execute ECU Coding Again: Click “ECU-Coding”. This time, the coding process should complete successfully. If it fails, retrace your steps carefully.
- Save Post-Coding Parameters: Click “Save to Files” again. This saves the ECU parameters after coding, allowing you to compare the before and after states to see the changes.
- Hard Reset ECU: In the left-hand tree menu, navigate to “System: MED40 / ECUs / MED40 – xxxxx / Function”. You’ll find “FN_HardReset”.
- Perform Hard Reset: Double-click “FN_HardReset”. This command instructs the MED40 ECU to reload the modified parameters, activating your coding changes.
- Exit ECU Contact: Click the “Exit ECU Contact” icon (fourth icon from the top).
- Close Vediamo: Close the Vediamo program.
Conclusion: Coding Complete, Proceed with Caution
Congratulations! You have successfully performed variant coding on your Mercedes-Benz using Xentry and Vediamo. By following these OBDII Xentry steps, you’ve gained the ability to customize various vehicle functions. However, remember that with this power comes responsibility. Exercise extreme caution when modifying vehicle parameters. Only make changes when you fully understand their implications and are confident in your actions. Incorrect coding can lead to unexpected vehicle behavior or malfunctions. Always back up your original settings and proceed methodically and carefully. Happy coding!