Keeping your Mercedes-Benz diagnostic tools up-to-date is crucial for optimal performance and access to the latest features. This guide provides a detailed walkthrough on how to update the software on your Xentry Connect C5 (DoIP) diagnostic scanner. Please note that this update procedure is specifically for DoIP Xentry Connect C5 and is not applicable to SD Connect C5 (SD C4 in a C5 case).
This update is particularly recommended if you are experiencing issues with older software versions like XDOS 2018.3 or 2017.9. Upgrading to version 2018.7 can resolve many common problems. If your XDOS 2018.5 is functioning smoothly, updating is optional but recommended for the latest enhancements and vehicle coverage.
For users who prefer professional assistance, we at xentryportal.store also offer an upgrade service. You can send us your DoIP C5 HDD and Dell HDD, and our experts will handle the update process for you.
Preparing for Your Xentry Connect C5 Software Update
Before starting the update process, ensure you have the following tools and resources ready:
- Xentry_Kit_09_2017.iso: This software image is essential for the update. Copy it to the
_ISOfolder on your IODD 2541 external encrypted hard drive. - USB Drive with Windows PE: A USB drive preloaded with a Windows Preinstallation Environment (WinPE), such as Bigbaicai WinCE, is necessary for certain steps.
- IODD 2541 External Encrypted Hard Drive: Or a similar external storage device that can boot ISO images.
- Panasonic Power Adapter: To provide a stable power supply to your Xentry Connect C5 during the update.
Alt: Essential tools for Xentry Connect C5 software update, including IODD 2541, Panasonic power adapter, and USB drive.
- Xentry Connect C5 Multiplexer: Your Mercedes diagnostic interface device.
Alt: Image of the Xentry Connect C5 multiplexer, the central device for Mercedes-Benz diagnostics and software updates.
Step-by-Step Guide to Update Xentry Connect C5
Follow these steps carefully to update your Xentry Connect C5 software:
- Initiate Update Mode:
- Ensure your C5 mux is in standby mode.
- Connect the Panasonic power adapter to your C5 device.
- Insert the IODD 2541 into the USB port on the C5 multiplexer.
Alt: Close-up showing the connection of the IODD 2541 and Panasonic power adapter to the Xentry Connect C5 for software update preparation.
Alt: Xentry Connect C5 device with IODD 2541 and power adapter correctly connected, ready to start the software update process.
- Start the Update Process:
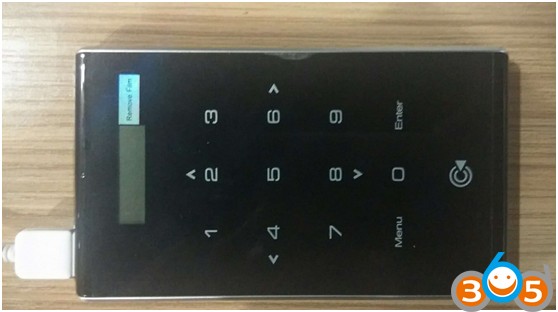
- In standby mode, simultaneously press and hold the “X” and “√” buttons on the C5 device.
- A prompt “Start Update?” should appear on the screen. If you initially see “Start XENTRY Connect?”, wait for the prompt to disappear, and “Start Update?” will then be displayed.
Alt: The ‘Start Update?’ screen on Xentry Connect C5, indicating readiness to begin the software update procedure.
Alt: Confirmation prompt ‘Start Update?’ on the Xentry Connect C5 screen, requiring user confirmation to proceed with the software update.
- Confirm and Begin Software Installation:
- When “Start Update?” is displayed, press the “√” button to confirm.
- The Connect C5 will enter update mode, and the IODD 2541 will light up, indicating activity.
- Immediately press button “5” on the IODD 2541. The cross “X” on the C5 screen will change to a circle “O”.
Alt: Xentry Connect C5 in update mode, indicated by the illuminated IODD 2541 and the screen displaying update progress.
Alt: The IODD 2541 external hard drive actively working during the Xentry Connect C5 software update process, as indicated by its activity light.
- Monitor the Update Progress:
- The C5 screen will display the update progress. This process typically takes between 50 to 55 minutes to complete.
Alt: Xentry Connect C5 screen showing the initial phase of the software update, indicating the process has started successfully.
Alt: The software update process actively running on the Xentry Connect C5, with progress indicators displayed on the screen.
Alt: Advanced stage of Xentry Connect C5 software update, indicating the process is progressing towards completion.
- System Restart:
- After the installation is complete, the system will automatically restart.
Alt: Xentry Connect C5 restarting after the software update has been successfully installed, finalizing the update procedure.
-
Troubleshooting Startup Issues:
- If your system fails to start after the update, power off the C5 mux and restart it again.
-
User Account Setup (If Necessary):
- Once C5 starts, remove the hard disk from C5 and install it into a laptop (e.g., Dell 55220).
- Boot the laptop from the Windows PE USB drive by pressing F12 during startup to access “Boot Options”.
Alt: Boot options menu accessed by pressing F12 on a Dell laptop, required for booting from the USB drive during Xentry Connect C5 update.
Alt: Dell laptop boot menu, highlighting the ‘USB Storage Device’ option that needs to be selected to boot from the USB drive.
* Select "USB Storage Device" and press Enter.Alt: Selection of ‘USB Storage Device’ in the boot menu, crucial for initiating the Windows PE environment for Xentry Connect C5 setup.
* In the WinPE interface, choose "[03] WIN2003 PE Classical".Alt: Windows PE interface displaying the ‘[03] WIN2003 PE Classical’ option, which needs to be selected to proceed with user account setup.
* Navigate to the PE system and create a new user account. Ensure Windows is located on the D: drive.Alt: Windows PE system interface, showing the desktop environment where a new user account for Xentry Connect C5 can be created.
Alt: Options within Windows PE for creating a new administrator account, essential for completing the Xentry Connect C5 software update.
Alt: The process of creating a new administrator account within Windows PE, with fields for username and password to be configured.
*   Right-click on "Create a new admin account" and set the User name (e.g., C5) and Password (e.g., abc12345678). You can choose any username and password.
*   Click "Ok" and close the application.
*   Power off the laptop, remove the hard disk, and reinstall it into the C5 multiplexer.
Alt: Setting up a new administrator account with the username ‘C5’ and password ‘abc12345678’ in Windows PE for Xentry Connect C5.
Alt: Confirmation dialog after successfully creating the new administrator account in Windows PE, ready for use with Xentry Connect C5.
Alt: Reinstalling the hard disk back into the Xentry Connect C5 multiplexer after completing the user account setup in Windows PE.
Your Xentry Connect C5 software update is now complete!
Post-Update Activation and Setup
After updating, you may need to reactivate your Xentry Connect C5. Here are the necessary files and resources for activation:
- Activation Key: Activation key
- 2018.7 Key: 2018.7 key
- Blacklist C5: Black list C5
For a step-by-step activation guide, refer to this TeamViewer file: https://mega.nz/#!Gp8lzLLK!-B3Ytw1j-YoC9tWM_atYxgvmer5mbOMNxfH4BYz4D0E
Connecting Your Xentry Connect C5
To ensure your updated Xentry Connect C5 is properly connected with your Xentry Tab or laptop, follow these steps:
- Standby Status: When not connected to a vehicle, the C5 should be in standby mode.
Alt: Xentry Connect C5 in standby mode, indicated by the display screen, ready for connection to a vehicle or diagnostic system.
Alt: Close-up of the Xentry Connect C5 standby display screen, showing detailed status information and connection readiness.
- Connect Cables: Locate the USB and power connectors on the left side of the C5. Connect the LAN cable and the power cable.
Alt: Side view of Xentry Connect C5 highlighting the USB connectors and round power connector used for connecting peripherals and power supply.
Alt: Connecting the LAN cable and power cable to the Xentry Connect C5, preparing it for communication and operation.
Alt: Xentry Connect C5 fully connected with LAN cable and power cable, ready to be turned on and linked with diagnostic software.
- Power On and Connect: Press the Power button for 3 seconds to turn on your Xentry Tab. Connect the Xentry C5 OBD cable and LAN cable.
Alt: Powering on the Xentry Tab, the tablet device used in conjunction with Xentry Connect C5 for Mercedes-Benz diagnostics.
Alt: Connecting the Xentry C5 OBD cable and LAN cable, establishing the physical connections needed for vehicle diagnostics and software communication.
- Verify Connection: If no car is connected, it will indicate “No car connected.”
Alt: Xentry Connect C5 screen displaying ‘No car connected,’ indicating that the device is ready but not currently linked to a vehicle for diagnostics.
Alt: Detailed view of the ‘No car connected’ message on Xentry Connect C5, confirming the device is operational but awaiting vehicle connection.
- Launch Xentry Control: On the Xentry Tab main menu, open Xentry Control.
Alt: Main menu interface of the Xentry Tab, showcasing the options and applications available for Mercedes-Benz vehicle diagnostics.
Alt: Opening the Xentry Control application on the Xentry Tab, initiating the software interface for managing vehicle diagnostics and communication.
- Wait for Communication: Wait for the communication interface to appear.
Alt: Xentry Control communication interface, showing a waiting screen as it establishes a connection with the Xentry Connect C5 device.
- Xentry Connected: Xentry will connect with SD C5. Click on the green icon to launch the Xentry software.
Alt: Xentry software interface indicating successful connection with the SD C5 diagnostic device, ready to perform vehicle diagnostics.
Alt: Launching the Xentry diagnostic software by clicking the green icon, initiating the vehicle diagnostic application for Mercedes-Benz vehicles.
Alt: Main interface of the Xentry diagnostic software, fully launched and ready to begin diagnosing Mercedes-Benz vehicles using the connected Xentry Connect C5 device.
You are now ready to run MB Star diagnostic software and begin diagnosing Mercedes-Benz vehicles with your updated Xentry Connect C5.
Visit www.xentryportal.store for more diagnostic tools and support.