Xentry is the cornerstone of Mercedes-Benz diagnostics, a powerful software suite used by technicians worldwide to troubleshoot, repair, and maintain Mercedes-Benz vehicles. For automotive professionals and serious DIY enthusiasts, mastering Xentry is crucial. This guide provides a comprehensive, step-by-step walkthrough on How To Load Xentry onto your Windows 10 system, ensuring you’re ready to tackle any diagnostic challenge.
Before you begin the installation process, it’s essential to prepare your computer. A critical first step is to disable the Secure Boot option in your BIOS settings. This is a necessary prerequisite for Windows 10 systems to allow for the installation of Xentry. Please ensure your system is running Windows 10, as newer versions of Xentry are specifically designed for this operating system and are not compatible with older systems like Windows 7.
Let’s dive into the installation process.
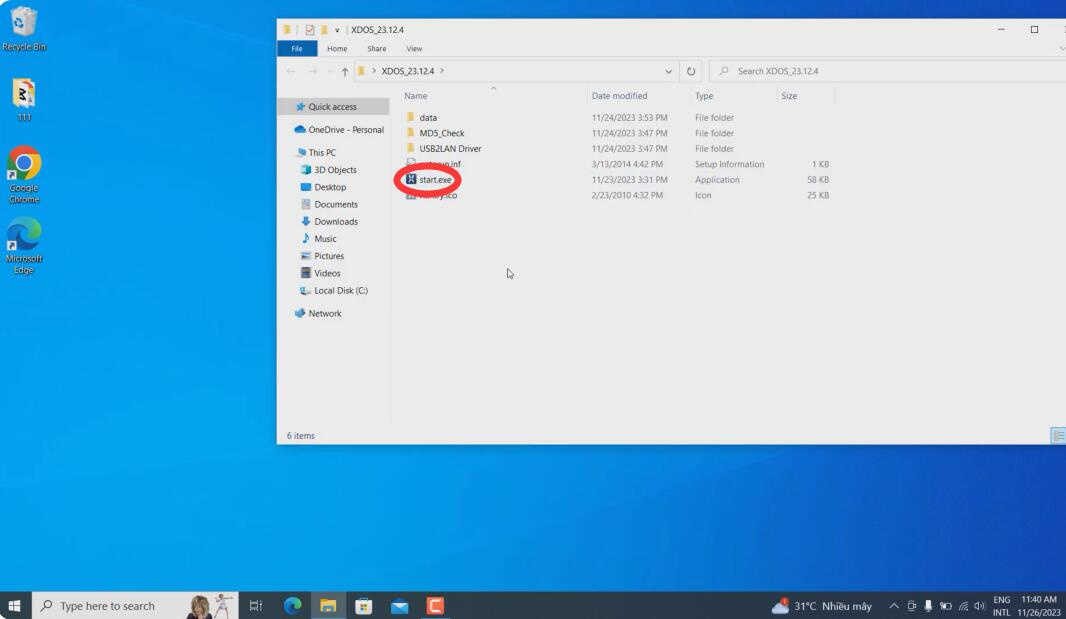
Step 1: Initiating the Xentry Installation
Locate the installation package, typically found within a folder named “XDS_version“. In this folder, find and double-click the “start” application. This action will launch the Xentry installation wizard and begin the setup process.
Step 2: Language Selection
The installation wizard will prompt you to select your preferred language for the installation process. Choose your language from the provided list to continue in your native language.
Step 3: Prerequisite Installation
XENTRY Diagnostic OpenShell requires several prerequisite components to be installed on your computer to function correctly. The next screen will outline these requirements. Click “Install” to initiate the installation of these necessary components.
Step 4: Welcome to the InstallShield Wizard
The InstallShield Wizard is the installation engine for Xentry Diagnostic OpenShell. Click “Next” to proceed through the welcome screen and begin the core installation steps.
Step 5: License Agreement
Carefully read the terms of the license agreement. To continue with the installation, you must accept the terms. Select “I accept the terms in the license agreement” and then click “Next”.
Step 6: Destination Folder
The installer will suggest a default installation directory for Xentry. It is generally recommended to install Xentry in the default location unless you have specific reasons to choose a different path. Click “Next” to accept the default destination folder.
Step 7: Ready to Install Program
The installation wizard is now ready to begin the actual installation of Xentry Diagnostic OpenShell. Click “Next” to start the process.
Step 8: Installation Progress
The InstallShield Wizard will now proceed with installing XENTRY Diagnostic OpenShell on your computer. This process may take a significant amount of time, potentially exceeding two hours, depending on your computer’s processing speed and performance. Allow the installation to complete without interruption.
Step 9: Restart Your Computer
Once all modules are successfully installed, the wizard will prompt you to restart your computer to finalize the installation. Follow the prompt and restart your PC.
Step 10: Post-Restart Configuration
After your computer restarts, ConfigAssist may launch automatically. Close ConfigAssist as we will address configuration and activation in subsequent steps.
Step 11: ConnectorAPI Integration
Navigate to the “ConnectorAPI” folder within your installation files. Copy the “ConnectorAPI64.dll” file to C:WindowsSystem32. Then, double-click the “64.reg” file and confirm adding it to the system registry by clicking “OK”.
Step 12: XentryAPI Integration
Open the “SysWOW64” folder, copy the “XentryAPI.dll” file, and paste it into C:WindowsSysWOW64. Next, double-click “old key loader for configassist or startkeycenter 64bit.reg” and click “OK” to add it to the registry list.
Step 13: Blacklist Execution
Run the “XDOS black list.exe” application and click “Extract”. This step is important for system stability and proper function.
Step 14: Vehicle Model Pictures
Copy the images from the “Baureihen” folder to the directory C:Program Files (x86)Mercedes-BenzXentryKontexteProduktuebersichtBilderBaureihen. This adds visual elements for vehicle model selection within Xentry.
Step 15: Configuration File Setup
Go to C:ProgramDataMercedes-Benzconfig and create a new folder named “Xentry”. Then, navigate to C:ProgramDataMercedes-BenzconfigXD_MB and copy the file “GlobalUserSettings.properties” to the newly created C:ProgramDataMercedes-BenzconfigXentry folder.
Step 16: Xentry Activation
Now you can proceed with the activation process using ConfigAssist. To activate Xentry, you will need a StartKey. Copy your Hardware ID and send it to [email protected]. Please note that obtaining a Smart Key code is typically a paid service. Alternatively, you can explore options for a Xentry Key Generator if you prefer a self-activation method.
Once you receive your Smart Key code, in ConfigAssist, click “Manual”, enter the StartKey code, and click “Save”. A successful installation of the StartKey will activate your Xentry software.
Step 17: XentryServices.xml Modification (For versions prior to 12.2023)
Note: For version 12.2023 and later, this step can be skipped.
Navigate to C:Program Files (x86)Mercedes-BenzXentryXD_MBbin. Cut the “XentryServices.xml” file to your desktop. Open the file with Notepad and locate a specific line (the original article mentions deleting a line, but it’s better to specify which line if possible for accuracy – if the specific line is crucial and known, insert here. If not, keep it general as in the original). Delete the identified line, save the file, and cut the modified “XentryServices.xml” file back to C:Program Files (x86)Mercedes-BenzXentryXD_MBbin. Repeat this process for the “XentryServices.xml” file located in C:Program Files (x86)Mercedes-BenzXentryXD_DTbin.
Step 18: Backup and Startup Script
Copy the “Backup.bat” file from your downloaded files to C:. Double-click it to run. This will generate a “lic_key_2.dat” file; do not delete this file as it’s essential for licensing. Copy “start_Xentry.bat” to C:Program Files (x86)Mercedes-BenzXentryXD_MB. Right-click on “start_Xentry.bat”, send it to Desktop (create shortcut). Always use this newly created shortcut “start_Xentry” on your desktop to launch Benz Xentry instead of the default executable.
Step 19: Completing Installation and Exiting Xentry
With the previous steps completed, your Xentry installation and activation are now finished. To start Xentry, use the “start_Xentry” shortcut on your desktop. When you need to exit Xentry, double-click the “Diagnosis Stop” icon on your desktop.
Troubleshooting: Invalid SmartKey
If you encounter an “Invalid SmartKey” error, revisit your BIOS settings and ensure that the “Secure boot” option is disabled. This is a common cause for activation issues.
By following these detailed steps, you should successfully load and activate your Xentry diagnostic software, unlocking a powerful suite of tools for Mercedes-Benz vehicle diagnostics and repair. Remember to always source your software from reputable vendors and ensure your system meets the necessary requirements for optimal performance.