Navigating the installation and operation of Xentry Openshell XDOS on Windows 10 can present unique challenges. Many users, especially those new to the system, encounter issues ranging from startkey validation problems to Wi-Fi connectivity hiccups. This guide, drawing upon user experiences and expert insights, addresses common problems faced when running Xentry Openshell XDOS on Windows 10, offering practical solutions and tips to ensure smooth and efficient vehicle diagnostics. While this article doesn’t directly focus on the Xentry Open Shell Xdos Patcher 3.0, the underlying principles and troubleshooting steps remain broadly applicable for users seeking to optimize their Xentry Openshell XDOS setup, regardless of the specific patcher version in use.
Common Xentry Openshell XDOS on Windows 10 Issues and Solutions
Let’s delve into some of the frequently reported problems and their corresponding fixes. These solutions are compiled from user experiences and aim to provide helpful guidance. Remember, while these tips are based on practical application, always proceed with caution and at your own risk when modifying your diagnostic tools and vehicle software.
1. Resolving “StartKey not valid” Errors in XDOS Windows 10
One frustrating issue users encounter is the “StartKey not valid” error within ConfigAssist, preventing the entry of the Xentry key. Furthermore, attempting to use standalone key centers might result in a 0x8000704C7 error. While Windows 10 x64 is a recommended environment for Mercedes diagnostics software, compatibility hurdles can arise.
Potential Solutions:
While the original post doesn’t offer a direct fix, it highlights that other users have successfully navigated this issue. This suggests the problem is solvable, though potentially complex. For “StartKey not valid” errors, ensure the following:
- Correct Key Entry: Double-check that you are entering the StartKey exactly as provided, paying attention to case sensitivity and character accuracy.
- Software Compatibility: Verify that the Xentry Openshell XDOS version you are using is indeed compatible with Windows 10 x64. Consult the software documentation or vendor for compatibility information.
- System Date and Time: Inaccurate system date and time can sometimes interfere with software licensing. Ensure your Windows 10 system date and time are correctly set.
- Firewall and Antivirus: Temporarily disable your firewall and antivirus software to see if they are blocking key validation processes. If this resolves the issue, configure exceptions for Xentry Openshell XDOS within your security software.
- Reinstallation: As a last resort, consider a clean reinstallation of Xentry Openshell XDOS, ensuring you follow the installation instructions meticulously.
It’s worth noting that the original poster mentions using standalone key centers and encountering errors. If you are using a xentry open shell xdos patcher 3.0 or similar tool, ensure its compatibility with your Xentry version and Windows 10. Incorrect or outdated patchers can lead to key validation failures.
2. Windows 10 Security Settings and XDOS Compatibility
Windows 10’s robust security features, while beneficial for general system protection, can sometimes clash with the operation of diagnostic software like Xentry Openshell XDOS. Users have reported fewer issues when using Windows 7 x86, suggesting security settings in Windows 10 might play a role in compatibility problems.
Understanding Security Conflicts:
Windows 10’s User Account Control (UAC) and other security measures can restrict software access to system resources or block certain operations deemed potentially harmful. This can interfere with the proper functioning of Xentry Openshell XDOS, particularly components related to vehicle communication and system access.
Recommended Adjustments (Proceed with Caution):
- Run as Administrator: Always run Xentry Openshell XDOS and related components (like ConfigAssist) as an administrator. Right-click the application shortcut and select “Run as administrator.”
- Disable UAC (Temporarily for Testing): For troubleshooting purposes, you can temporarily lower or disable User Account Control. Search for “UAC” in the Windows search bar and adjust the slider. However, remember to re-enable UAC after testing for security reasons.
- Firewall Exceptions: Configure Windows Firewall to allow exceptions for Xentry Openshell XDOS executables and related ports. Consult your Xentry software documentation for specific port requirements.
- Antivirus Exclusions: Add Xentry Openshell XDOS installation directories and executable files to your antivirus software’s exclusion list to prevent interference.
Remember, modifying security settings should be done with caution. Always understand the implications of disabling security features and re-enable them once troubleshooting is complete.
3. Windows 10 Native Installation vs. Virtual Machines
The original post touches on the question of using Windows 7 in a virtual machine (VM) on Windows 10. The user confirms they are running Xentry Openshell XDOS directly on Windows 10 64-bit Professional, without virtualization.
Native Installation Advantages:
Running Xentry Openshell XDOS natively on Windows 10 generally offers better performance and resource utilization compared to running it within a VM. VMs introduce an extra layer of software abstraction, which can sometimes impact performance and compatibility, especially for resource-intensive applications like diagnostic software.
VM Considerations (If you choose this route):
While native installation is often preferred, some users might opt for VMs for system isolation or compatibility reasons. If you choose to run Xentry Openshell XDOS in a VM on Windows 10:
- Resource Allocation: Ensure your VM is allocated sufficient RAM, CPU cores, and storage space to run Xentry smoothly.
- VMware Compatibility: If using VMware, ensure you are using a compatible version with both your Windows 10 host and the guest operating system (e.g., Windows 7 VM).
- Network Configuration: Properly configure the VM’s network settings to allow communication with your diagnostic interface (e.g., SDConnect C4).
For most users, a direct installation of Xentry Openshell XDOS on Windows 10 is recommended for optimal performance and fewer potential compatibility issues.
4. Addressing Windows 10 Ad-Hoc Connection Problems for SDConnect C4
Establishing a wireless (Ad-Hoc) connection between Windows 10 and an SDConnect C4 diagnostic interface can be problematic. Windows 10 has tightened security around hosted networks and WEP encryption, which is often used in older SDConnect C4 setups.
The Windows 8.1 Driver Solution:
One user successfully resolved Ad-Hoc connectivity issues by installing Windows 8.1 wireless adapter drivers on their Windows 10 system. This workaround leverages the potentially less restrictive Ad-Hoc implementation in Windows 8.1 drivers.
Step-by-Step Guide to Driver Rollback (Use with Caution):
- Identify Your Wireless Adapter: Determine the exact model of your wireless network adapter. You can find this in Device Manager (search for “Device Manager” in Windows).
- Download Windows 8.1 Drivers: Search online for “Windows 8.1 drivers [your wireless adapter model]”. Download the driver package only, avoiding bundled software suites.
- Uninstall Current Drivers: In Device Manager, locate your wireless adapter, right-click, and select “Uninstall device.” Important: Check the box “Delete the driver software for this device” to remove the current drivers completely.
- Install Windows 8.1 Drivers: Run the downloaded Windows 8.1 driver executable. The installer should detect your wireless adapter and install the older drivers.
- Reboot: Restart your Windows 10 system.
- Test Ad-Hoc Connection: Attempt to establish an Ad-Hoc connection with your SDConnect C4.
Important Considerations for Driver Rollback:
- Driver Compatibility: While this solution worked for some, driver rollback can sometimes lead to instability or reduced functionality of your wireless adapter. Proceed with caution and be prepared to revert to the latest drivers if issues arise.
- Security Implications: Using older drivers might have security implications. Ensure you download drivers from reputable sources.
- Alternative Connection Methods: Consider using a wired Ethernet connection for a more stable and potentially faster connection between your Windows 10 laptop and SDConnect C4, if wireless Ad-Hoc proves unreliable.
[](Xentry Openshell XDOS on Windows 10 Installation Screen 1)
[](Xentry Openshell XDOS on Windows 10 Installation Screen 2)
[](Xentry Openshell XDOS on Windows 10 Installation Screen 3)
5. Step-by-Step Guide to Manually Configure Ad-Hoc Connection on Windows 10 for SDConnect C4
If driver rollback is not desired or doesn’t resolve the Ad-Hoc issue, manually configuring the Ad-Hoc network in Windows 10 can be another approach. This involves creating a specific network profile and adjusting settings through the command prompt.
Detailed Manual Configuration Steps:
-
Note Network Details: Record the SSID (network name), security type (WEP), encryption type, and network key of your Ad-Hoc network (typically provided with your SDConnect C4).
-
Disable Wireless and Disconnect: Disconnect from any existing Wi-Fi networks and disable your wireless adapter temporarily.
-
Enable Wireless (No Connection): Re-enable your wireless adapter but do not connect to any network.
-
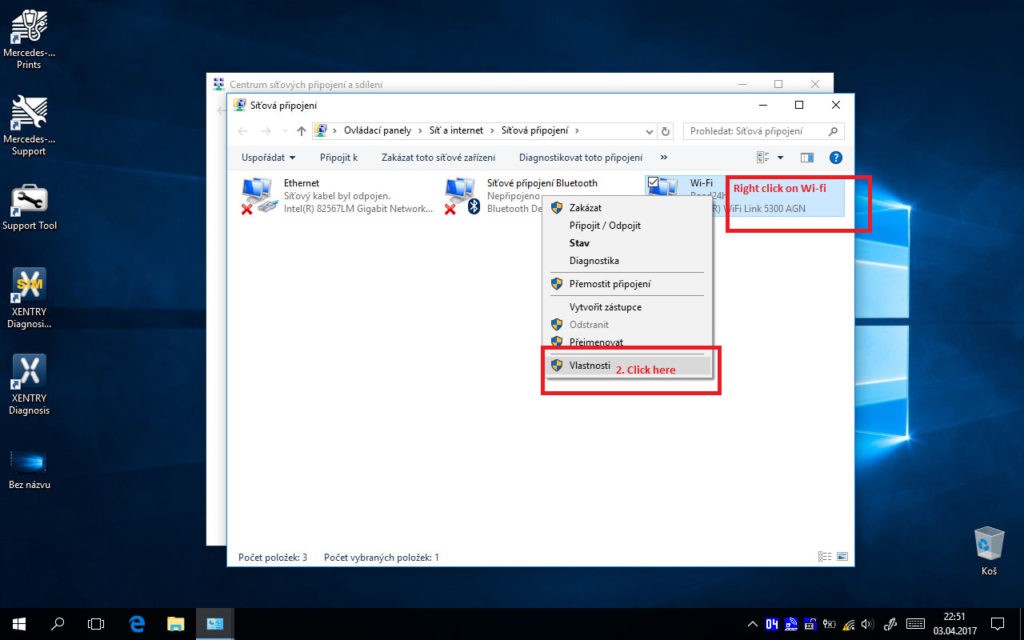
Open Network and Sharing Center: Right-click the network icon in the taskbar and select “Open Network and Sharing Center.”
-
Manage Wireless Networks: Click “Manage Wireless Networks” on the left-hand side.
-
Add Network Profile: Click “Add” and then “Manually create a network profile.”
-
Enter Network Information (Infrastructure Profile):
- Network name (SSID): Enter the SSID you noted in step 1.
- Security type: Select “WEP.”
- Encryption type: Ensure it matches your Ad-Hoc network settings.
- Security key: Enter the network key you noted in step 1.
- Uncheck “Start this connection automatically” and “Connect even if the network is not broadcasting.”
-
Click Next and Close: Click “Next” and then “Close.” Your newly created network profile should appear in the list with an infrastructure icon (two screens connected to a tube).
-
Open Command Prompt (Admin): Open Command Prompt as an administrator (search for “cmd,” right-click “Command Prompt,” and select “Run as administrator”).
-
Set Connection Type to IBSS (Ad-Hoc): In the Command Prompt, type the following command exactly, replacing “NetworkName” with the SSID of your Ad-Hoc network:
netsh wlan set profileparameter name=NetworkName ConnectionType=IBSSPress Enter. If successful, the network icon in “Manage Wireless Networks” should change to an Ad-Hoc icon (three small screens connected).
-
Enable Wireless and Connect: Enable your wireless adapter and attempt to connect to your Ad-Hoc network. You should no longer be prompted for the network key.
Automatic Ad-Hoc Connection on Boot (Optional):
To automatically connect to the saved Ad-Hoc network when Windows starts:
-
Open Startup Folder: Open the Startup folder by going to Start > All Programs > Startup (or Open All Users Startup for system-wide startup).
-
Create Shortcut: Right-click in an empty space within the Startup folder, go to New > Shortcut.
-
Enter Connection Command: In the “Type the location of the item” field, enter the following command, replacing “NetworkName” with your Ad-Hoc network’s SSID:
netsh wlan connect NetworkName -
Name Shortcut and Finish: Click “Next,” give the shortcut a descriptive name (e.g., “Connect to SDConnect”), and click “Finish.”
This shortcut will run at Windows startup, attempting to connect to your Ad-Hoc network automatically.
6. Finding a Reliable Source for 09.2018 Xentry Openshell XDOS
Users often seek reliable sources for downloading Xentry Openshell XDOS software. The original post mentions a source and highlights the importance of reliable tech support.
Source Recommendation (Use Discretion):
The original post points to http://www.obdii365.com/wholesale/201809-mb-sd-connect-compact-c4-software-ssd.html as a source used by a user, praising their tech support and free activation assistance.
Important Considerations When Choosing a Source:
- Reputation and Reviews: Research the source’s reputation and look for user reviews or testimonials regarding software reliability and support quality.
- Software Version and Compatibility: Ensure the offered Xentry Openshell XDOS version is compatible with your diagnostic interface (e.g., SDConnect C4) and your vehicle models.
- Support and Activation: Inquire about the availability of technical support and activation assistance, especially if you are new to Xentry software.
- Security: Download software only from trusted sources to minimize the risk of malware or corrupted files.
[](Xentry Openshell XDOS Download Source Example)
[](Xentry Openshell XDOS Download Interface 1)
[](Xentry Openshell XDOS Download Interface 2)
[](Xentry Openshell XDOS Download Interface 3)
[](Xentry Openshell XDOS Download Interface 4)
[](Xentry Openshell XDOS Download Interface 5)
Conclusion
Running Xentry Openshell XDOS on Windows 10, while generally supported, can present users with specific challenges. This guide has addressed some of the common hurdles, including startkey errors, security setting conflicts, Ad-Hoc connection problems, and finding reliable software sources. By understanding these issues and applying the suggested solutions, users can enhance their experience and ensure smoother operation of their Xentry diagnostic systems. Remember to always exercise caution when modifying system settings and software configurations, and prioritize reliable sources and reputable vendors for your diagnostic tools and software needs. While the xentry open shell xdos patcher 3.0 was not directly addressed, the general troubleshooting principles outlined here are beneficial for users working with various Xentry Openshell XDOS setups on Windows 10.