As a seasoned auto repair professional working with Mercedes-Benz vehicles, I’ve spent considerable time utilizing the Xentry Connect C5 diagnostic tool. While robust and essential for in-depth diagnostics, one common frustration stands out: its sluggish performance. From booting up to launching Xentry software, the delays can be significant, especially when compared to standard interfaces like Chinese clones, SDConnect (C4), or VCI (C6). This isn’t due to poor design, but rather the Xentry Connect C5 being essentially a complete, albeit compact, computer, unlike simpler interfaces.
Driven by the need for improved efficiency, I decided to delve into the hardware of the Xentry Connect C5. Disassembling the unit revealed its internal components and potential avenues for performance enhancement. This article will guide you through understanding the Xentry Connect C5 hardware, identifying bottlenecks, and implementing key upgrades to significantly boost its speed and responsiveness.
Understanding the Xentry Connect C5 Hardware
The Xentry Connect C5 is more than just an interface; it’s a mini-computer running an embedded operating system. Here’s a breakdown of its core components:
- OS: Windows 7 32bit Embedded
- Motherboard Chipset: HM65
- CPU: Intel Celeron B810 (2 cores, 2 threads, 1.6Ghz, 35w, 2MB L3 cache, PGA989 socket – 2nd Gen) – This is a key area for improvement.
- GPU: Integrated Graphics
- RAM: 4GB Samsung DDR3 1333Mhz (Limited to ~3.5GB usable by 32-bit OS)
- SSD: Xmore 256GB (or 238GB in older models, or 223GB in newer models)
- WiFi: Intel Centrino Advanced-N 6205 (2.4Ghz and 5Ghz, 300mbps, PCIe Half MiniCard)
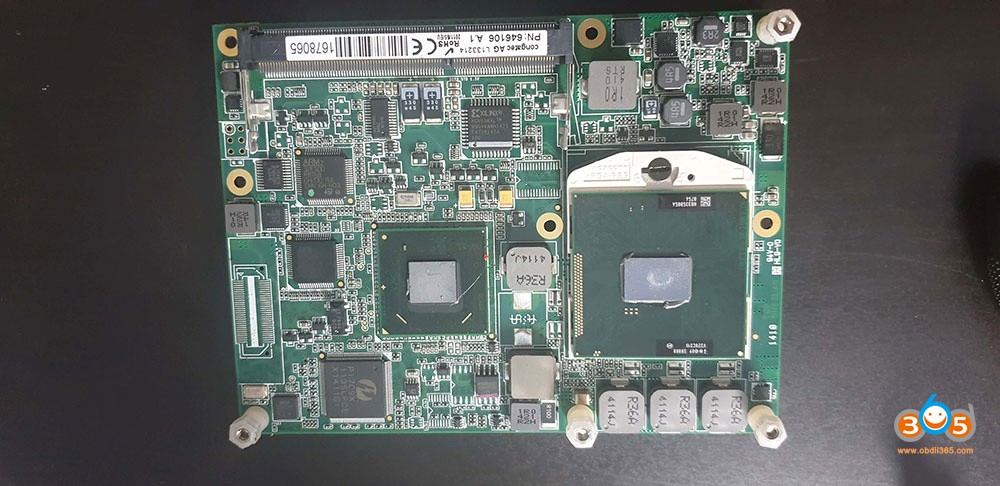
This hardware configuration, typical for its design period around 2011-2012, is now showing its age. The Intel Celeron B810 processor, in particular, is a significant bottleneck.
Image: Internal view of Xentry Connect C5 showcasing its motherboard and components.
Performance-Boosting Upgrades for Your Xentry Connect C5
While several components can be considered for upgrades, the CPU offers the most dramatic performance gains for your Xentry Connect C5.
CPU Upgrade: The Core Improvement
Replacing the Celeron B810 CPU with a more powerful, compatible processor is the single most impactful upgrade you can perform. I personally upgraded to an Intel Core i7 2640m (2 cores, 4 threads, 2.8Ghz – 3.5Ghz Turbo, 4Mb cache, 35w). This upgrade yielded impressive results:
Boot Time Comparison (Xentry Program to Data Status 2020/06):
- Celeron B810: 57 Seconds
- Intel Core i7 2640m: 25 Seconds
Wake-up Time from Sleep Mode (Sleep to No Car Connected):
- Celeron B810: 47 Seconds
- Intel Core i7 2640m: 37 Seconds
As you can see, the i7 2640m significantly reduces loading times within the Xentry software, making diagnostics much more efficient.
Important Considerations for CPU Upgrade:
- TDP (Thermal Design Power): Stick to 35W TDP processors. The Xentry Connect C5 cooling system (a small radiator and two fans) is designed for this thermal output. Higher wattage CPUs can lead to overheating and system instability.
- Socket Compatibility: Ensure the new CPU is compatible with the PGA989 socket (2nd Generation Intel Mobile Processors). While 3rd generation CPUs use the same socket, they are not supported by the HM65 chipset motherboard.
- Recommended CPU: The Intel Core i7 2640m is an excellent balance of performance and thermal compatibility for the Xentry Connect C5. Avoid attempting to install quad-core processors as they may exceed the motherboard’s power delivery capabilities, causing shutdowns.
Image: Close-up of the Xentry Connect C5 CPU socket during disassembly.
CPU Installation Guide:
- Safety First: Disconnect the battery from the Xentry Connect C5.
- Access the CPU: Remove the back shield (it’s held by double-sided adhesive). Unscrew the six radiator screws and detach the radiator.
- CPU Socket Access: Turn the small black protection piece on the CPU socket to release the existing CPU.
- CPU Replacement: Carefully remove the Celeron CPU and install the i7 2640m. Apply new thermal paste for optimal heat transfer.
- Reassembly: Reinstall all components in reverse order, ensuring the radiator is securely mounted.
Image: Removing the heatsink to access the CPU.
SSD Upgrade: Incremental Improvement
While the stock SSD is adequate for Xentry software and related programs like Vediamo, WIS/EPC, and DTS Monaco, upgrading to a faster SSD might offer marginal improvements in boot times and application loading. However, the CPU is the primary bottleneck, so the SSD upgrade is secondary.
RAM: 4GB is the Limit (for 32-bit OS)
Due to the 32-bit Windows 7 Embedded OS, the Xentry Connect C5 is limited to a maximum of approximately 3.5GB of usable RAM. Upgrading beyond 4GB is not beneficial unless you undertake the complex task of installing a 64-bit operating system, which is generally not recommended.
WiFi: Consider an Upgrade for Modern Standards
The Intel Centrino Advanced-N 6205 WiFi card is functional but not the latest standard. While upgrading to a newer card like the Intel AC-7260 is possible, it can be complex due to driver compatibility issues. Using driver booster software via remote desktop connection might be necessary to install the correct drivers if you choose to upgrade the WiFi. USB 3.0 and 3.1 are supported if you opt for a USB WiFi adapter.
Image: Internal components showing the WiFi card.
Software Updates and Configuration for Xentry Connect C5
Keeping your Xentry Connect C5 software up-to-date is crucial for compatibility and access to the latest diagnostic features.
Xentry Software Installation
The Xentry Connect C5 software suite comprises two main parts:
- Xentry Tab (Laptop Software): Installed on your diagnostic laptop, this software interfaces with the Xentry Connect C5.
- Xentry Connect (Interface Software): The operating system and diagnostic applications running directly on the Xentry Connect C5 device.
It’s highly recommended to update both components to the latest compatible versions, ideally the 2020.06 release, which is generally considered the final update for this hardware platform.
Updating the Xentry Connect Interface:
- Download Xentry Kit 2 06-2020 Final Edition.
- Extract the downloaded files and copy the folder to a USB drive (minimum 32GB).
- Prepare Xentry Connect for Update: Ensure the Xentry Connect C5 is in standby mode (shutdown via the menu or Xentry Control session). Connect the power supply and insert the USB drive.
- Initiate Update Mode: Simultaneously press and hold the “red cross” and “green tick” buttons until “Start update” appears on the display. Confirm with the “green tick” button.
- Update Process: The update will take approximately 100 minutes. The Xentry Connect C5 display will indicate progress and completion.
- Completion: Once finished, press the “gearwheels” button or wait for automatic shutdown.
Image: Xentry Connect C5 update process displayed on screen.
Xentry Control Configuration
After software updates, configure your Xentry Connect C5 via Xentry Control:
- Start the interface.
- Connect via LAN cable to your laptop.
- Open Xentry Control and navigate to the configuration section.
- Follow the step-by-step guide to configure LAN, WiFi, and other settings.
Xentry License/StartKey
License expiration is common, especially if your Xentry Connect C5 was originally intended for dealership use which typically transitioned to newer Kit 3 systems around 2018. Check license status in StartKey Center or when launching Xentry. License reactivation might be necessary if expired.
Image: Xentry Connect C5 connected to a laptop for diagnostics.
Troubleshooting Common Xentry Connect C5 Issues
Here are solutions to common problems you might encounter with your Xentry Connect C5:
“Device is booting/Update” Error (Prolonged Boot Time):
This often indicates BCD (Boot Configuration Data) corruption.
- Create a Windows 7 32-bit bootable USB drive (non-embedded version).
- Remove the SSD from the Xentry Connect C5 and connect it to a laptop.
- Boot from the USB drive and select “Repair my computer.”
- Run Startup Repair and allow it to complete.
- Reinstall the SSD into the Xentry Connect C5, ensuring it’s securely fastened to prevent movement that could cause BCD corruption again.
Update Errors:
- Open Support Tool on your Xentry Connect C5.
- Navigate to Reset and check “I have spoken to the Diagnosis UHD and would like to reset the Xentry Connect.”
- Create a Reset USB stick using the Support Tool (a small 1.6KB file).
- Insert the USB stick into the Xentry Connect C5 (in sleep mode).
- Press and hold “Tick (Green)” and “X (Red)” simultaneously to initiate the reset process.
- After reset (x/15 stages), perform the software update again using the 2020/06 update files.
Display Lights Up But No Text:
This could indicate hardware defects, missing display files, or BIOS issues, requiring more in-depth technical diagnostics.
Overheating:
Dust accumulation can severely impede cooling. Regularly remove the back cover and clean out any accumulated dust to improve thermal performance, even without a CPU upgrade.
Image: Dust accumulation inside Xentry Connect C5 hindering cooling.
Optional Software: Expanding Functionality
While primarily designed for Xentry, the Xentry Connect C5 can also run other diagnostic software:
- DAS Standalone
- Vediamo (up to version 05.01.01)
- WIS 2020.04 (and EPC) – later versions may not be fully compatible.
- DTS Monaco 8.16
Image: Xentry Connect C5 with diagnostic software interface on a laptop.
Conclusion: Revitalizing Your Xentry Connect C5
Upgrading the CPU of your Xentry Connect C5 is a highly effective way to combat performance bottlenecks and significantly improve diagnostic workflow speed. While other upgrades like SSD and WiFi are possible, the CPU upgrade offers the most substantial return on investment in terms of performance enhancement. By understanding the hardware limitations and implementing these upgrades and software maintenance steps, you can ensure your Xentry Connect C5 remains a powerful and efficient tool for Mercedes-Benz diagnostics for years to come.
Reliable source for SDConnect C5: https://www.obdii365.com/wholesale/mb-sd-connect-compact-5-diagnosis.html