Mercedes-Benz vehicles are renowned for their complex engineering and advanced technology. To properly diagnose and maintain these sophisticated machines, specialized diagnostic software is essential. Xentry Diagnosis software stands out as the premier tool for Mercedes-Benz vehicles, offering in-depth system analysis and repair capabilities. Many users search for terms like “Xentry Diagnosis Free Download” seeking accessible solutions for vehicle maintenance. While the official software requires licensing, understanding its features and proper installation is crucial for anyone working with Mercedes-Benz vehicles. This guide provides a comprehensive overview of Xentry Diagnosis software, its functionalities, installation steps, and key considerations for users in the automotive repair field.
What is Xentry Diagnostic Software?
Mercedes Xentry Diagnostic software is a powerful, dealer-level diagnostic tool designed specifically for Mercedes-Benz vehicles. It provides comprehensive diagnostic coverage for a wide range of models, up to and including many 2024 releases. Xentry goes beyond simple error code reading; it enables users to perform a wide array of functions critical for vehicle maintenance and repair. These functionalities include:
- Reading and Clearing Diagnostic Trouble Codes (DTCs): Identify and resolve issues by accessing detailed error information from all vehicle systems.
- Actuator Tests: Verify the functionality of various components by directly activating and testing them through the software.
- Comprehensive System Diagnostics: Evaluate the health and performance of all electronic control units (ECUs) within the vehicle, from engine and transmission to braking and safety systems.
- Guided Repair Plans: Access step-by-step repair instructions and troubleshooting procedures, streamlining the repair process and improving efficiency.
For automotive professionals and serious DIY enthusiasts working with Mercedes-Benz vehicles, Xentry Diagnostic software is an indispensable tool for accurate and effective diagnostics and repairs.
Key Features of Xentry Diagnostic Software
Xentry Diagnostic software is packed with features designed to enhance diagnostic capabilities and streamline the repair process. Here are some of its standout features:
- Extensive Vehicle Coverage: Supports Mercedes-Benz cars, trucks, buses, vans, and Unimogs, ensuring broad applicability across the Mercedes-Benz range.
- User-Friendly Interface: Designed for efficient navigation and ease of use, allowing technicians to quickly access necessary diagnostic information.
- Regular Updates: Continuously updated to support the latest Mercedes-Benz models and incorporate new diagnostic functionalities, ensuring ongoing relevance and effectiveness.
- Integration with Workshop Information Systems: Seamlessly integrates with WIS (Workshop Information System) and EPC (Electronic Parts Catalog) to provide comprehensive repair information, wiring diagrams, and parts details directly within the diagnostic environment.
- Advanced Programming and Coding Capabilities: Enables ECU programming, SCN coding, and adaptation functionalities for complex repairs and component replacements (certificate may be required for certain functions and newer models).
These features combine to make Xentry Diagnostic software a robust and versatile tool for any workshop or individual specializing in Mercedes-Benz vehicle maintenance.
Xentry Versions and Compatibility
Understanding the different versions of Xentry Diagnostic software and their hardware compatibility is essential for ensuring proper functionality. The latest versions are typically categorized as:
- Xentry Openshell 10/2024: Designed to work with standard diagnostic interfaces and is compatible with a range of hardware connectors.
- Xentry Passthru 10/2024: Compliant with the PassThru standard (SAE J2534), allowing it to function with generic J2534 diagnostic devices.
Hardware Compatibility:
- Xentry Openshell: Optimized for use with professional diagnostic tools like SD Connect C4 DOIP, SD Connect C5, and VCI C6. For optimal performance and access to all functionalities, SD Connect C4 DOIP is often recommended.
- Xentry Passthru: Compatible with J2534 compliant devices. This includes a variety of interfaces such as VAS5054, Autel J2534, and Open Port devices. This version provides flexibility in hardware selection, allowing users to leverage existing J2534 equipment.
Choosing the correct version and ensuring compatibility with your diagnostic hardware is crucial for a successful and effective diagnostic process.
Do You Need a Xentry Certificate?
For diagnosing newer Mercedes-Benz models, particularly those from 2021 onwards, a Xentry certificate may be required. This certificate is an authorization key that unlocks full diagnostic capabilities for recent vehicles and specific advanced functions.
- Certificate Requirement: Primarily for models 2021 and newer, and potentially some late 2020 models, a certificate is necessary to access all diagnostic and programming features.
- Obtaining a Certificate: Xentry certificates are typically obtained through authorized channels, such as Dealers Software or official Mercedes-Benz dealerships.
While some basic diagnostic functions may be accessible without a certificate, for comprehensive diagnostics, programming, and accessing all systems on modern Mercedes-Benz vehicles, a valid Xentry certificate is generally necessary.
Step-by-Step Guide to Installing Xentry Diagnostic Software
Installing Xentry Diagnostic software requires careful attention to system requirements and a systematic approach to prevent errors. Follow these steps for a smoother installation process:
System Requirements
Before beginning the installation, ensure your computer meets these minimum specifications:
- Operating System: Windows 10 64-bit is mandatory for optimal performance and compatibility.
- Storage: Allocate at least 23GB of free space for the software files and an additional 110GB of free space for the installation process itself. Insufficient disk space is a common cause of installation failure.
- Processor: An Intel Core i5 3rd generation processor (or equivalent) with a frequency of 2.3 GHz or higher is recommended for adequate processing power.
- RAM: 8GB of RAM or more is essential for smooth operation, especially during intensive diagnostic procedures.
- .NET Framework: Ensure .NET Framework 4.8 is installed. This is a critical component for the software to function correctly.
Meeting these system requirements is the first step towards a successful Xentry installation.
Installation Steps
-
Disable Antivirus and Firewall:
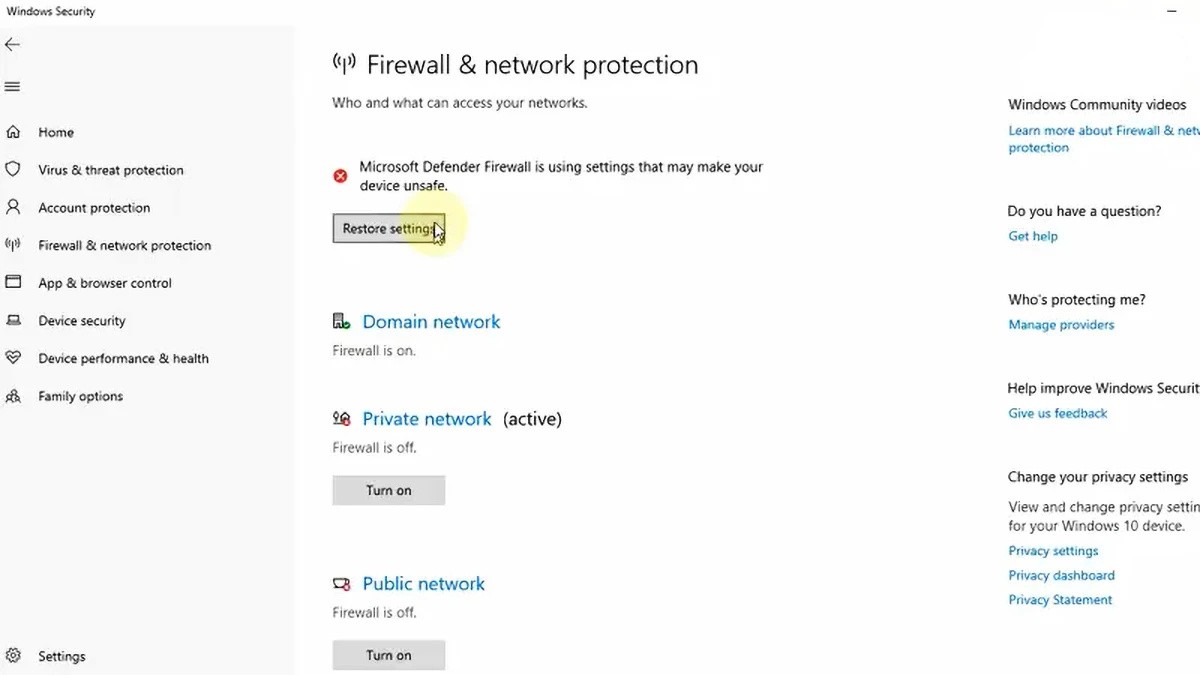
- Temporarily disable your antivirus software and Windows Firewall. These security measures can interfere with the installation process and cause errors.
- In Windows 10, search for “Windows Security,” go to “Virus & threat protection,” then “Manage settings,” and toggle “Real-time protection” off. Similarly, disable the firewall through “Windows Security” > “Firewall & network protection.”
- Remember to re-enable your antivirus and firewall after the installation is complete.
-
Run the Software Installer:
- Locate the folder containing your Xentry Diagnostic software files.
- Before starting the Xentry OpenShell installation, ensure that VCRedist x86 x64 is enabled on your system. This is often a prerequisite for the software to run correctly.
- Navigate to the “XDOS” folder within the software directory.
- Right-click on the installation file and select “Mount” to begin the installation process. Alternatively, you may need to run an executable file depending on the software package.
- Allow the installation to proceed without interruption. Be aware that the full installation process can take several hours to complete, depending on your system speed.
- During the installation, run all applications as administrator to ensure necessary permissions are granted.
- Select your preferred language when prompted.
- Double-check that you have sufficient free disk space as per the system requirements.
- Verify that .NET Framework 4.8 is installed. Consider enabling the Microsoft Message Queuing Server (MSMQ) feature if your Windows version requires it; this can sometimes resolve installation issues.
- Monitor the installation progress closely until it is fully finished.
-
Reboot Your Computer:
- After the XENTRY installation process completes, the system will prompt you to reboot your computer. Restart your system to finalize the installation.
-
Re-disable Antivirus (if needed):
- After restarting, check if your antivirus software has automatically re-enabled itself. If it has, disable it again temporarily as it might still interfere with the software activation or initial run.
-
Disable Xentry PDF Background Processes:
- To optimize system resources, disable Xentry’s PDF reader from running in the background. Open Task Manager by right-clicking on the Windows taskbar. Locate any Xentry-related PDF processes and end them. This step can improve software responsiveness.
-
Crack and File Insertion (Activation):
- Navigate to the CLO drive (or the designated installation drive) to locate the crack folder.
- Follow the instructions provided with your software package to crack the OpenShell software. This often involves copying and pasting specific files into designated directories to activate the software. This step is crucial for bypassing licensing restrictions in non-official versions.
-
Software Activation:
- Launch the Xentry software. You may be prompted for an Activation Key or ID.
- Use the provided ID from your software package to generate an Activation Key using a key generator tool (if provided) or follow the specific activation instructions included with your software.
-
Save Activation Key:
- Securely save the generated Activation Key. You may need it again if you reinstall the software or encounter activation issues.
-
Modify LAN ID (if necessary):
- In some cases, you may need to modify the LAN ID settings within the Xentry configuration to match your hardware or licensing requirements. Refer to your software instructions for details on whether and how to modify the LAN ID.
-
Verify and Utilize the Software:
- Launch Xentry Diagnostic software and perform a test connection to a Mercedes-Benz vehicle to verify that the installation and activation were successful.
- Explore the software interface and familiarize yourself with its features and functionalities.
By following these steps carefully, you should be able to install and activate Xentry Diagnostic software successfully.
Reasons for a Failed Installation:
Despite following the installation steps, you might encounter issues. Common reasons for installation failures include:
- Incorrect Activation Key: Providing an invalid or incorrect activation key is a primary reason for activation failure. Double-check the key and ensure it is entered accurately.
- Antivirus/Firewall Interference: Failing to completely disable antivirus and firewall software during the entire installation and activation process can lead to corrupted files or blocked processes.
- Insufficient Disk Space: Not having enough free disk space, both for the software files and the installation process, will prevent the software from installing correctly.
- Previous Xentry Version Conflict: If a previous version of Xentry was not completely and properly uninstalled, conflicts can arise, hindering the new installation. Ensure a clean uninstall of any old versions before installing a new one.
If you continue to experience difficulties after troubleshooting these common issues, consider seeking professional assistance. Dealers Software or other specialized providers can offer remote installation support and technical assistance to ensure a successful setup.
For further information on Mercedes-Benz diagnostic tools and related equipment, please visit https://www.obd2tool.com.